


So my website hasn’t been updated in awhile. I originally designed it on iWeb on my mac years ago, and it was not very user friendly. Well, I have decided to take some time and move everything over to a wordpress run site. I wanted to be able to easily update what I am doing and what I am working on without the hassle of trying to figure out exactly what I needed to upload. So now with wordpress its much easier. Also I have been trying to integrate Twitter and my YouTube channel right on this site. I really have never used twitter before this, but from what I hear its kind of a “thing” now. haha. So here are links to my Twitter, FaceBook and YouTube Channels. I hope this new design makes it easier for everyone to find what they are looking for!
Archives for :
Before, I hated working with acrylic on my CNC Router, but after acquiring a nice Laser Cutter/Engraver it makes working on acrylic soooo much easier. No machine is a “do everything” machine, but this one does have ALOT of uses around my shop. When you combine this laser with a CNC router, 3D Printer you can create some very awesome projects. Check out this video to see it cutting through .093″ acrylic like a hot knife through butter! I will be posting a better walkthrough of my workshop soon including all of my machines at work!
Here is something I wanted to do for awhile on my Jeep Wrangler. It is FLIR Thermal Night Vision. Check out the video. I explain what I did to create this nifty gadget

I used a old Cadillac “Night Vision” Camera that use to come on some of there models from 01-05. It truly is a Thermal “FLIR” Camera, not so much Night Vision, but has a similar purpose. This is the same technology used on Apache Helicopters and other military vehicles to spot the enemy at night since there heat is what the camera picks up.I mounted this camera to a GoLight Moveable spot light after removing the bulb and lens. I thought the camera would be smaller than it is and I would be able to mount it inside the GoLight, but it had to be mounted to the outside the still be able to get some up and down movement. The camera video feed is wired directly into my Jeeps Stereo head unit and can display the feed whenever it is selected. The joy stick is mounted directly below the head unit and has a great range of motion (would have a lot more if mounted ontop of the jeep). I turn the camera towards the grill when not in use to protect the lens from debris. Overall I accomplished my goal to have a moveable FLIR camera on my Jeep and I am happy with the results. I will be finding a different system to move the camera to replace to GoLight so that it all fits better and looks a little cleaner.
So I went to a river this weekend for a swim and realized that I had no way to lock my jeep up without hiding my key through my back soft window and fetching it after to unlock the Jeep, and if I can do that, so can anyone that was watching me hide my key! Then my friend showed me how his “super cool SUV” had a keypad for keyless entry. I told him that I would add that feature tomorrow, and I did, and here is how it looks!
I had some spare water tight keypads laying around from some old projects I did, So I took one, hooked it up to a microcontroller (called a arduino) along with my spare key I got when I bought the Jeep and began writing some code. Basically what the micro controller does it watch the keypad, and if the right code is typed it will push the unlock button twice on the factory key (so it unlocks all the doors, not just the driver). This will also deactivate the alarm as well. Then when your done, you can push the arrow button to lock the Jeep back up. It works great and I did not ruin my factory key. I can still unsolder the wires and use it just like from factory if I ever needed. The Key is well hidden and locked up so no one can find it and use it to drive my Jeep away. I love this and wanted to share!

Watch this video to see it all. Its just a walkthrough of all the mods I have done to my Jeep. Its a good quick overview and I try to explain as much as I can.
Well a few weeks ago I figured out that the rear stock bumper will hold water very well. At first I thought it would hold 10 gallons, but looks like it is more like 7. Still more than the AEV Bumper! Anyways, i wanted to use that water as running water to hose off my jeep and me after mudding, hose down my scuba gear after diving, washing hands, ext. So Here is how I did it!
First, you need to seal your bumper. On a stock bumper there is 4 drain holes on the bottom to seal. For now, i just plugged them with stainless bolts. 
Then you need to drill a couple holes onto the top, I put one on the drivers side to fill the tank with a cap. The other side I hid between the fender and bumper, this is the pickup line, and is great here since you can not see it at all! I use a pvc pipe since it is rigid and sealed it well.


After this, I designed my outlet for the water to come out. I am going to be putting in a air compressor in the near future, so I went ahead and designed a panel that would handle both. I used a normal hose spickett so you can have multiple hook up uses. I have some cnc equipment, so I designed a nice panel and gasket to keep a good seal. 

Now, came the part that made me a little nervous, I needed to cut into the side of my jeep to hide all of the lines, but yet make it look cool and unique. So Here is where I cut the side of my jeep. Is is nice, because there is a lot of room behind here not being used and allows you to run your hoses outside the jeep and underneith it without drilling any more holes. You can run the hose up and over and it will drop behind your fender under the jeep. see pics.


I know I know, how could I do this! But, its no different then when you need to cut your hood for a PS Hood louver! (which I am getting from UPS today!) After cutting, make sure you paint any exposed metal to reduce rust in the future! I then installed my panel with its gasket, and it came out very nice!
The pump I used is a shurflo pump used on RVs. Mine gets about 3.2 gallons per minute at 55 PSI. What is nifty about these little pumps is that they automatically turn off when the pressure reaches 45 PSI. So what that means is you don’t need an extra on/off switch for your water. Whenever you open the nozzle/spicket, the water comes out, reducing pressure slightly, the pump sees this and turns on. Then when you close it it sees the pressure build up, and turns off! cool trick! It also self primes itself and can run dry without damage (will turn it self off automatically after dry for a few) I mounted the pump underneath the jeep above and to the side of the rear diff. There was a lot of extra space up there and it wont be hit. The lines hooked up to it and ran power straight to the battery.
You will need to get different fittings ext depending on the way you set yours up, but this is a general idea and gives you the idea to go out and do it! Check out both videos, it shows it all installed and working with a hose and the other shows it all setup before it was installed!
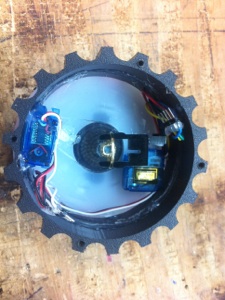
This is by far one of more more fun projects Ive ever done! A little background first, my girlfriend, now fiancé, has always loved projects I’ve made and really enjoys them. She has started calling me Tony Stark (which any guy will gladly accept that comparison) after I created a simple Arc Reactor prop replica to sit on display on my desk. So I had a idea after I decided to pop the question! How great would it be if my “Arc Reactor Heart” could give her the ring? So the idea was created!
So I went off and started redesigning the reactor. I made it smaller, and more detailed. I laser cut and cnc routed all of the parts and slowly starting building the basic shell. My idea was to use two servos controlled by and arduino. At first I was not sure how to light it up, but I had some of AdaFruit’s RGB LED Strip laying around from a pinball project. So I cut off enough to go around the reactor and used the arduino to control that as well! Also added a couple of bright white LEDs to hit the ring once it comes out. So here is the inside of the device.
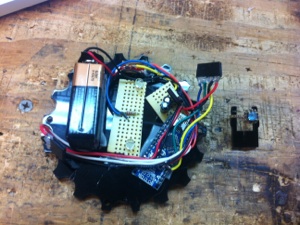
The two halves screw together and hookup easily. I had to keep everything very compact so the servos would not hit each other. Also had to come up with a small bracket to hold the ring, but allowed it to easily be pulled off and put back on as you can see in the second picture. So needless to say, she said yes and loved the ring and the reactor! Hope you all enjoyed and it gave you ideas for your own projects!
The XBOOK ONE – The Xbox One Laptop is HERE!
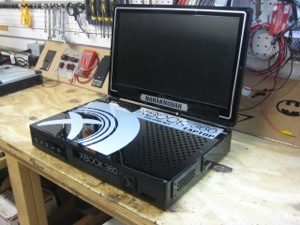
THE NEW AND IMPROVED XBOX LAPTOP! I call it the XBOOK!
![]()
The XBOOK ONE – The Xbox One Laptop is HERE!
The last XBOX Laptop I made was a great little machine. It sold well on here and I brought it to so many LAN parties and got tons of compliments on it. I not only sold them to people that just wanted a xbox laptop to brag about, but also went to soldiers that used them all over the world. But at $1700 it was a bit out of reach for alot of people.
I wasn’t trying to charge alot to make alot. Alot of people would email me and offering me as little as 200.00 for one! I had to turn down alot of people because of how long it took me to build. Took me about 3 weeks of time from the CNC Machining to all of the soldering I would do. So I set out to make a new Xbox laptop that was not only better quality, thinner and better screen… but one that I could sell for much cheaper and could build quicker. So the idea of the XBOOK was born!
Since my last xbox, I have acquired more machines to help me build this XBOOK. I got a bigger CNC Router as seen on my blog. This allowed me to make more parts at once and make it faster. I also purchased a Laser engraver/cutter. This has been extraordinary to use to cut acrylics. I also picked up a vinyl plotter that has been a life saver when it comes to the detail work and graphics on the XBOOK.
I took alot of time designing this xbox in cad drawings. It is made up of a total of 4 layers of black starboard plastic. Starboard is a marine grade polymer that hold up real well! Its VERY strong and comes in black so no paint that can chip off! Saves time and materials! Its of the same type of material that cutting boards are made out of. This stuff holds up WAY better than the older PVC material I used on the previous laptop. I then used Black acrylic for all of the outside covers and also the inside of the laptop. This allows for a nice glossy shine, but also gives something for the vinyl to stick too as its hard to apply anything to starboard with adhesive.
All of the silver detail work on this is vinyl. This is all cut on my plotter and fits PERFECTLY on this XBOOK. It gives it a real professional look that is superior to the older laptop. All of this is customizable. You can pick pretty much any color for the graphics and also on the screen in between the speakers I can put your gamer tag in! (Or any other word you’d like). I can not change the color of the black starboard. That is the only color it comes in (other than white) and you really cant paint it. But, that being said, all of the acrylic you can change the color of. That would be the Button panel, CD Tray, Ring of Light, side covers and the LCD bezel and inside of the XBOOK. I would have to special order the colors if you wanted something other than black for the acrylic, and would take a little longer to make and cost just a little more for materials. But I do have in stock like 30-40 colors of vinyl and will do any color you’d like! Just email me if you have any questions about that.
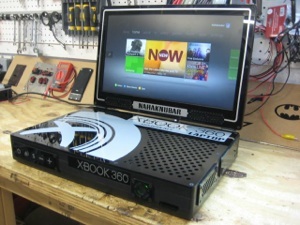
Now onto the screen! The old xbox laptop I made had a very nice 17” 720p HD monitor. This looked real good and made for a great display. But.. I wanted something better for this new one. I have upgraded this laptop to a 19” 720p HD LED Screen. This is very crisp and VERY bright. The LED Backlight is current technology and has a very even glow to it! It also makes the screen much thinner as well! The old 17” screen was nice but still felt a bit small. This 19” is perfect! You dont feel like you gotta sit real close to play!
Right below the screen is a pair of high powered speakers. It gets much louder than the previous version and also is positioned better. On the last one the speakers were on the bottom portion of the laptop and pointed up. On this, I placed them inside the screen bezel. This positions the speakers to point towards you. Gives a great stereo sound to them and even has good low end as well. This comes stock with a headphone jack as well so you can play in privacy if you’d like!
As you can see there are PLENTY of vent holes. I used the stock cooling of the XBOX 360 Slim, so its quite and cools just perfectly. I have no had one overheating issue yet with this one or any previous model. Just dont leave it on if you close the lid! On the side you still have access to the slims internal hard drive. Just unscrew a couple screws and slide it into place and your good to go! (Also if you want, I left enough room inside the laptop to plug in a portable HDD into one of the stock USB ports… this can open up alot of possibilities for more HDD space!) The ring of light along with the CD Tray and Buttons are located on the front along with 2 USD ports. These buttons are the best I’ve ever made. They are extremely professional and look good! Starting left to right, you have Power, CD Open, Sync, and Volume up and down. (If you’d like to access the configuration menu of the LCD, there are more buttons inside the unit to change any settings you’d like of the LCD itself)
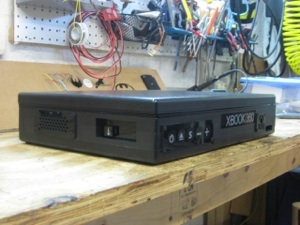
Onto the other side you have another vent and your ethernet port. This XBOOK comes with built in Wi-Fi so you can play xbox live without the worry of a cable. But hey, its there if you need it! If you’d like component video out, the second vent here is modular so I can add video out no problem. Currently the screen uses HDMI as the internal connection, but if you’d like video out, id have to switch the internal video to component. You will still get 720p High Def, but the internal screen wont be as great as HDMI. Thats all your choice!
On the back of the unit is a simple universal power supply cable. The XBOX’s main power brick is located inside of the XBOOK. So no longer do you need to carry around a power brick either! And the LCDs power is pulled off that same cable on the inside. So it only takes a single cable to get this thing running! Please note that this does NOT have a internal battery. xboxs are not made to run off batteries. They are very power hungry and would eat through batteries extremely quickly, plus is weigh alot more!
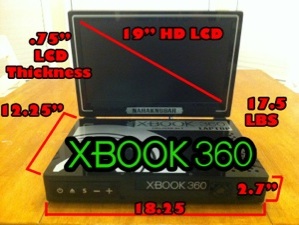
Total weight of this unit is 17.5 Lbs. Thats not really heavy considering what your carrying! A xbox, Power supply, LCD screen, cables and a case all in one! The dimensions closed are 18.25”x12.25”x 3.5”. This is bigger, but much thinner than the last one. Only reason its bigger is because of the the 19” LCD screen. But because of this same screen I was able to make it a 1” thinner! This really is a great machine that will be the envy of all your friends!
Now down to the real question… price…. Like I said, I wanted to make the most affordable XBOX laptop on the internet with my previous model, and I did. But with this one, I wanted it even cheaper! And I accomplished this goal as well! This XBOOK laptop starts at $995.00 USD. Thats right, UNDER $1,000.00!!! Thats for a brand spanking new XBOOK laptop with customizable options for you! You pick the vinyl color and free gamer tag personalization! If youd like it even cheaper, send me your XBOX 360 (must be the new style XBOX Slim) and ill knock off $200.00 dollars off the price!
So here is the Price info……..
4GB XBOOK 360 Laptop $995.00
250GB XBOOK 360 Laptop $1,095.00 (extra cost of the xbox slim)
Gamertag Personalization FREE
Customized Vinyl Color FREE
Customized Acrylic Color $50.00
Optional Component Out $50.00
Supply your own XBOX -$200.00
Shipping is $50.00 in the continental US. Contact me if your outside of the US.
Heres how the ordering will work. Click the Paypal button on the bottom of this site and you will pay $500.00 upfront nonrefundable deposit. This gets your name put on the list (trust me, its gets full quick) and gets me working on your XBOOK. After its completed, you will pay the remainder and shipping and your XBOOK will be shipped out! Once I start on your unit, it will take 2-3 weeks to complete. There may be people in front of you, so be aware of that. If you have any questions at all, please go to my contact page HERE and send me a message! I will be in contact with you through the building process and will make it personalized for you!
Inside this unit is a Microsoft XBOX 360 Slim. The xbox has not been altered in any way that would be illegal on xbox live. It has no performance modification or enhancements. The XBOOK is simply just a plastic case that holds a XBOX inside with a LCD Screen. I am in no way affiliated with Microsoft or Xbox. It does not have a xbox warranty as you loose the warranty as soon as you take a xbox apart. I will guarantee it will not be DOA and will give you a 30 day warrantee on the XBOOK to fix any problems it may have that is not from user abuse. It is non returnable as these are custom made for each individual buyer.
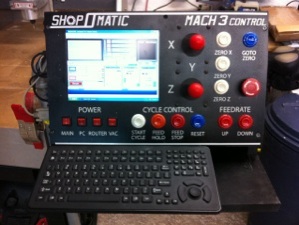
Yet again, its been awhile since I’ve posted anything on here! A lot has happened since! First off, I got a couple new toys, I picked up a vinyl plotter. This has been great for labeling things and just having fun. My other toy was upgrading my CNC Router to a bigger and faster machine. I picked up a 2×4 Warthog router, it took some work to get it running on Mach3, but has been worth it. I always liked how the industrial units had dedicated systems that used there own software. Made them cooler and so much more convenient IMO. But Mach3 is such a great easy to use piece of software that I wanted that as well. So here is what my ingenuity came up with!
Its a pretty simple device really. All of the parts, except the “E-Stop” Button I had laying around. The Screen is just a 10” LCD I took out of kiosk system. All of the buttons and joysticks came from a box of old MAME parts I had laying around. I had a extra I-pac ( http://www.ultimarc.com/ipac1.html ) laying around, which basically makes all the buttons keyboard commands which Mach3 can see as a “hotkey”. More details later.

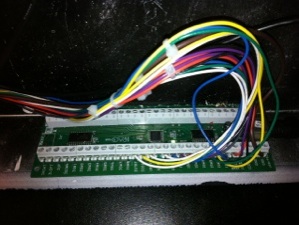
This definitely not the cleanest device I’ve come up with, but it will be cleaned up soon. The screen in the panel simply hooks up to the VGA output of the PC (the first one in the pic), Then I have a powered USB Hub in the panel that breaksout many USBs, this is for the Keyboard, Mouse, I-Pac and whatever else I may need like a USB stick. All of the buttons you can find on ebay if you search for “MAME Buttons” along with joysticks. They all hook into this I-Pac (this one is a bit big, but its what I had around).
This nifty little device has screw terminals for all of your buttons. It even comes with a piece of software that allows you to program each button to each keyboard command if you’d like to be technical. This is a great way to add inputs to Mach3 without the need of a second parallel port. You simply need to download Mach3Screen ( LINK HERE ) and tell each onscreen button what “hotkey” (from the ipac) you want. Now you can add as many buttons as you can imagine for any function you want! The only hotkeys your going to want to actually program in the Mach3 app is your movement commands. Thats easy as going to System Hotkeys in Mach3. Mach3 will see all the inputs from the Ipac as keyboard commands, so it works FLAWLESSLY! You could even do limit and home switches if you’d want, but i wouldn’t recommend it.
I went ahead and used my vinyl plotter to make all of the labeling for the machine to give it that professional look. I think it came out pretty darn good!
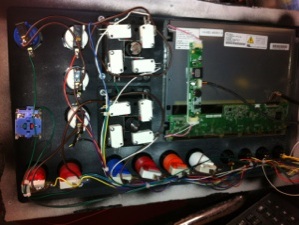
Now, the actual electronics for running a CNC (like my warthog) is a whole other project and is not going to be explained right now in detail, but i want to show you the inside of my motor control box just so you can see the relays and power outlets.
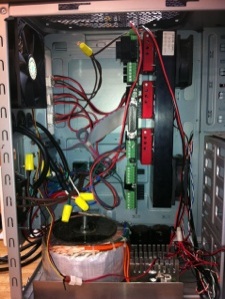
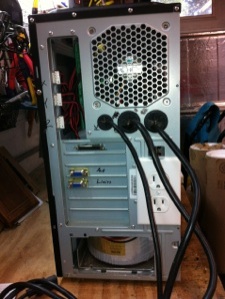
There are a few relays in the back which control the main power, the spindle and vacuum. These get there commands directly from the switches on the panel threw a normal 9 pin serial cable. I do this for a personal preference as I dont really want the computer controlling the spindle just yet. I was a bit worried about noise at first, but I haven’t had any problems.
The panel also got the keyboard added to it, which is a very nice keyboard, its all dust and water sealed and has the mouse built in. Also includes another 12 F keys which is excellent for giving commands in Mach3. Soon I will add a MPG Pendant to go next to the keyboard and make complete. Its all mounted to a steel bar that can easily swivel around.
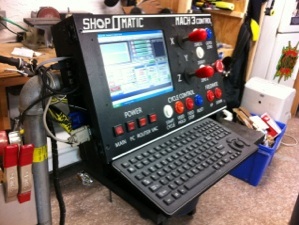
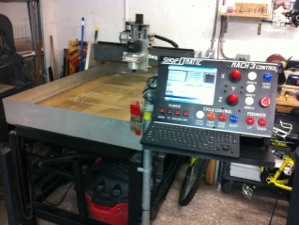
This really is perfect for anyone with a CNC Machine that wants to have it controlled very conveniently and not have to worry about dust and such getting into your keyboard and mouse
Many of these have been floating around the Internet the last couple of years, and usually they seem to have an astronomical price tag attached. It never looked that difficult to make, and I have always wanted to give it a go. So after I finally got around to obtaining a CNC Router (small one, but great for learning!) I came up with this!
I have never done ANY cad design/drafting or any CNCing at all in my life. But have always been interested, so what better way to start then buying your own and start cutting stuff! I started with some small logos on particleboard, then thought I should have a good project that has a good goal at the end, and this is where the XBOX laptop was born, at least for me.
I started originally looking after other peoples design features and the way they organized the inside of the laptop. I spent about an hour arranging the boards on a make shift case trying to find the best way I thought to have them laid out. I ended on the XBOX pretty much being in its stock layout, along with the LCD being in its stock layout.
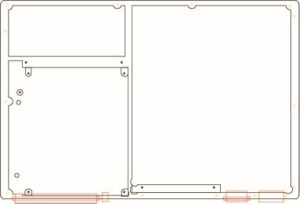
After getting a feel for where things were going to sit, I measured everything and went on to try to conquer the design. The only piece of software I had that could produce dxf was adobe illustrator, so I gave it a shot. Here is the top of the inside of the laptop.
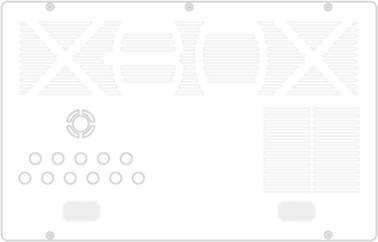
I knew I needed excessive vent holes, but I wanted them to look sharp and classy. So that is what I came up with. I liked the look! (and If you want one, we can work something out to put any word in there!).
So off to the world of routing all of this! I can’t say how many plastic particles ended up in my garage, but it was crazy, took a whole day vacuuming after I was done! I learned a lot from doing this first laptop, from what not to do, to some tricks to make it better. I was proud of the first one, yet it showed me areas of improvement for my future one (as this one is already sold to a friend, I miss it already). 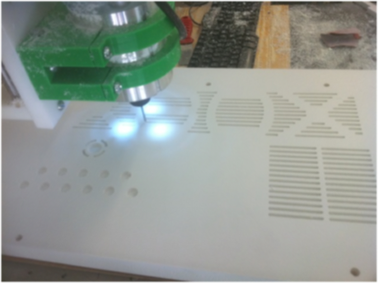
The router worked great, and I am sure I will post something later about my new CNC, but I do want to talk about it a bit here. It was interesting learning the different bits, and how much manual work is still involved, like sanding and positioning the materials, and a lot of trial and error! The machine worked rather well, although I did run into some problems. All is good now, and I feel very confident in my CNCing abilities! Great first project! Check out the video here of the router in action.
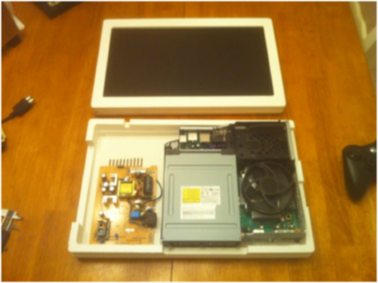
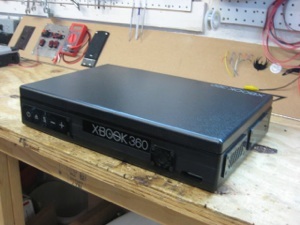
(yes, the DVD opening is not correct here, I fixed that after I took the pic)
Now I went onto placing the parts inside of the case. Still, even with the DVD drive here, the FAN on the CPU is the highest point. I left the metal casing, only because it helps with heat problems, and keeps everything aligned quite well. Plus a big positive with this way is you don’t need to extend near as many cables, most stock lengths work (except for obvious things, like ring of light and USB ports).
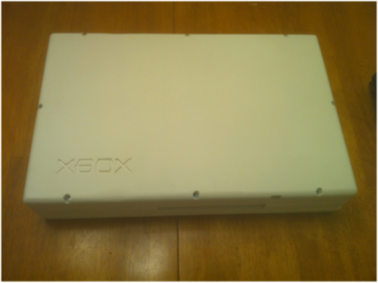
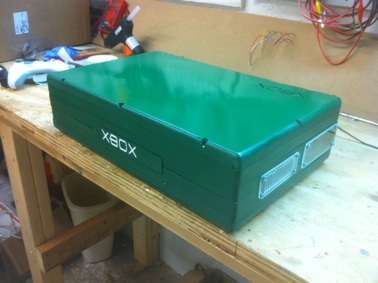
After getting all of the pieces together, soldering all my connections on the board, and hooking it all up…. Of course it didn’t work! What would a project be without trial and error….. and more trial and error.. and more…. But after many days of playing with things, discovering what works and what doesn’t, I took it all apart and painted it.
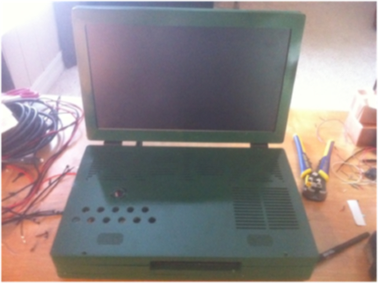
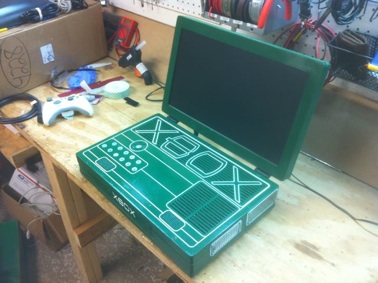
I went with a dark green on this one, which I think is pretty sharp, I then went and etched it again with my router, which gave me nice white pinstripes. And then I also added some LEDs to the inside the give it a nice glow and backlit the buttons (not perfectly backlit buttons, but I like it)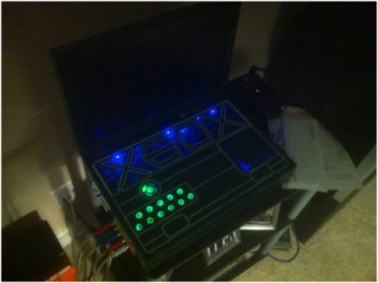
The ring of light is extended nicely, and all of the XBOX functions, audio controls and the LCD controls are all on the bottom portion of the laptop, and in the picture above, are all backlit. The speakers sound great, and as an added bonus there is a headphone jack that mutes the speakers automatically whenever a pair of headphones is plugged in. There is also the component on the side with a switch that chooses either the built in LCD or external component (sorry, impossible to display both at the same time). There is stereo audio out that is always enabled and is not amplified (so your stereo can amplify without any damage!). There are 4 USB ports on the side also that extend from the board along with the Ethernet port. Sorry, no kinect port is extended. The Hard Drive is accessible by only removing the cover with 4 screws. You can pull it in and out like stock. Also, the “power brick” is internal. So the only cable you need is the black “universal power cable”. Makes hauling this around a breeze! There are no batteries in this unit, although I have not tried to put any in, but both of these devices (LCD and XBOX) are not made with any power saving features, so the batteries would not last long and would only make it heavier.
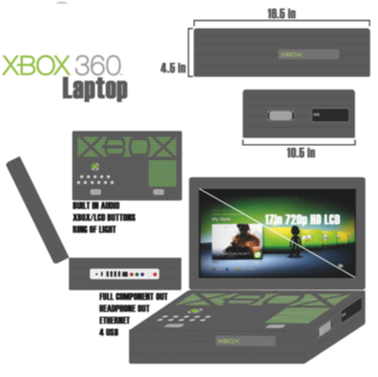
The screen is a 17” LCD that is very bright and very crisp. It has a native 720p Resolution and is a perfect size for this laptop.

I’m sure I could have made it thinner, but the work involved to save maybe a total of an inch was not worth it in my opinion, It would have made the price jump up a lot higher as well to you! So this is better for both parties involved! It’s approx 16.5×10.5×4.5. It has a 17” LCD HD 720p Internal display along with Internal Amplified Speakers, Component out, 4 USB, Ethernet, and a headphone jack. And since this is the XBOX 360 Slim, it has built in Wi-Fi as well. Which is great! No external antennas! I can promise it’s not a pain to carry around; it feels sturdy and makes for quite the bragging conversation and LAN parties!
Now for the fun part, how much it will cost!
I purposely built this unit to be easier to put together than other ones I have seen to keep cost low for both of us. A lot of time is involved still and especially in all of my initial startup times. I am not looking to take advantage of people and charge too much. But I cant give it away either. I can promise it is a fraction of the cost of others I have seen for sale. I can also do discounts if you can provide an XBOX (must be a 360 slim) and/or if you don’t want some of the features, like LED and Component/Audio out ext.
So for the whole setup you see (4gb)
$1600.00
If you provide your own XBOX (360 Slim)
-$200.00
No LEDs (Vent lights and Backlit Buttons)
-$50.00
No Component Out
-$50.00
No Paint
-$100.00
Extras
250 GB HDD XBOX Slim (Extra Cost of unit)
+$100.00
Custom Logo engraving (see below)
FREE
1 Wireless Controller (if I provide XBOX)
FREE
Shipping
In the United States (exc. Hawaii and Alaska)
$50.00
Outside of the United States (inc. Hawaii and Alaska)
Email for quote
If you decide to purchase one, I can guarantee the process to be personal and will try to custom engrave any logos you would like (NO COPYWRITED LOGOS). If you have a clan tag, or your name ext, As long as you can provide a detailed picture or vector, I can etch it into the laptop (like the XBOX logo) If you would like other words on the air vents, talk to me, we can see what we can come up with. You can choose the paint color, button colors, vent colors and LED Colors (to an extent) as well. Ill admit the paint is not perfect, it is honestly spray paint with high gloss. It is not horrible, but I am not a professional painter. It does not look bad white at all! But please note, if you don’t paint it, the logos that are etched white, with be “white on white” Still looks cool, but not as noticeable.
I will work closely with you and do my best to make sure you get exactly what you would like. But please email me with ANY questions you may have and then you can decide if you’d like one!
Depending on how many orders I have lined up and supplies available will depend on how fast you can receive yours. To just be safe, count on two weeks after I start yours (could be sooner, but like to estimate longer). But if you want to be put on the list, you must send me half of the cost, which is non refundable, to pay for supplies and time, after it is finished, the other half will be expected along with shipping. Once all is received, it will be shipped out UPS and should get to you within 3-5 days.
I DO NOT HAVE ANY PS3 LAPTOP PLANS RIGHT NOW. Maybe in the future, or if you want to pay more (significantly more) to have one made specifically email me.