*PLEASE NOTE* I am in no way affiliated with Microsoft or Xbox. The XBOOK is simply a console modification for a Microsoft XBOX One. This is not a licensed Microsoft Product and should not be confused as such. It is a custom made item by EdsJunk.
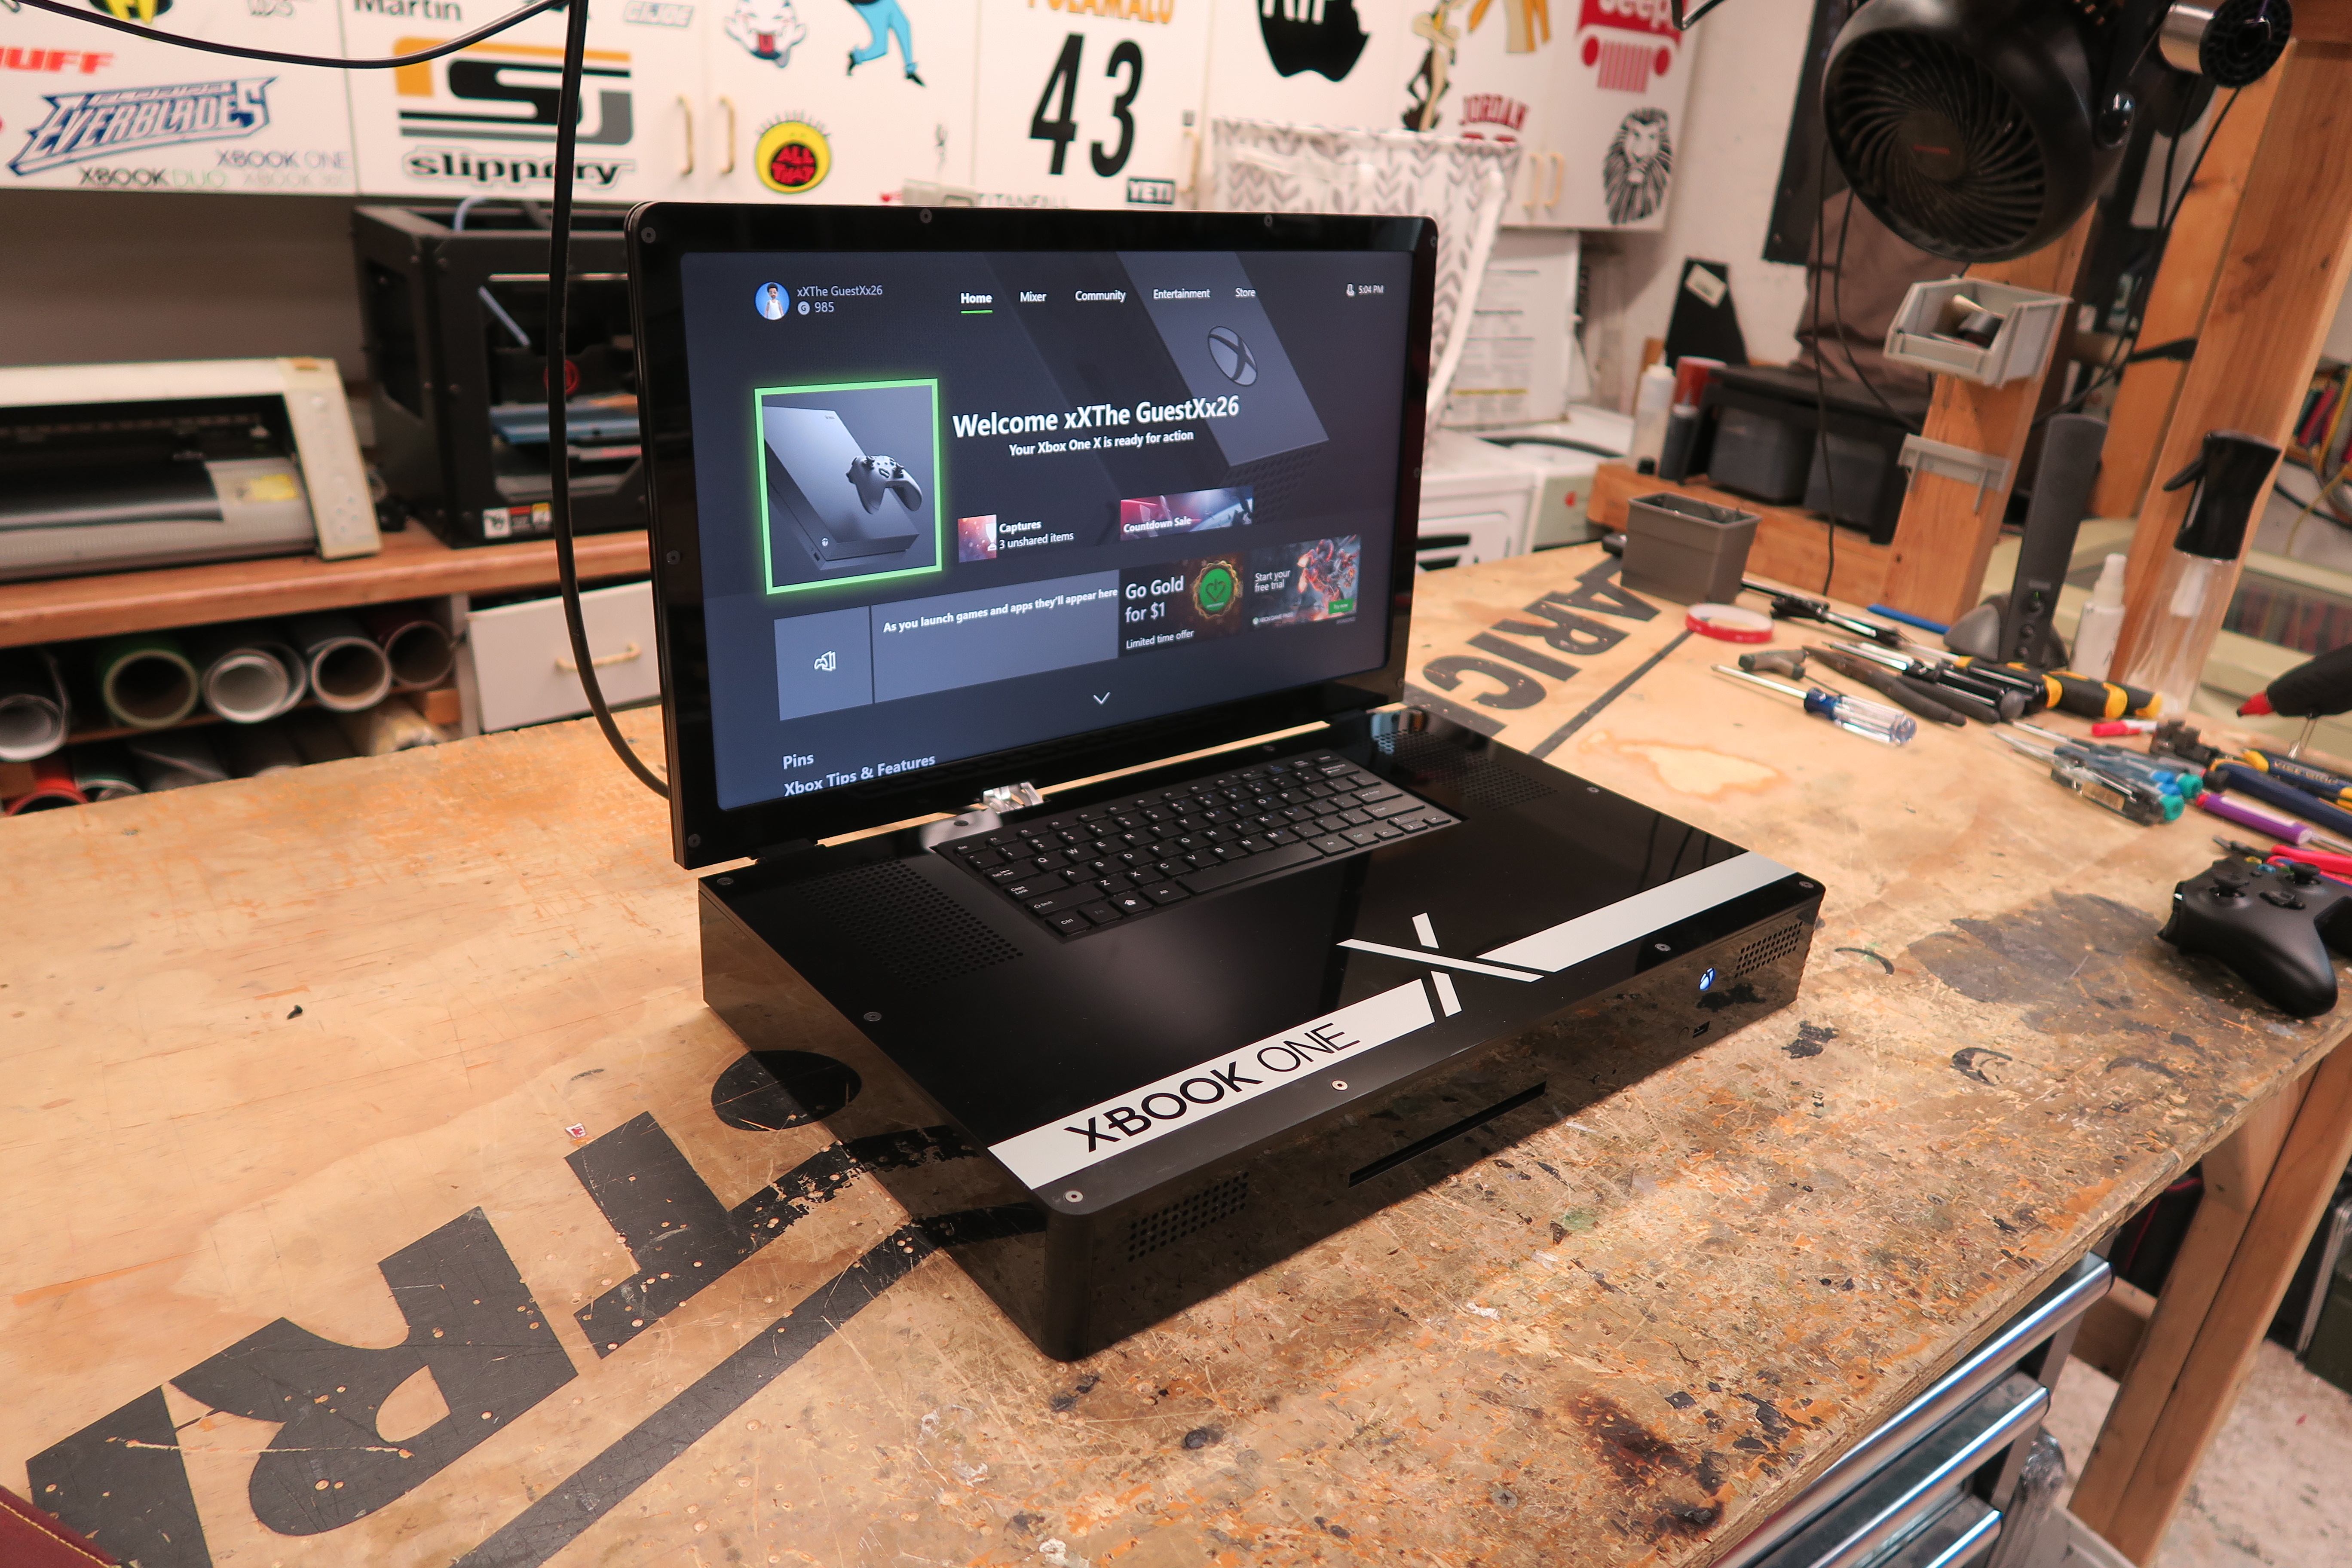
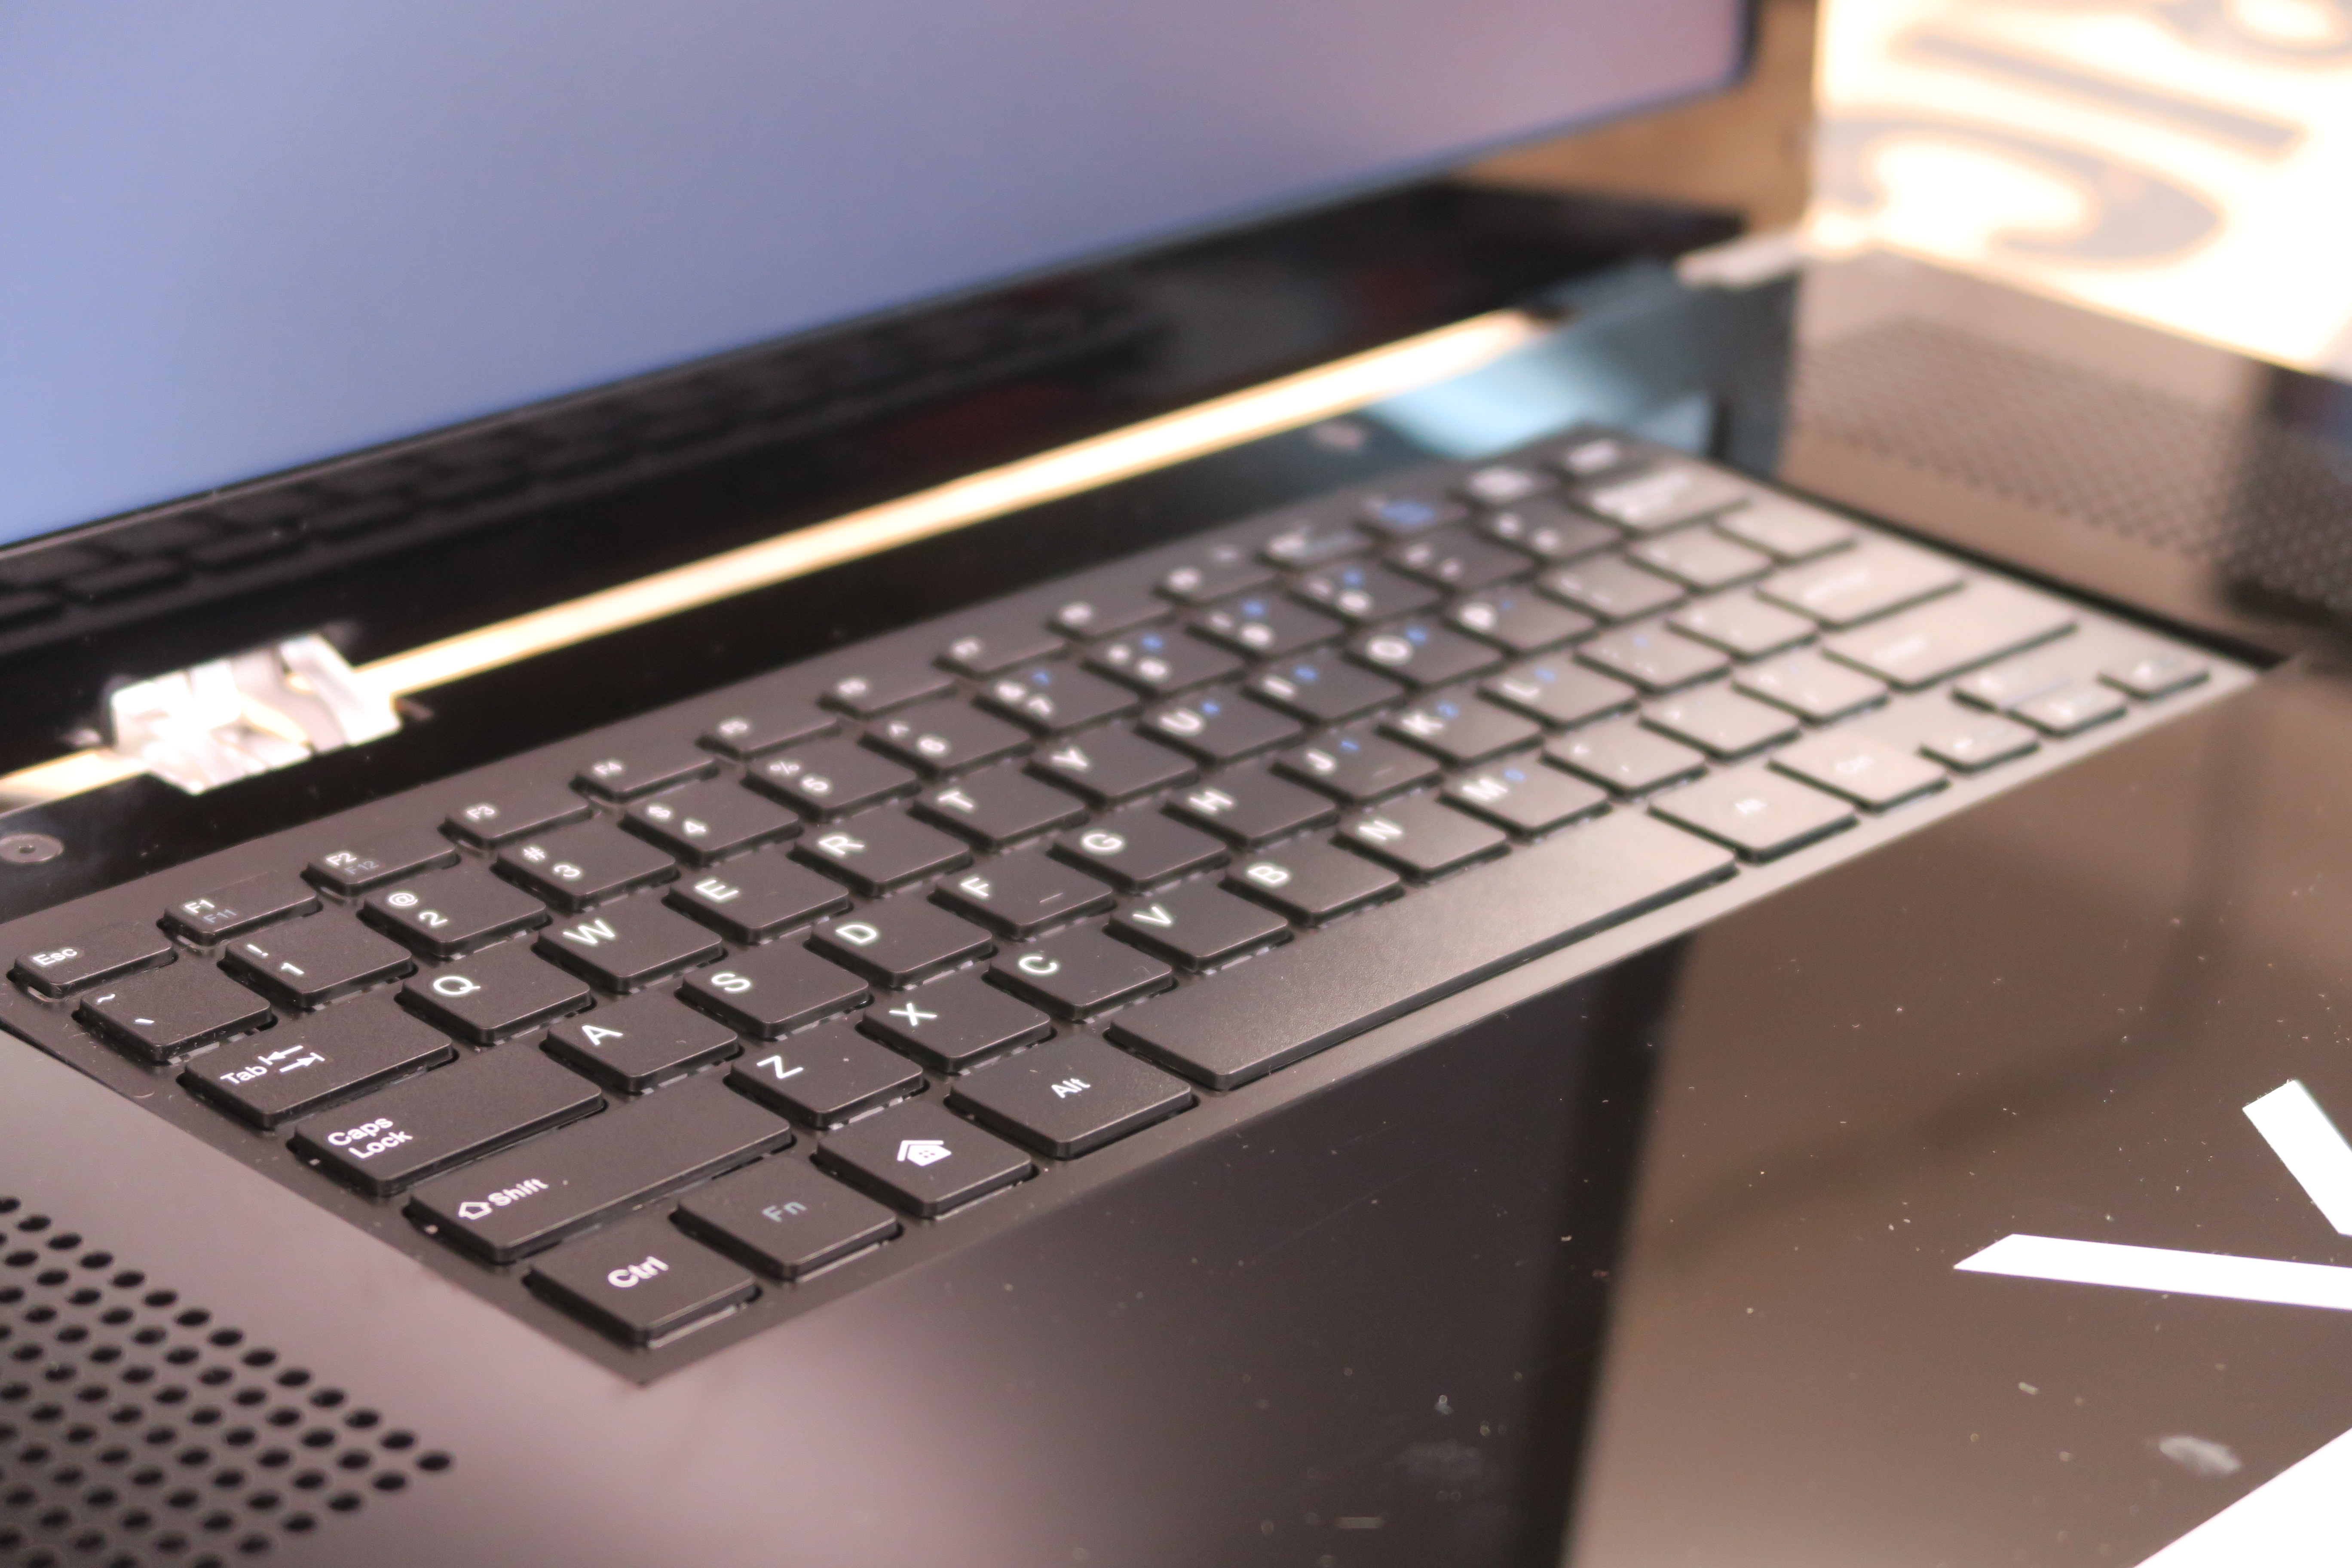
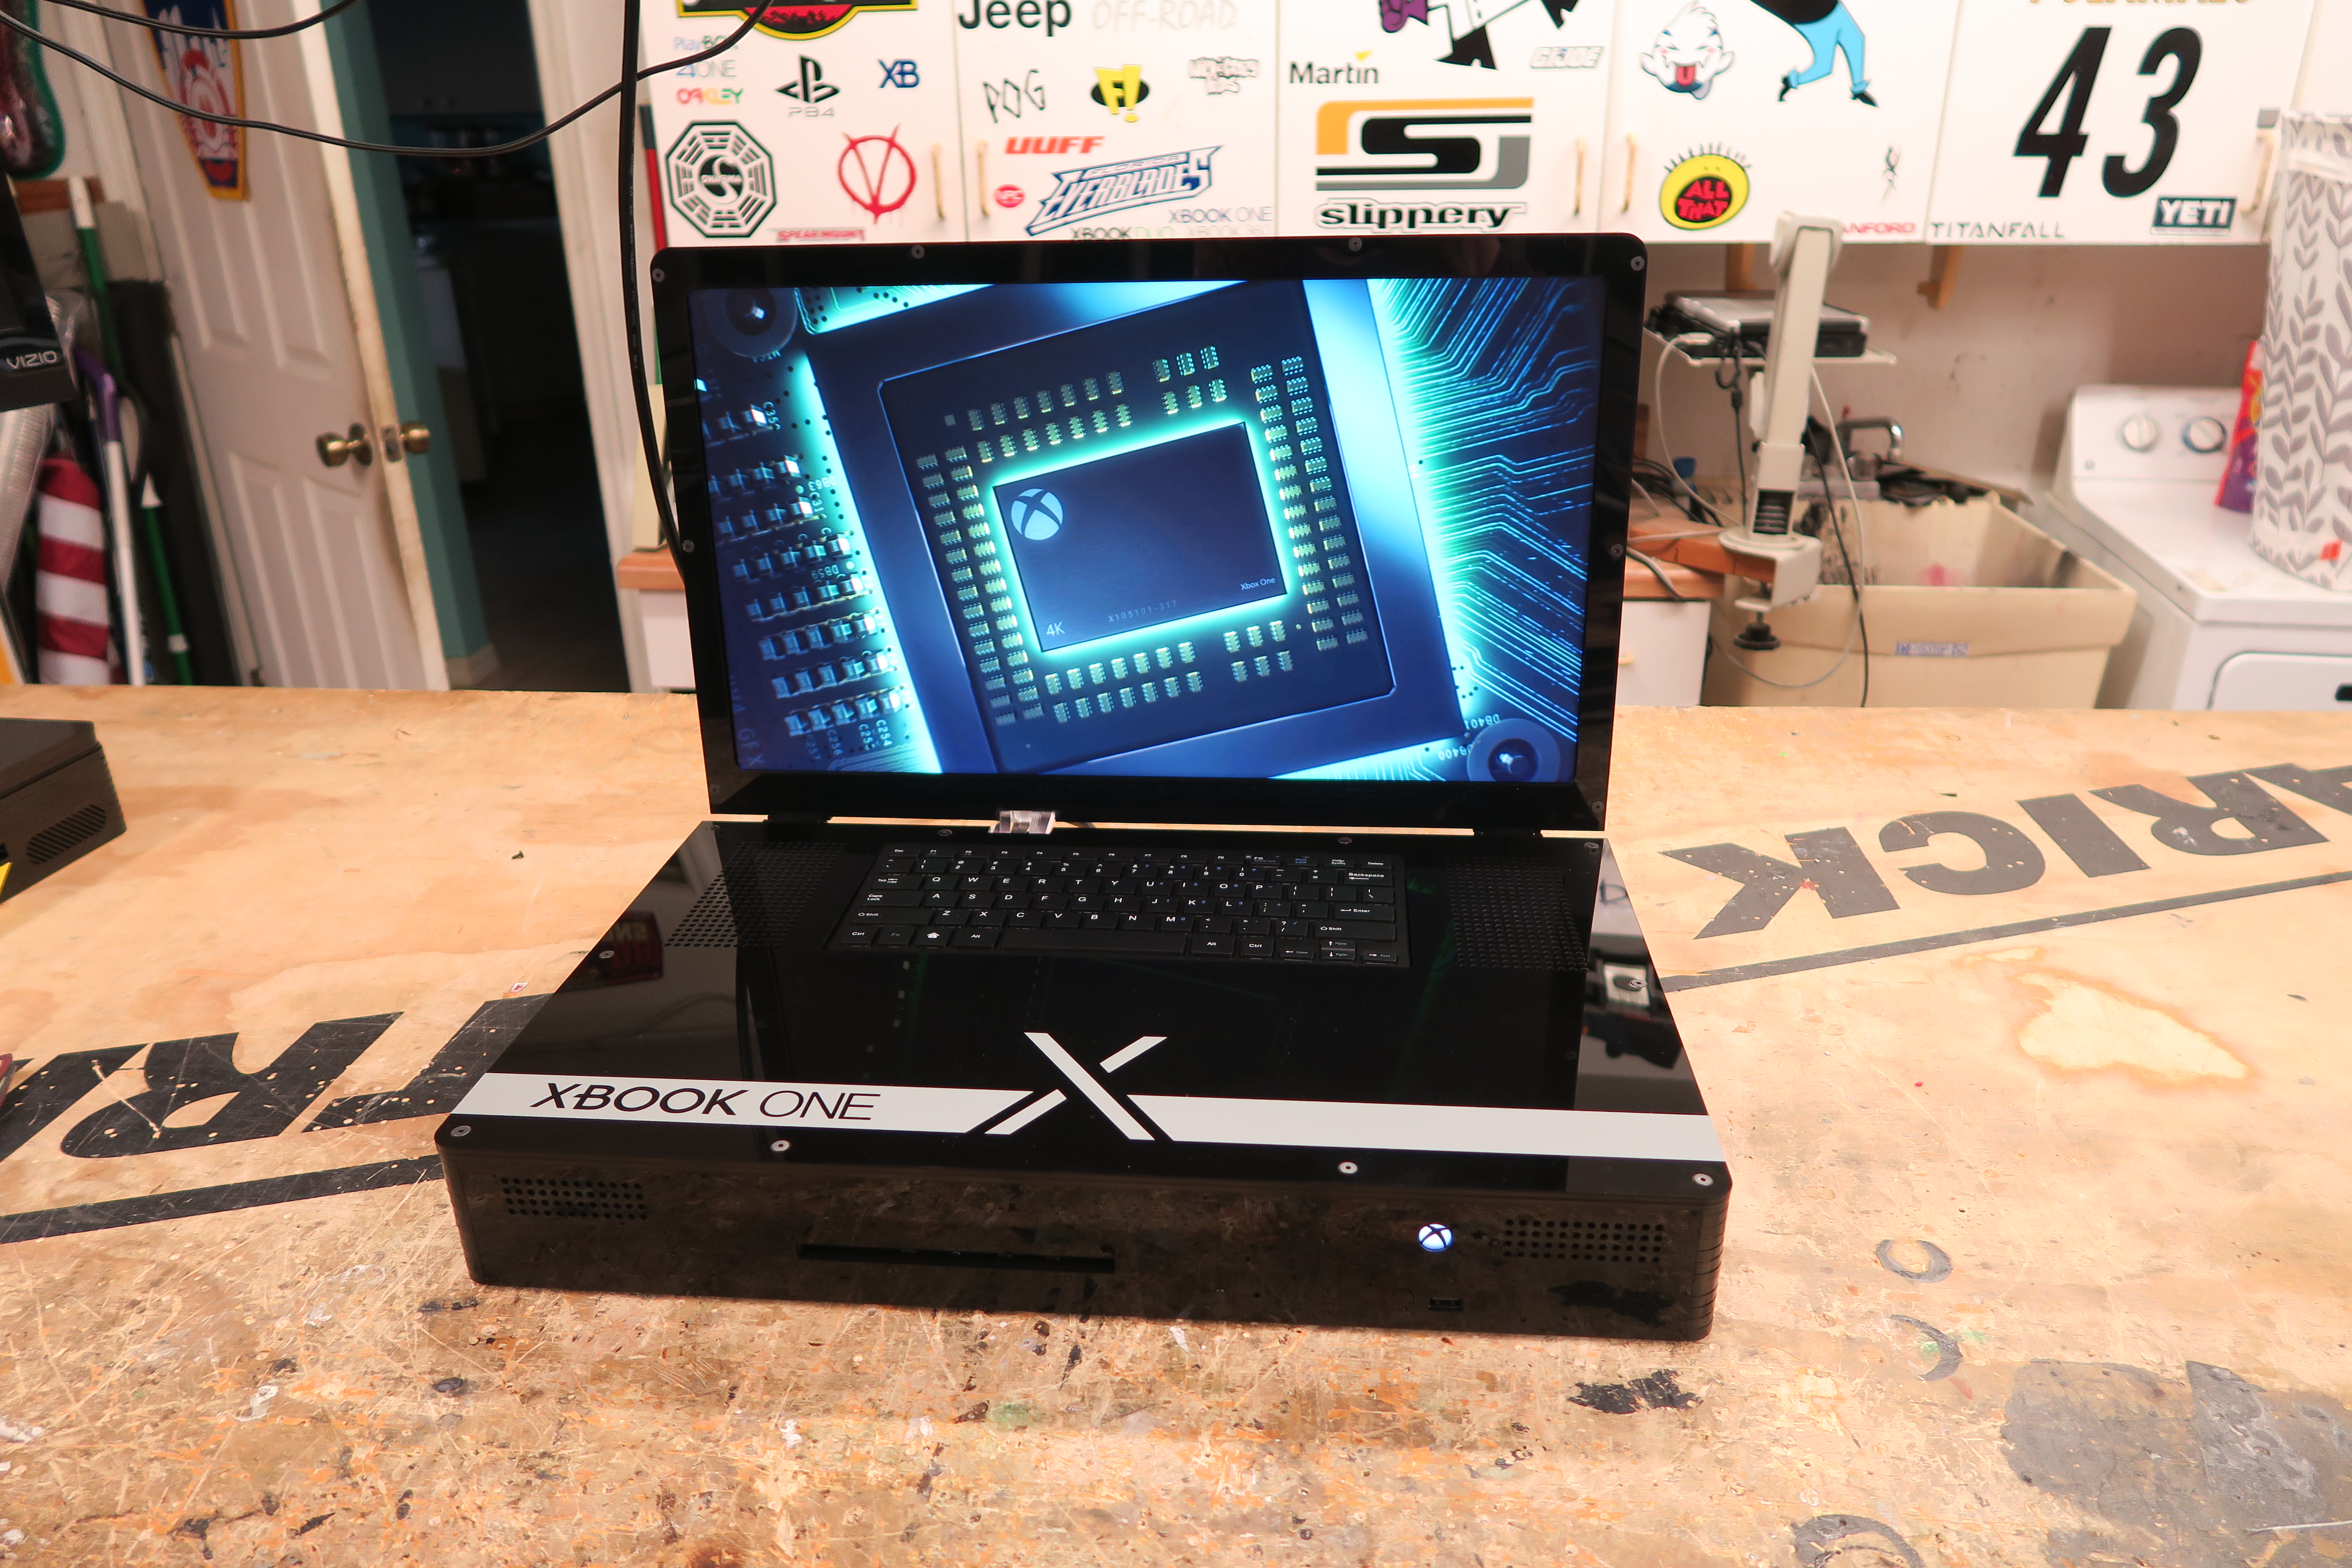
Today I am posting up my version of the XBOX ONE X… The XBOOK One X! Yes, thats right, another gaming laptop! (Cant get enough of these I guess) This is an actual XBOX ONE X that has been modified and put into a custom housing that gives it much more portability than a standard Xbox. This system houses an XBOX One X, a View Sonic 21.5″ 1080p Full HD Screen, Built in Audio and a keyboard. The keyboard is something new I have added that gives you the ability to navigate through the system settings and type out messages much easier than an on screen keyboard (please note, if you ordered a system with a keyboard, you will loose one of the back USB ports)
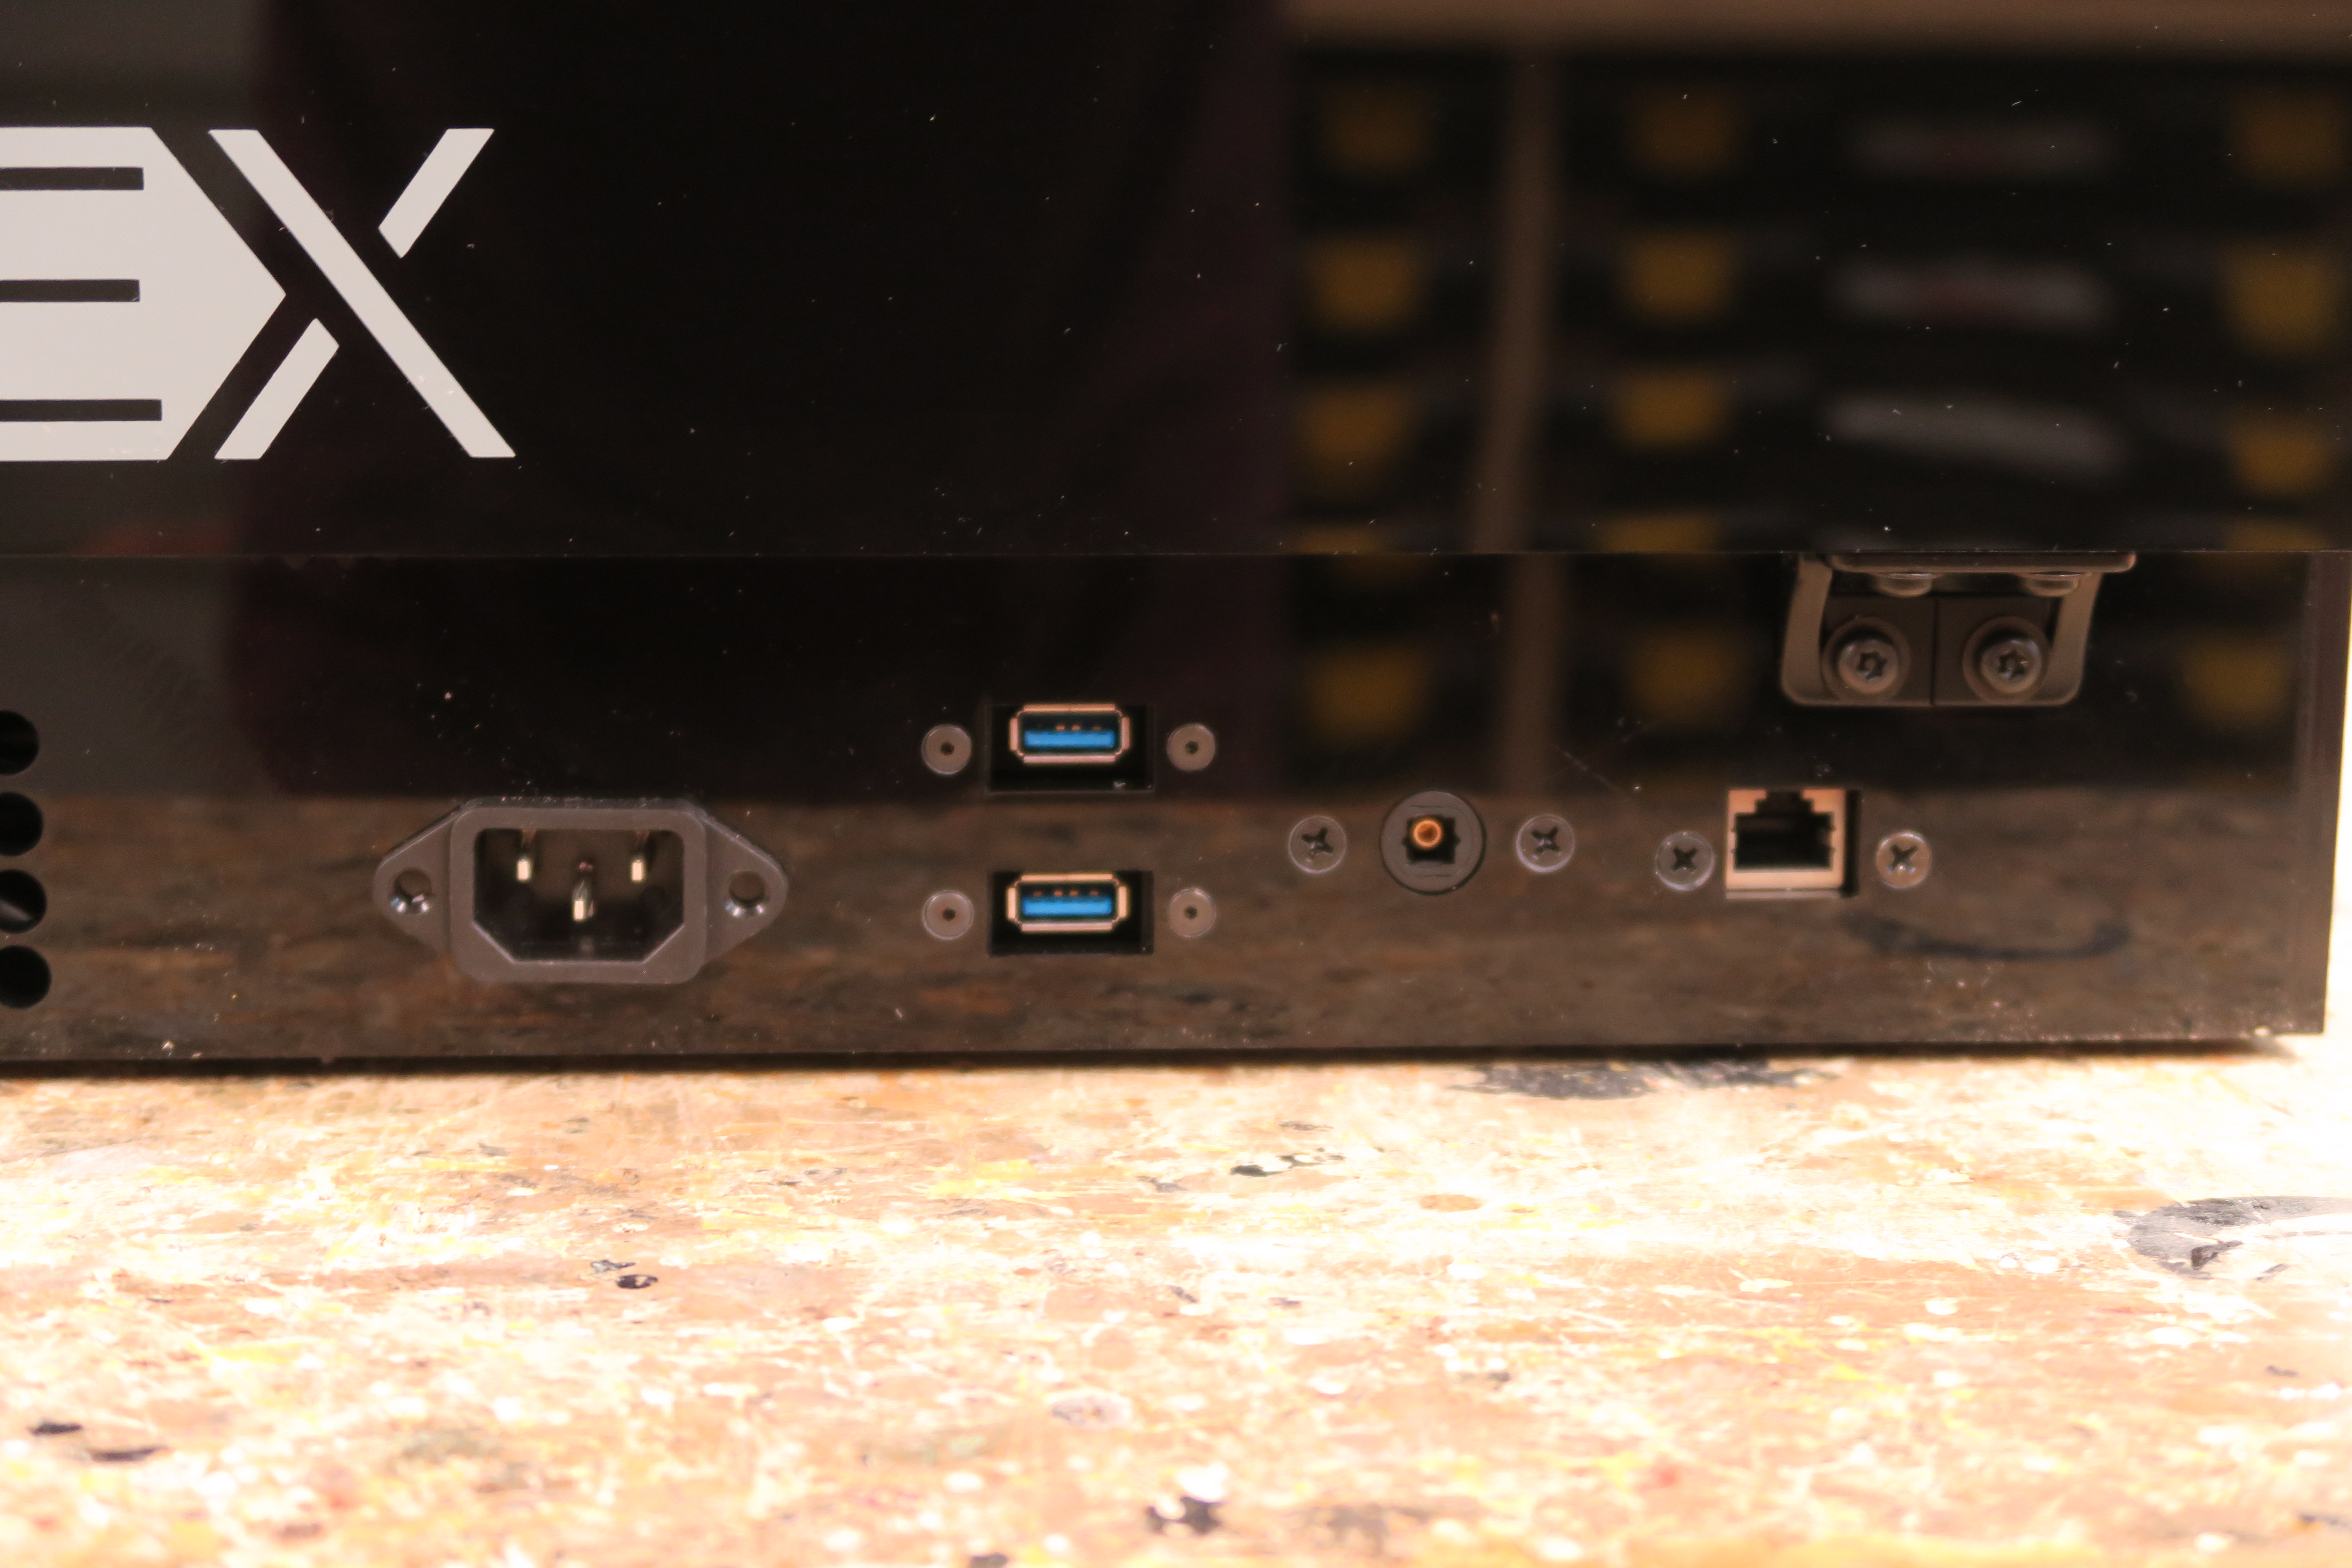
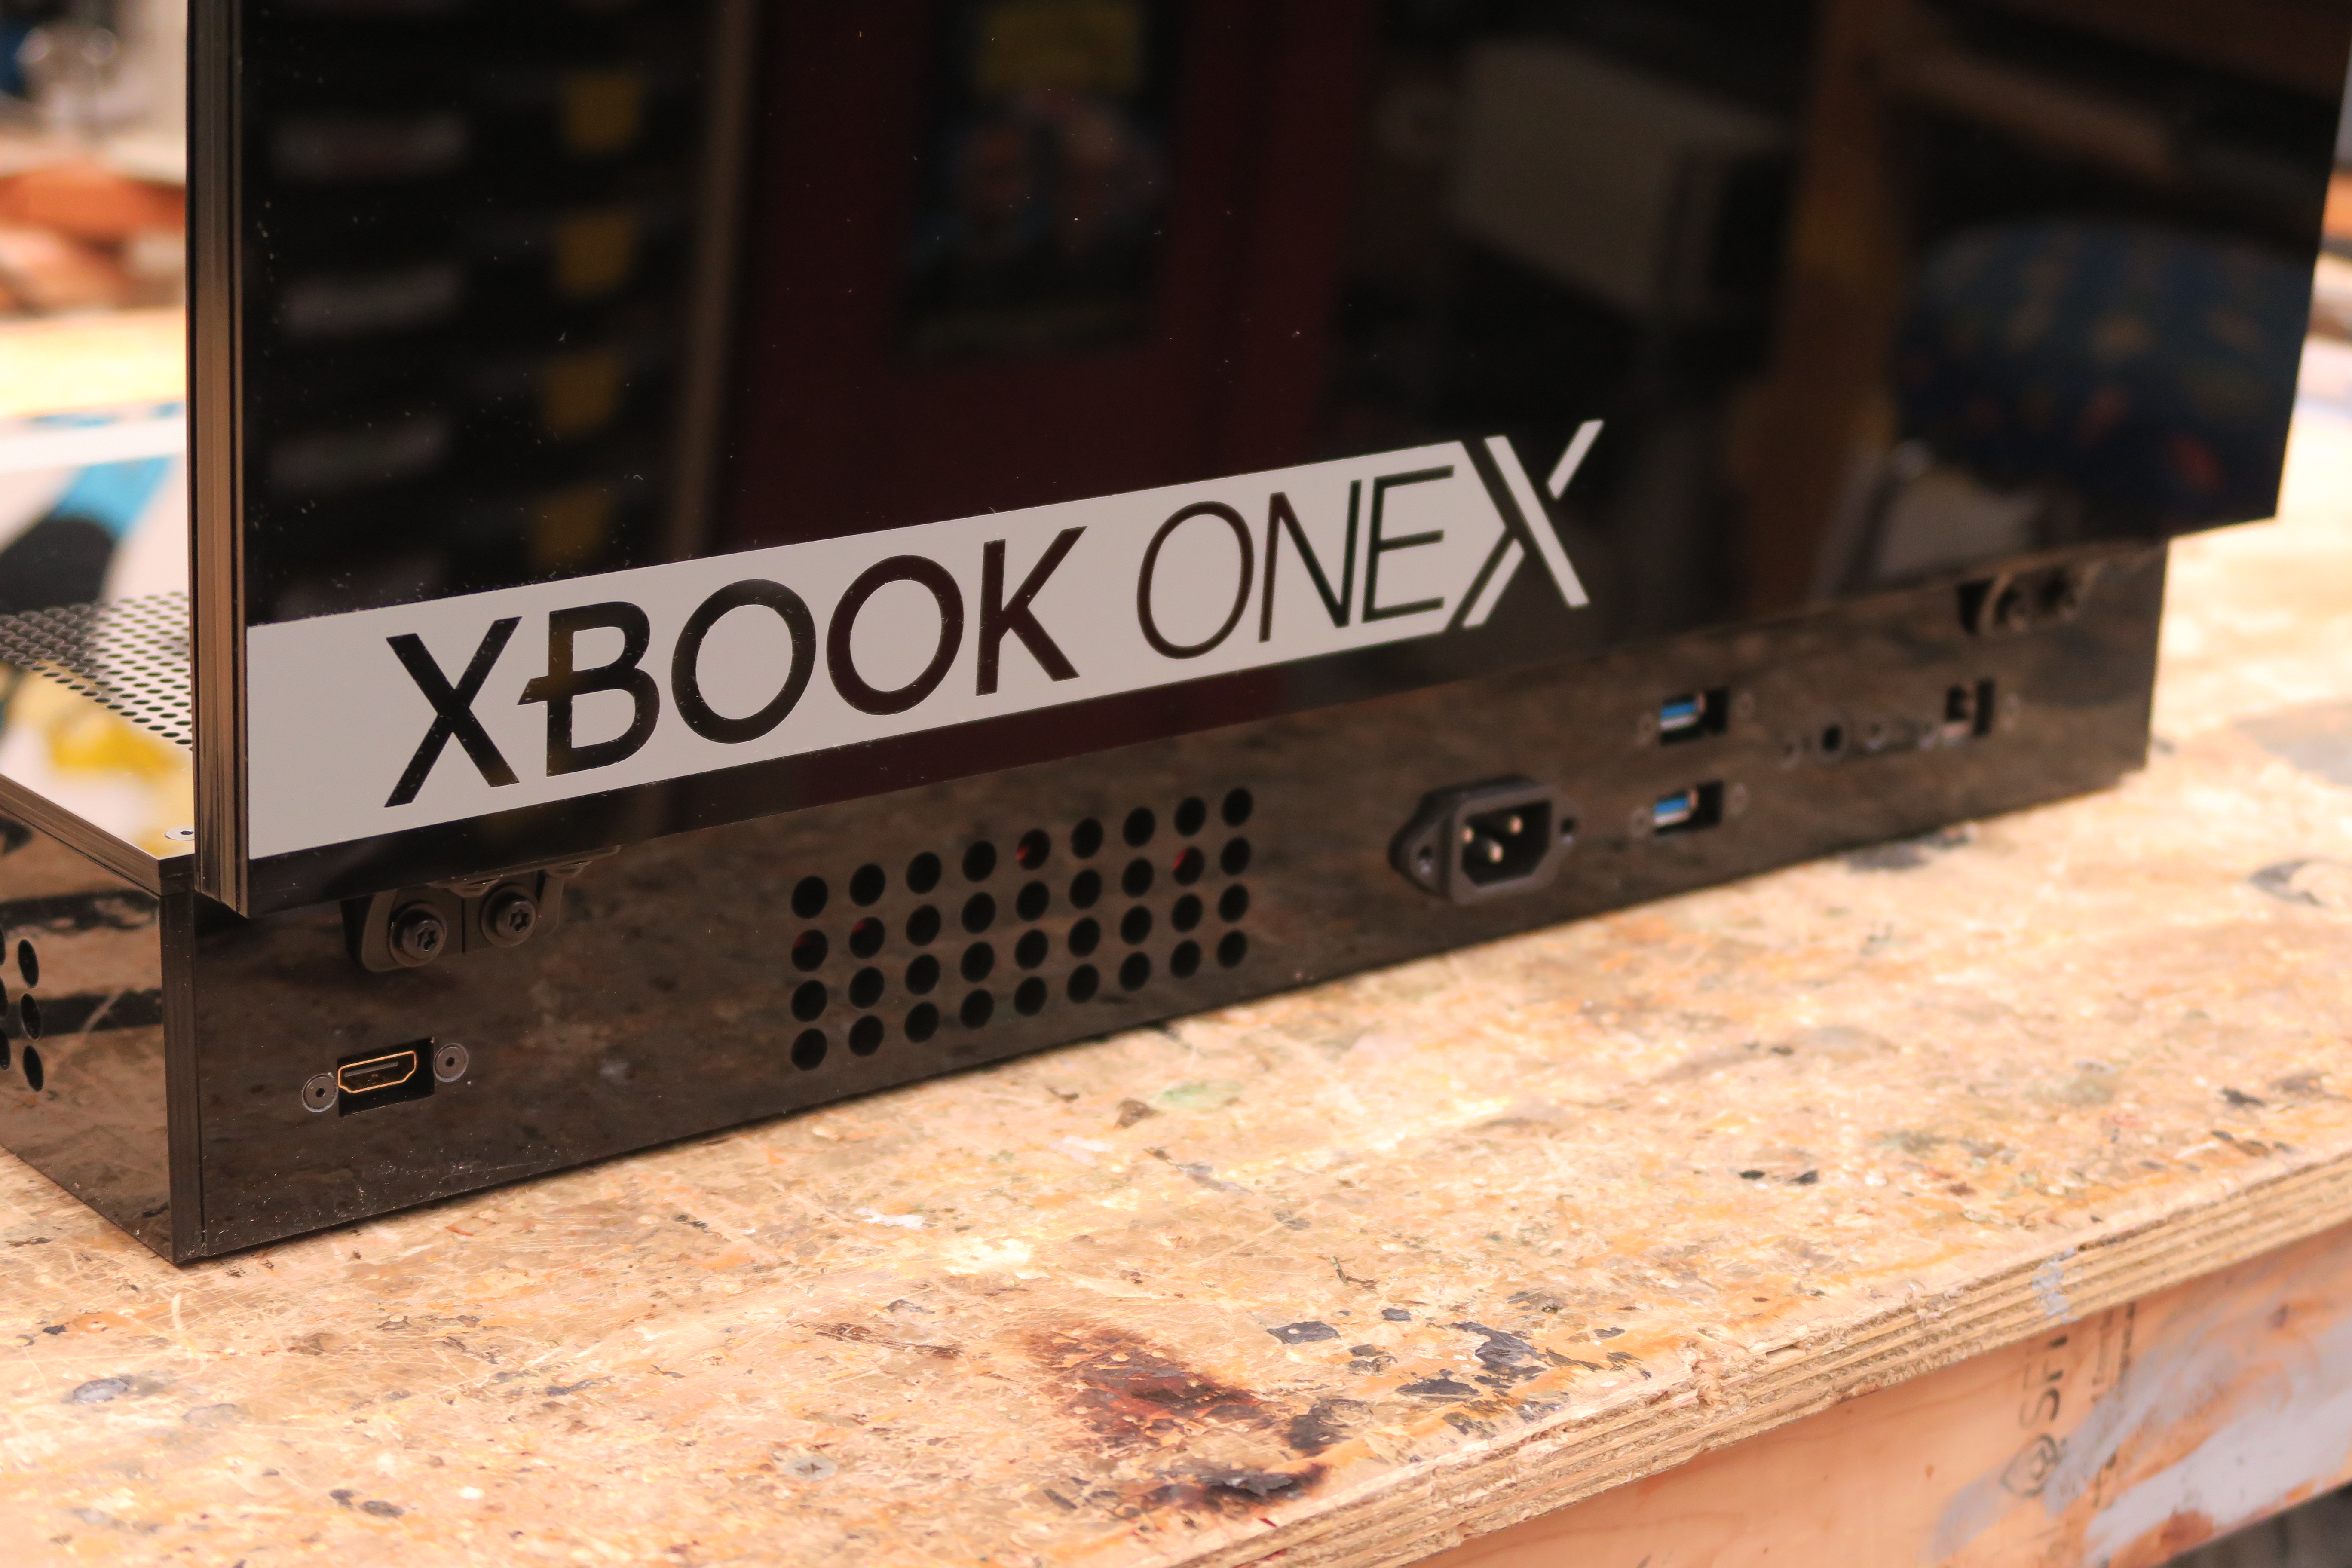
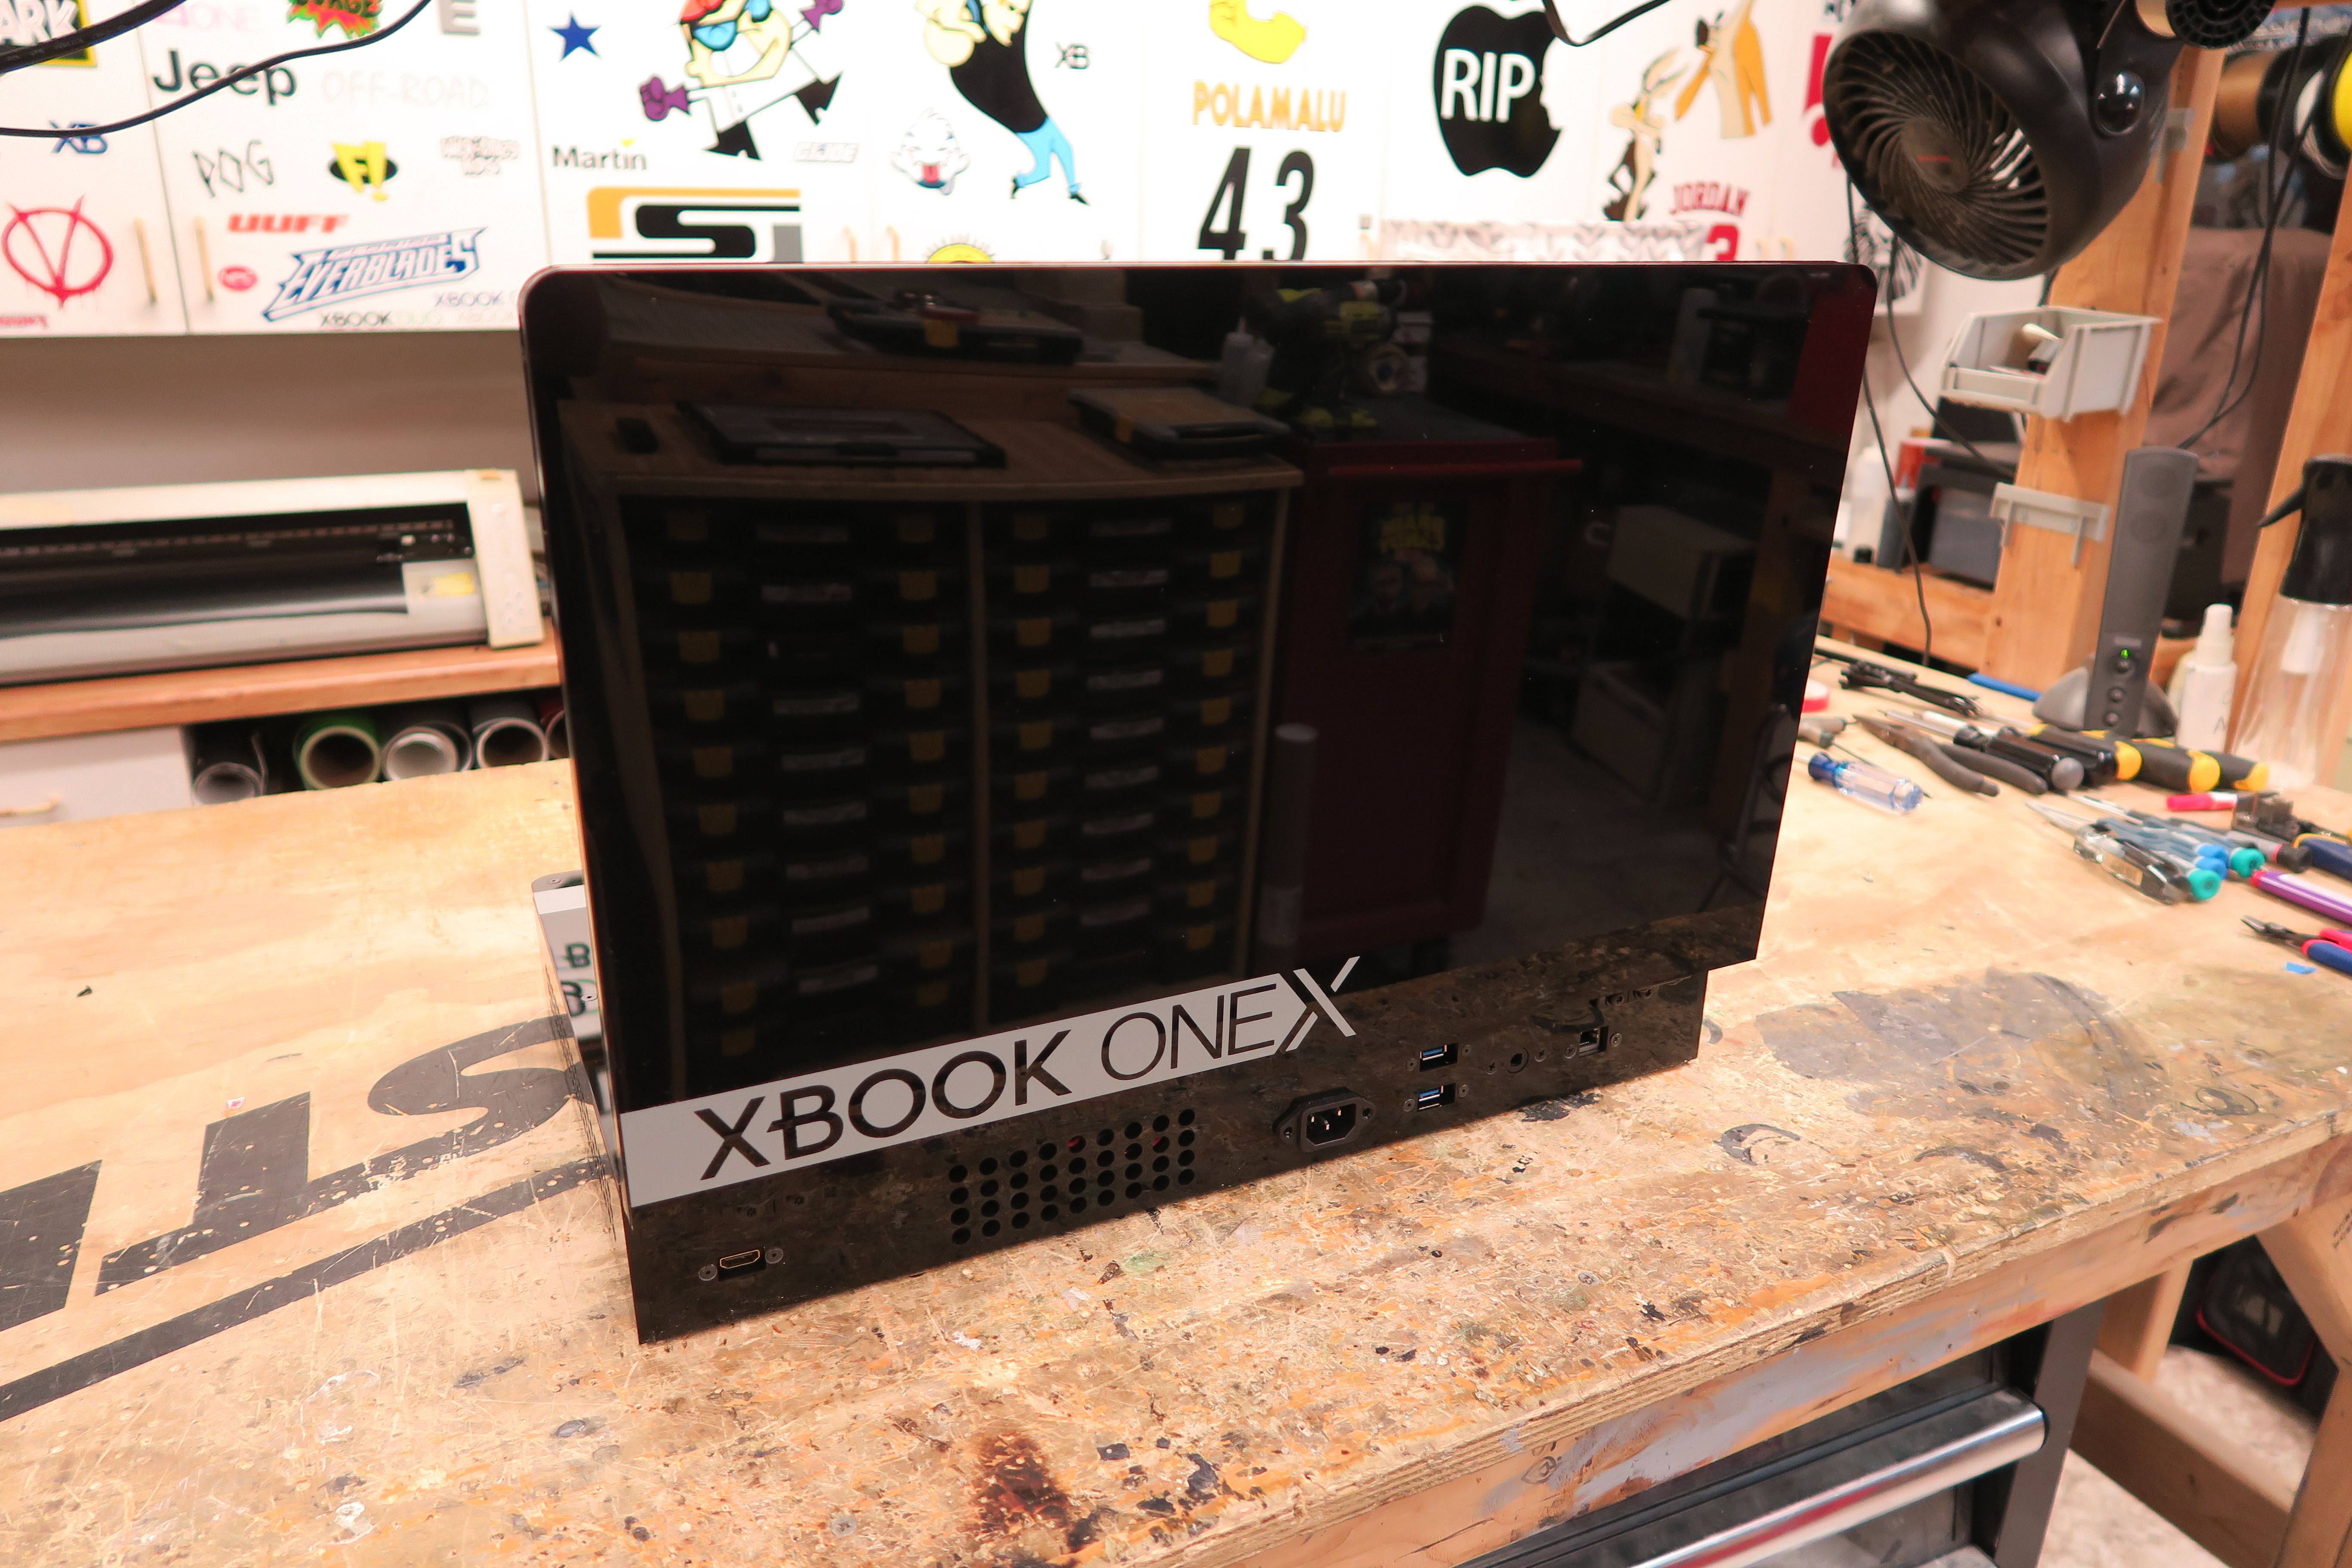
On the front of the system we have 5 buttons for controlling all of the functions of the LCD. It is an actual View Sonic computer monitor, so you can adjust the audio, screen settings ext right from the on board buttons. You also have the disk tray, power, disk eject and controller sync buttons as well. There is also one convenient USB on the front of the system. On the back of the unit you will be able to use HDMI Out (if ordered) to put the image on your big screen when you are at home in 4k! Next to those is going to be your power in, 2 USB ports (only one if you order the keyboard option), Ethernet and optical audio out. You only need one power plug to power this system on! Unfortunately there is no batteries in my systems due to the fact the XBOX is not designed to run on batteries and is very power hungry!
The system uses the stock XBOX cooling to keep the system running even when extreme gaming. The XBOX ONE X has a great fan and the heat sinks have not been modified in any way. The air is sucked through the bottom of the system and exhausted out the back!
Overall this is a great system if you want a bigger screen than my slim models of the XBOOK and Playbook. The 1080p 21.5″ screen is just gorgeous and plays really well! That being said, it does make it slightly less portable due to the increased size! But it is still way better than trying lug around a XBOX and a TV!
You have some options for your custom XBOOK. First off, you may choose either white or black for the main case color. Then you can also choose the color of the accents, for those pretty much any color can be chosen. Also I will offer to put your Live Gamertag on the system if you choose. After you place your order, please email me the details of your system. Also you may put in the colors under the notes section of PayPal. If you want a custom themed XBOOK, you will need to contact me directly as pricing on those system is more.
Pricing is simple. Here is the breakdown.
Complete XBOOK ONE X System (1TB) is going to be $2,495.00 plus shipping. Flat Rate Express Shipping of $150.00 to 48 US States Please contact me first if your international or at a APO or similar.
Heres how the ordering will work. Click the Paypal button on the bottom of this site and you will pay $1000.00 upfront nonrefundable deposit. This gets your name put on the list (trust me, its gets full quick) and gets me working on your XBOOK. After its completed, you will pay the remainder and shipping and your XBOOK will be shipped out! Once I start on your unit, it will take 2-3 weeks to complete. There may be people in front of you, so be aware of that and it could take longer. If you have any questions at all, please go to my contact page HERE and send me a message! I will be in contact with you through the building process and will make it personalized for you!
Use Paypal to pay the $1000.00 Deposit
Remaining due before shipped
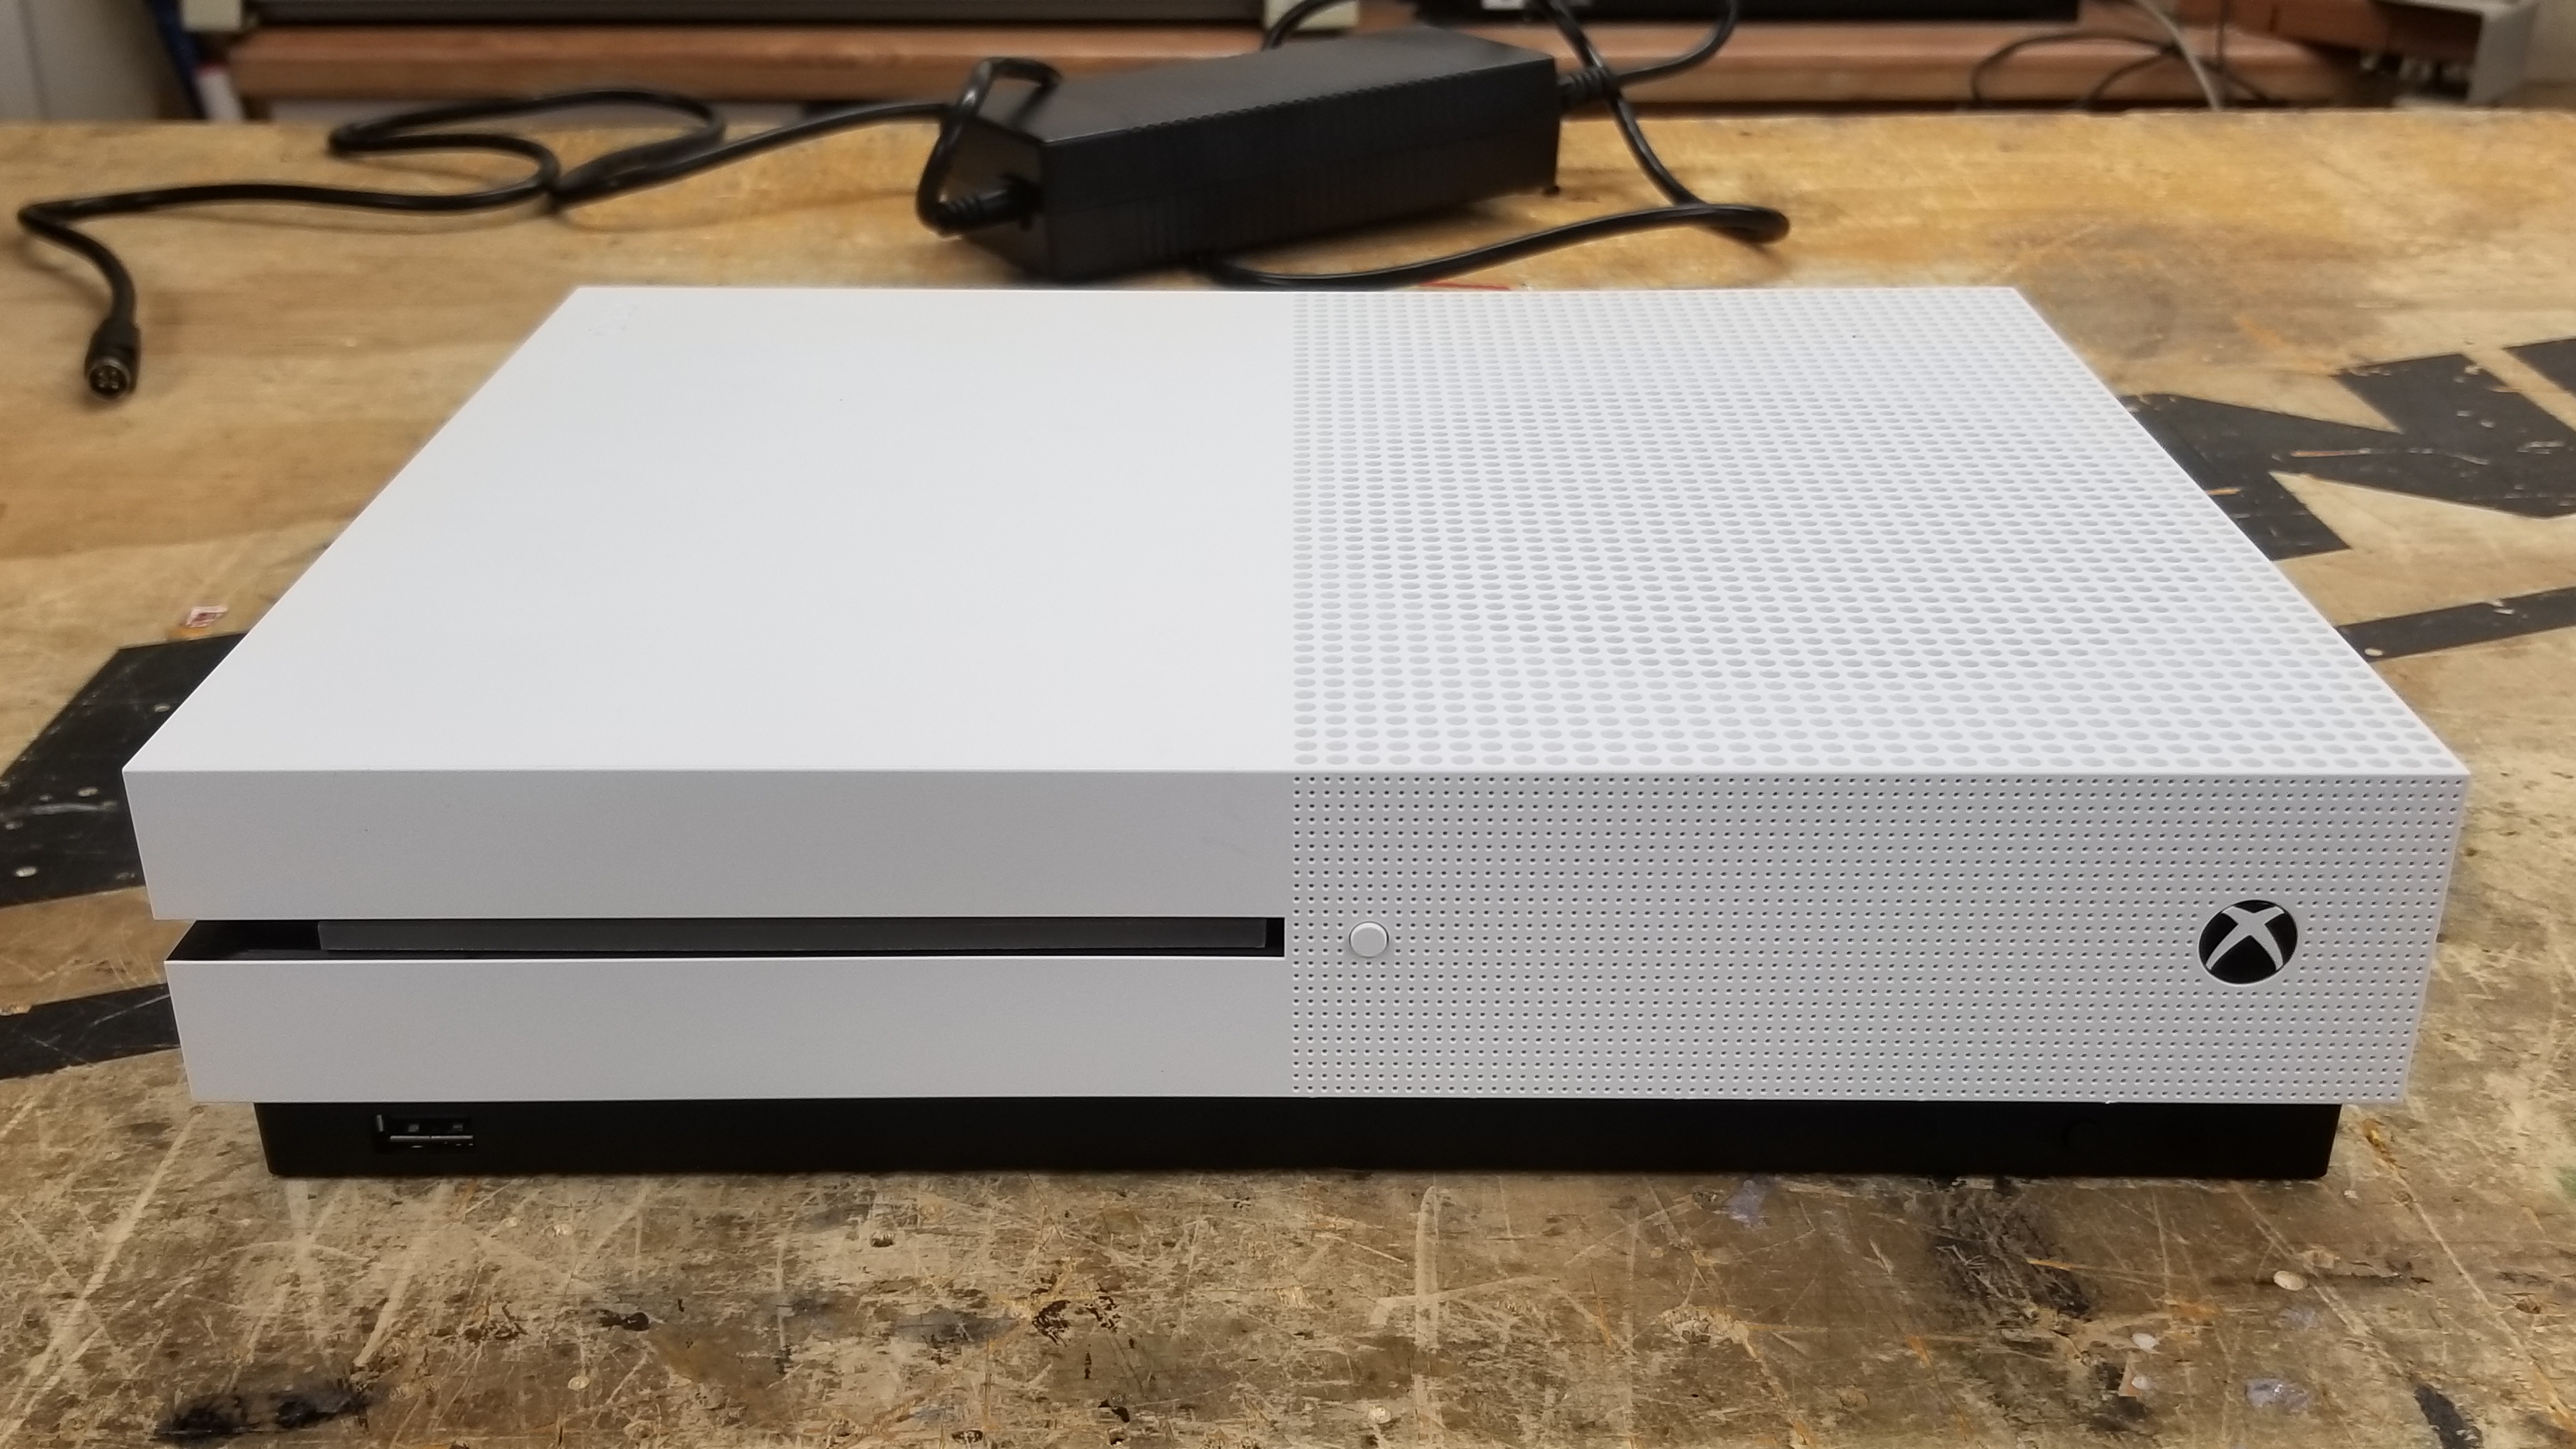
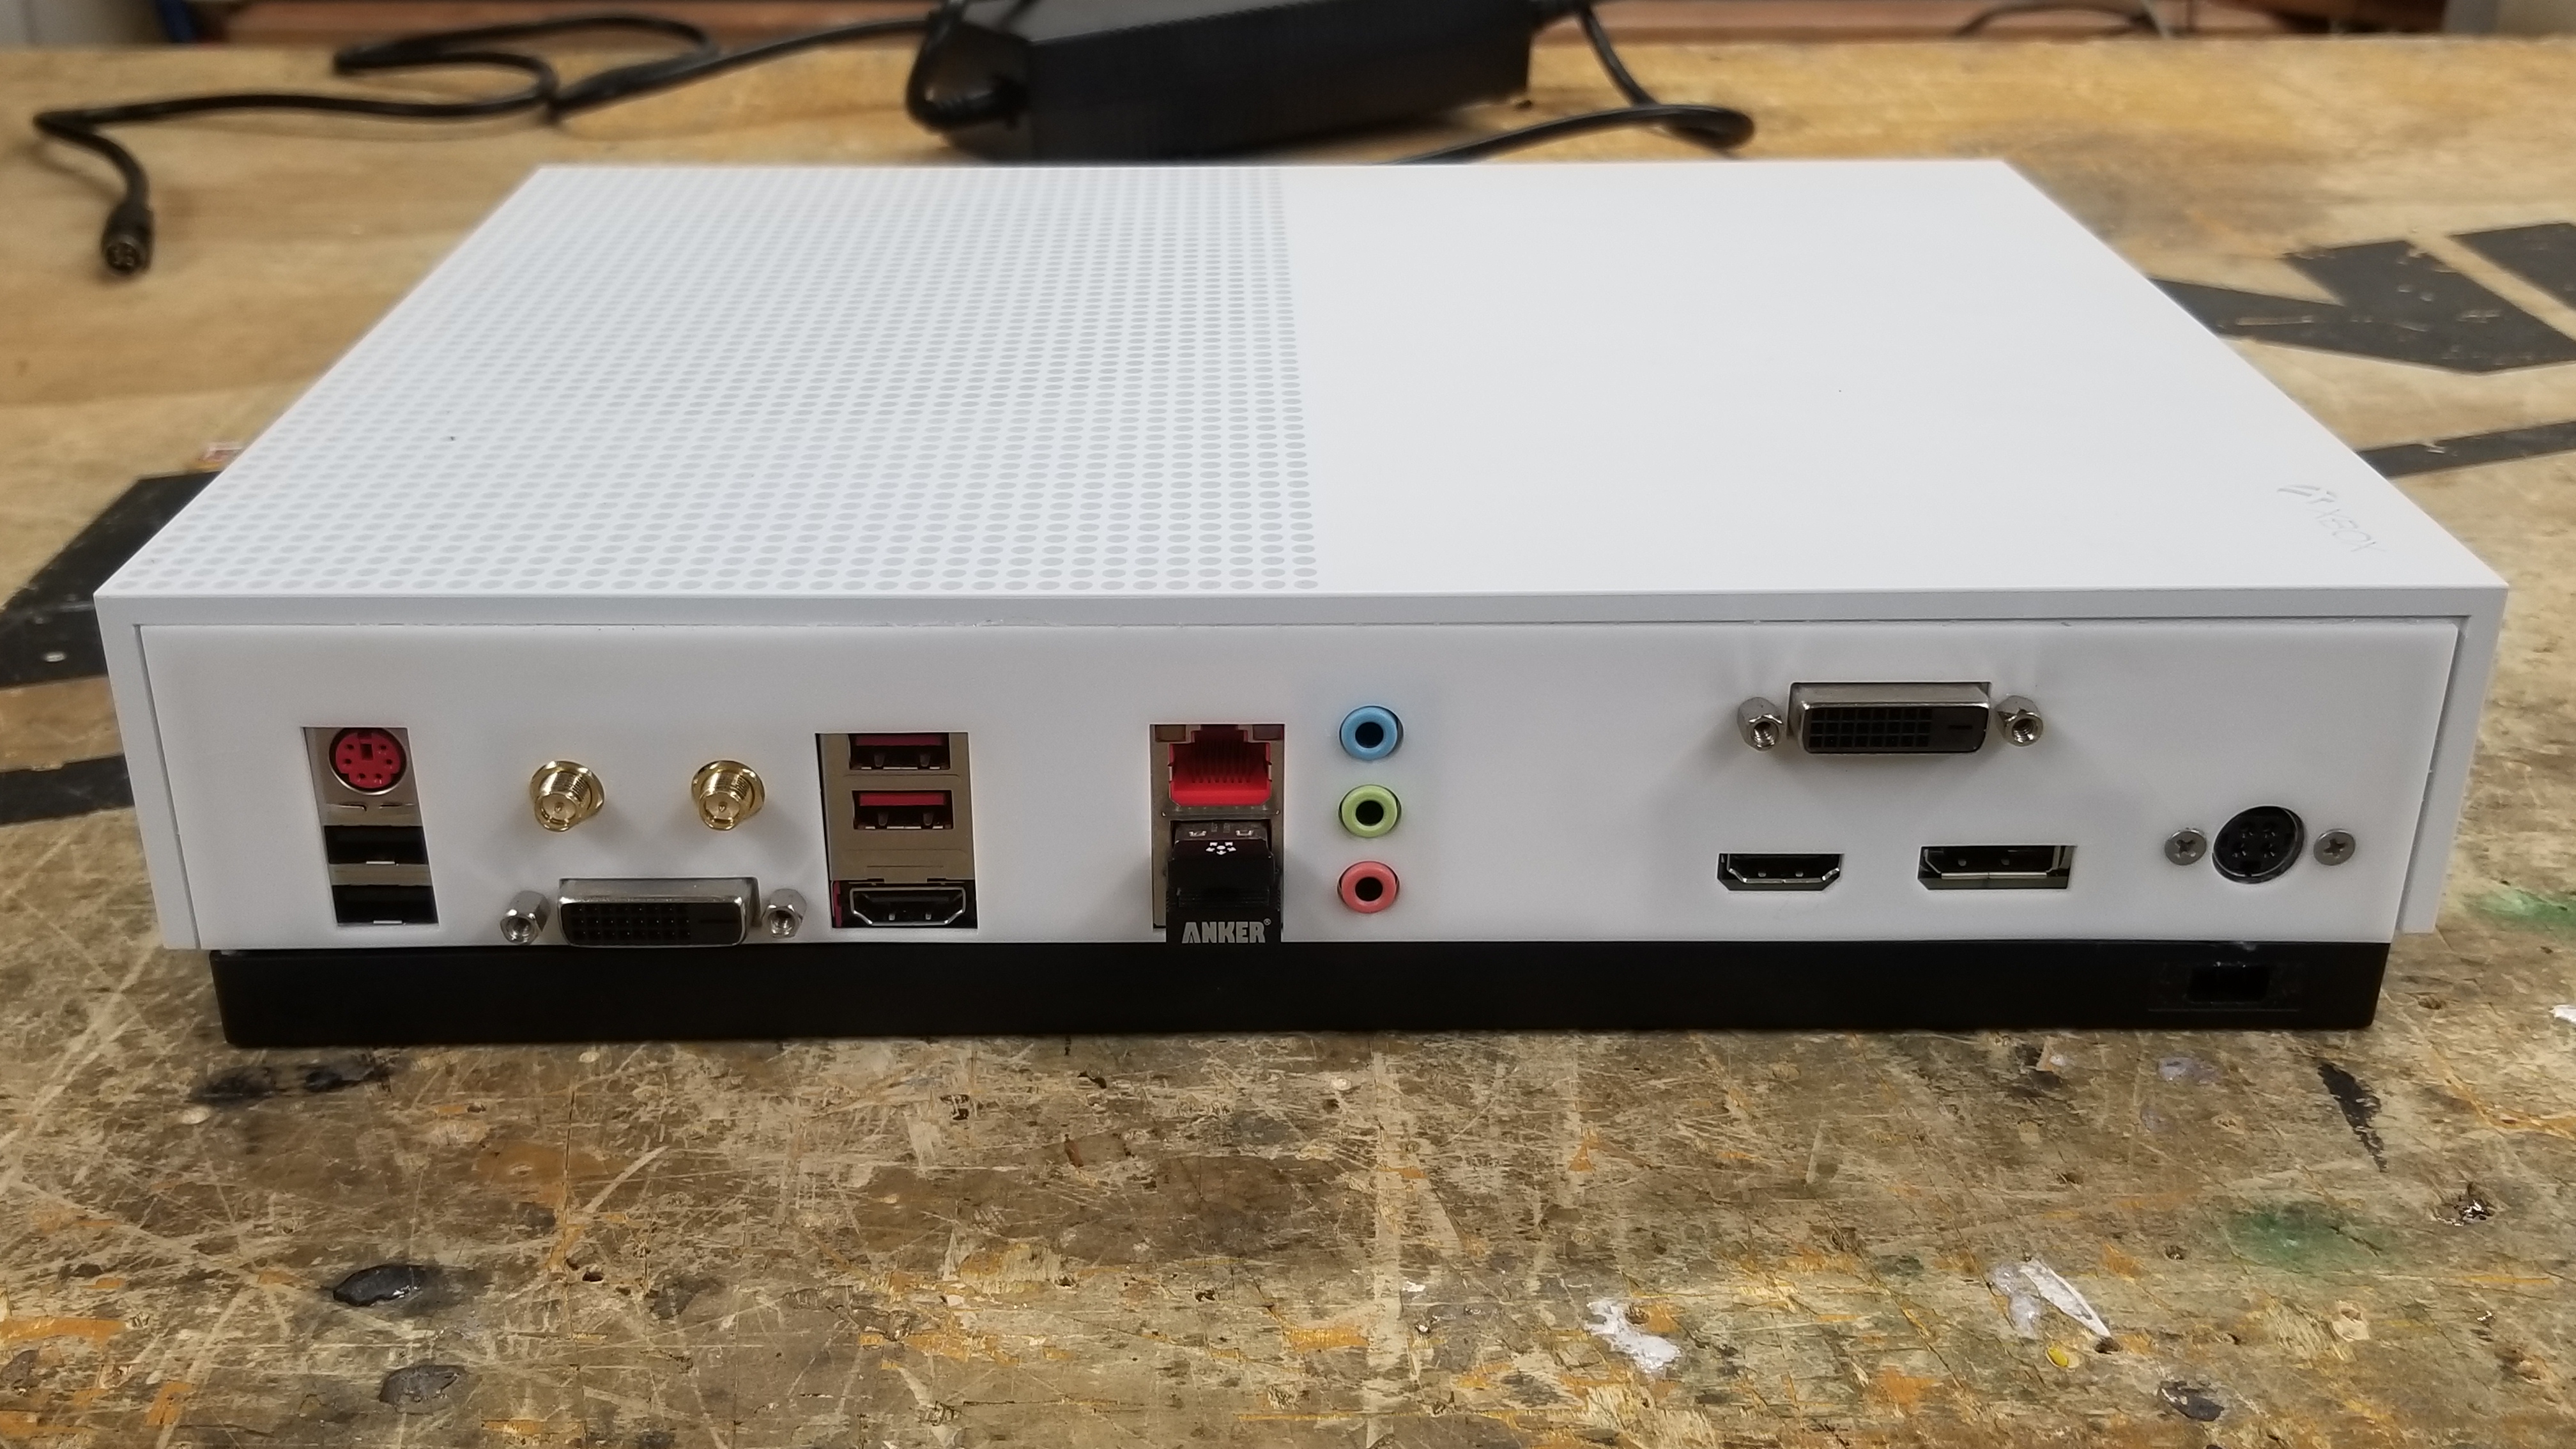
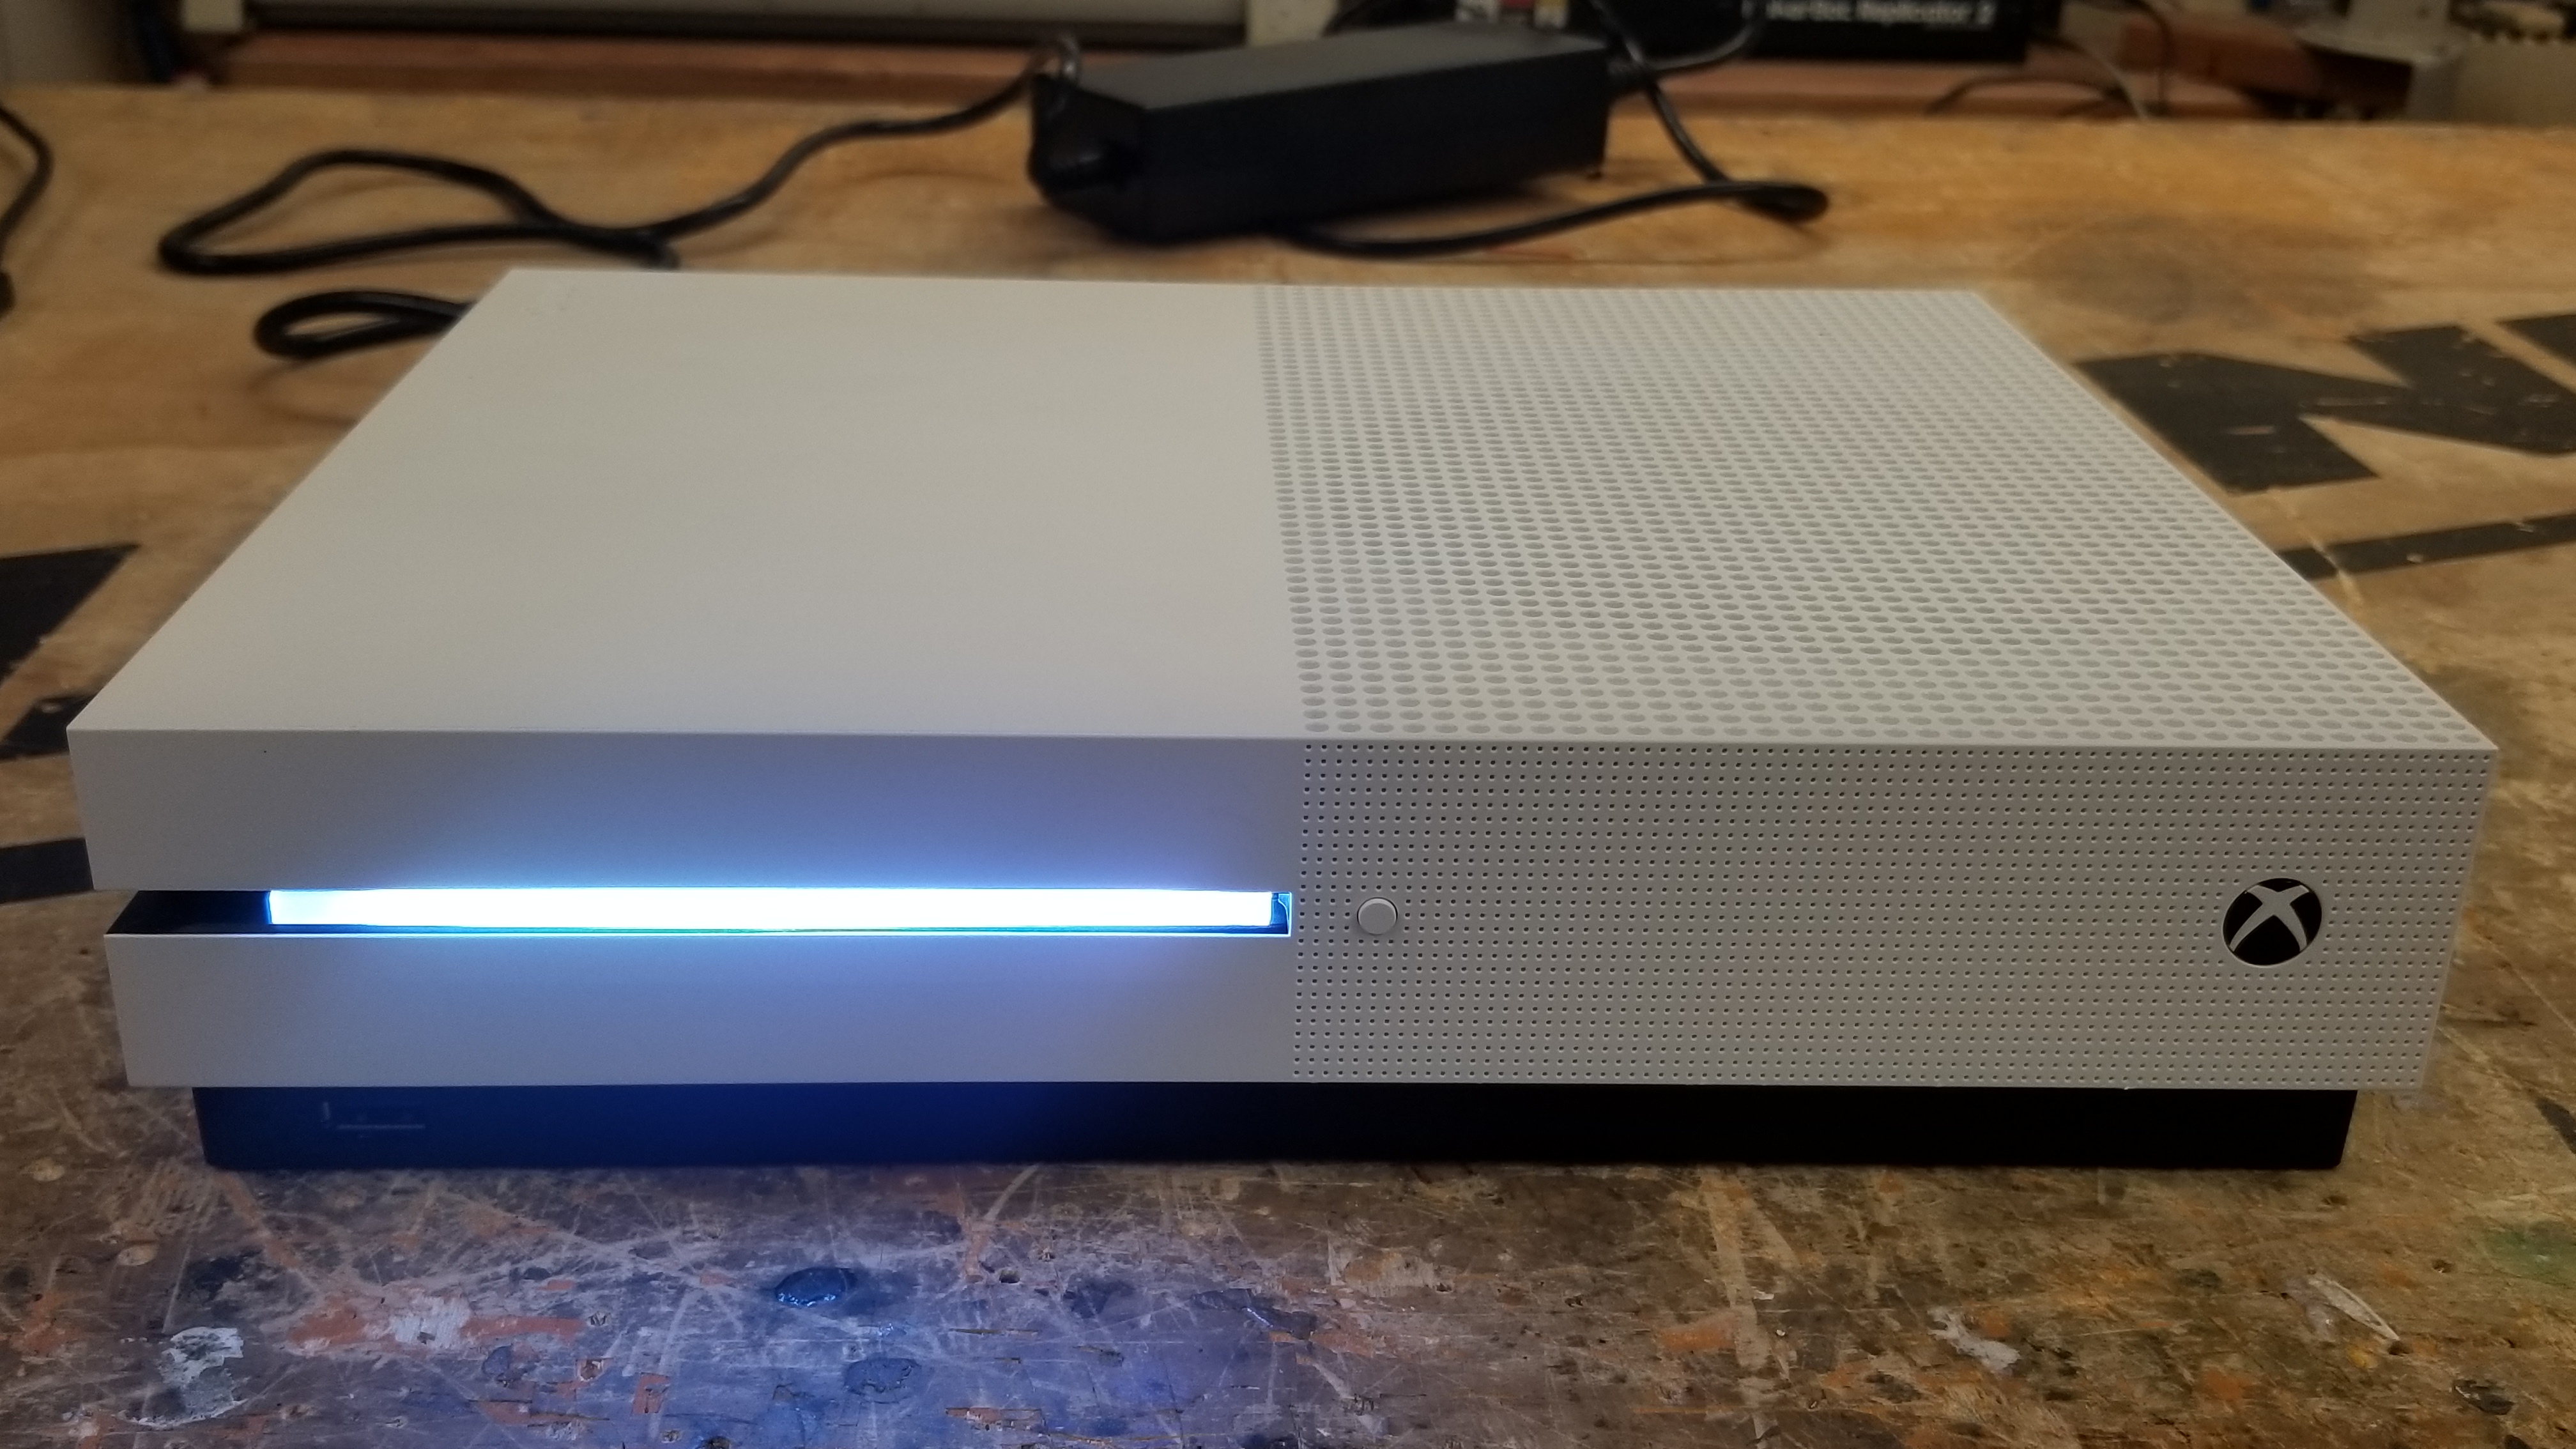
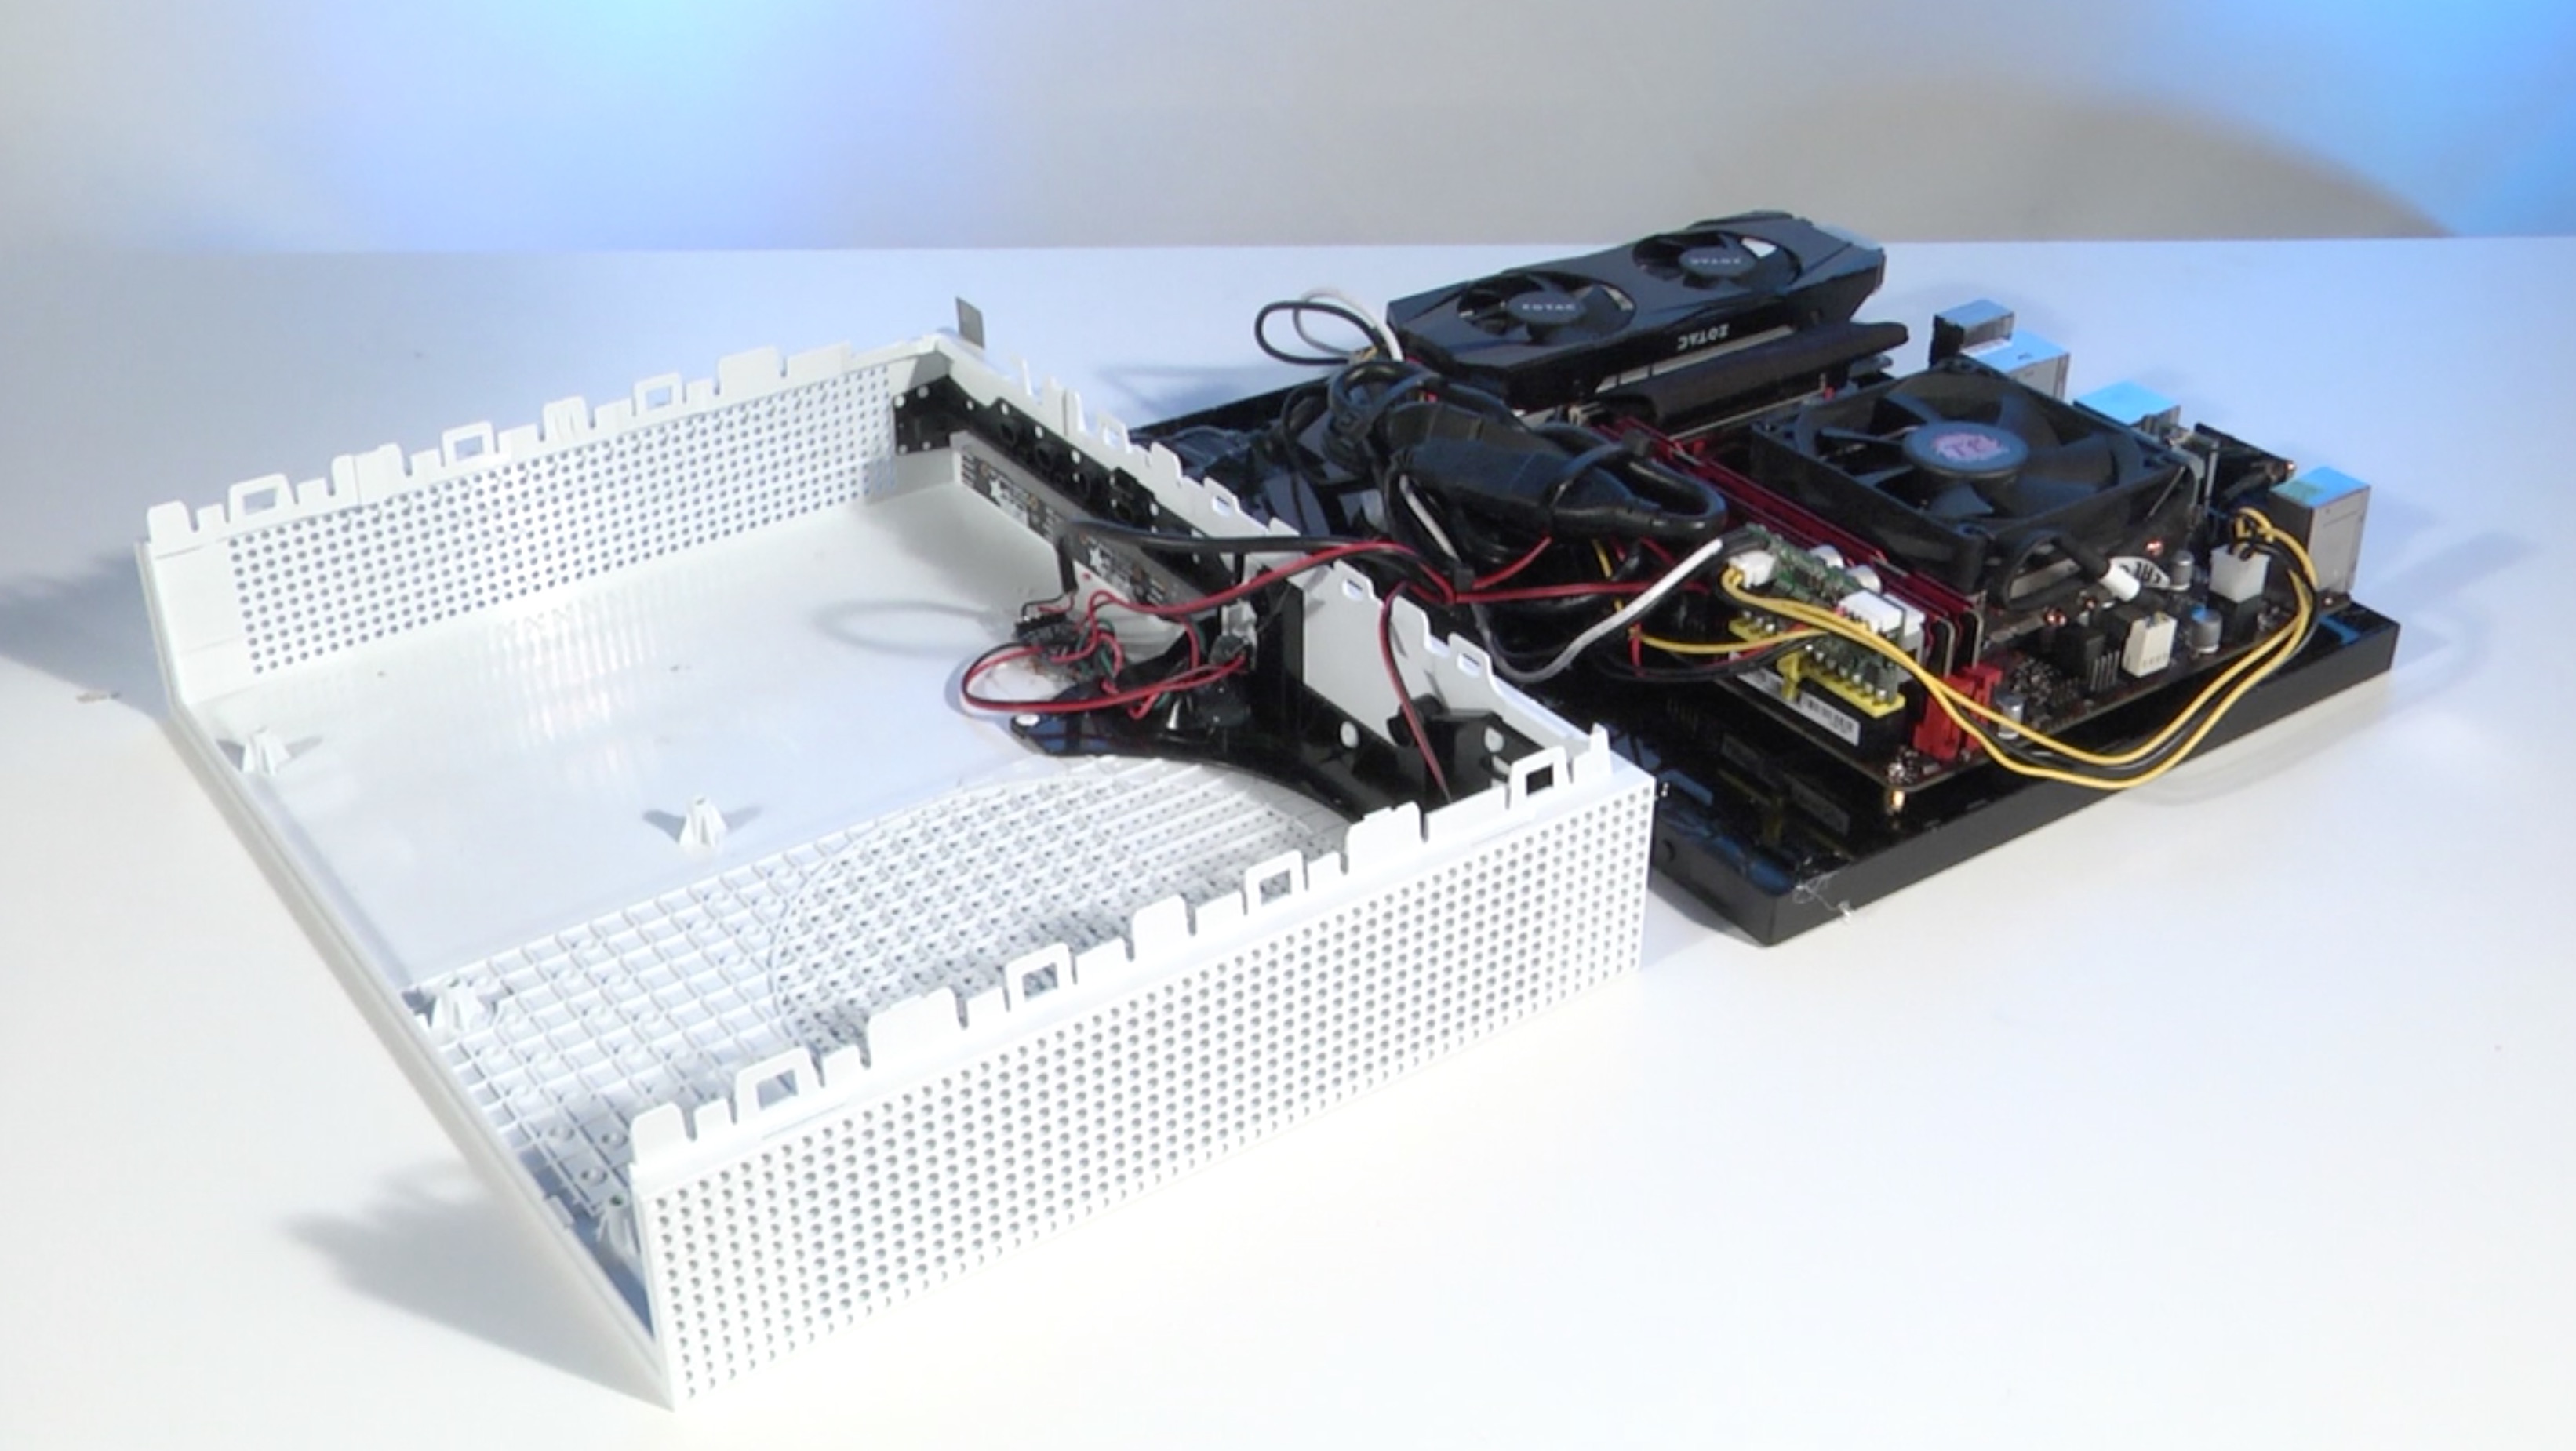
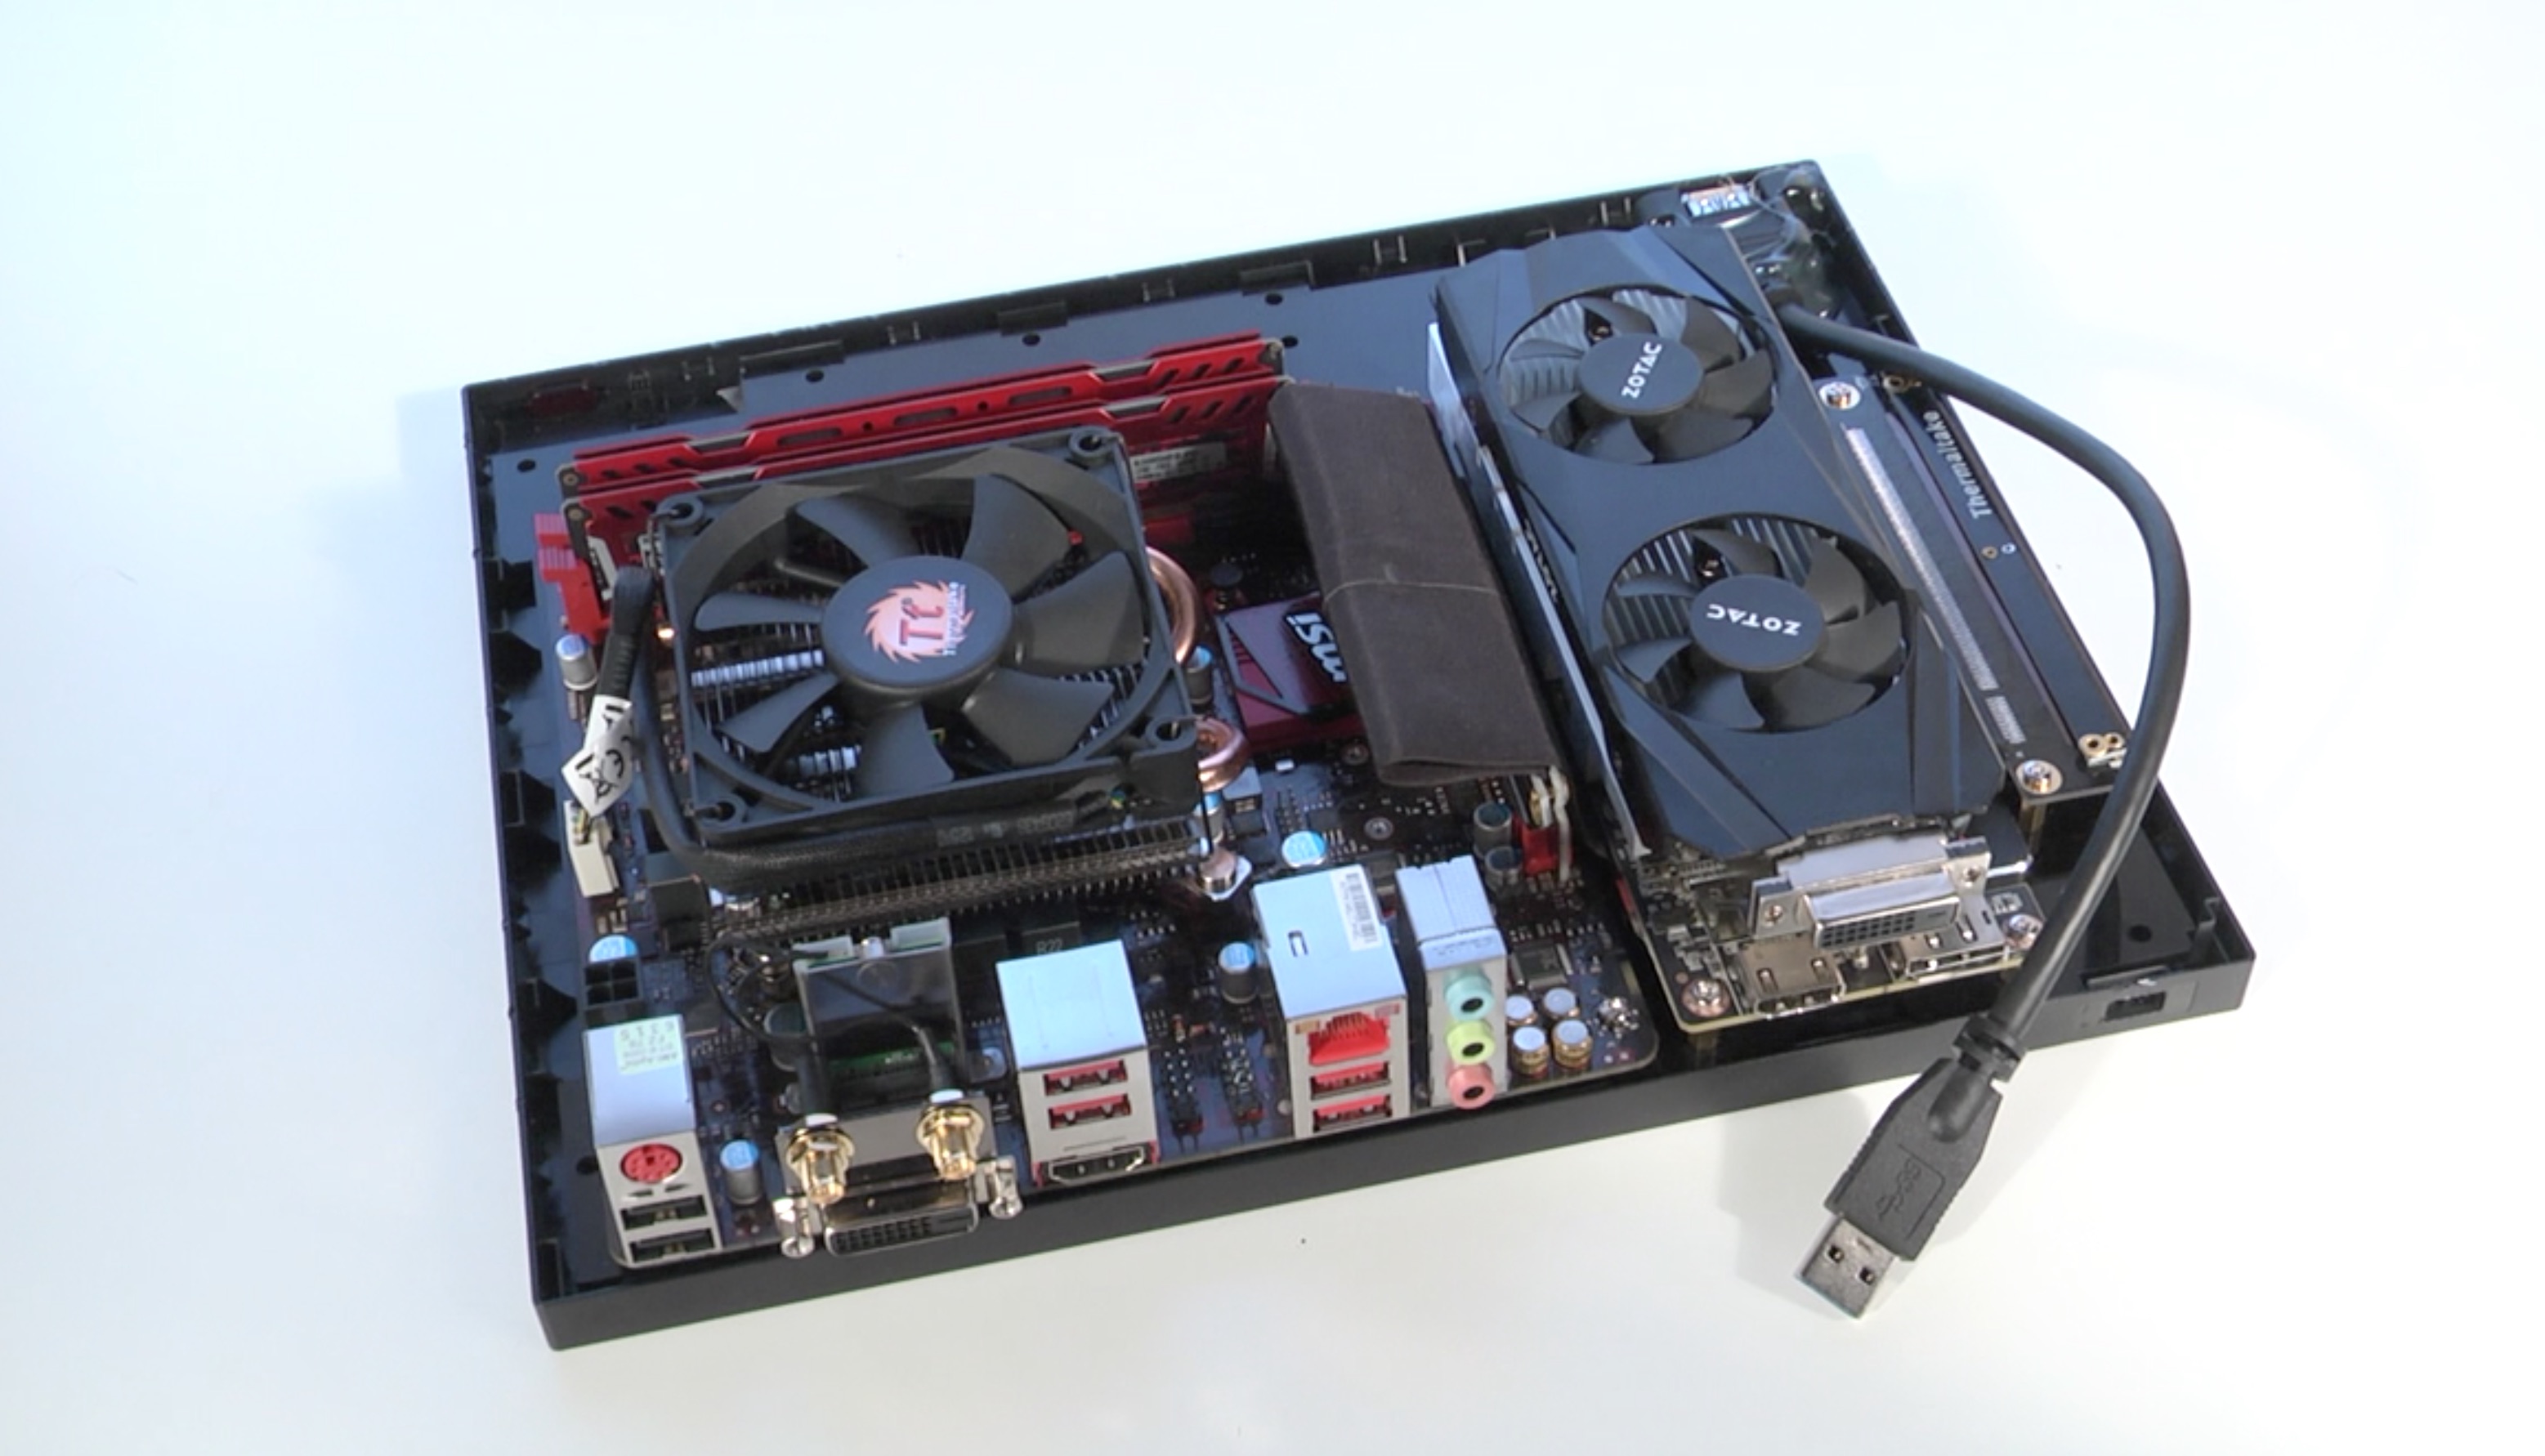
So I’ll admit, I have not shown much love to PC gamers out there! I am always modifying XBOX and PS4s and turning them into something else. Well.. This time I decided to mod something else into a XBOX. What ended up being born is a OEM XBOX One S looking Gaming/Home Theater PC. Making almost no modifications to the case itself we were able to get a Mini ITX Gaming PC crammed inside. From the back of the unit, you can see there is a few more ports than a standard XBOX One S. Using my laser cutter we made a perfect backplate to remain the factory look. It almost make it look like this could have been a XBOX One S prototype unit or something! I used the original power button to turn the PC on, but with space being a concern, we left out an optical drive. I mean, who uses these things anyways.. haha. So instead I added some Adafruit NeoPixel bars and an arduino to have the BluRay slot function as a power indicator. There is not much to say about this PC. Check out the pictures and parts list below and the video above!! Until next time…
Parts List
Intel – Core i3-7100 3.9GHz Dual-Core Processor
Thermaltake – CLP0534 22.4 CFM CPU Cooler
MSI – B250I GAMING PRO AC Mini ITX LGA1151 Motherboard
Crucial – Ballistix Sport LT 8GB (2 x 4GB) DDR4-2400 Memory
Samsung – 840 Pro Series 256GB 2.5″ Solid State Drive
Zotac – GeForce GTX 1050 Ti 4GB Low Profile Video Card
picoPSU-160-XT, 160w output, 12v input DC-DC Power Supply
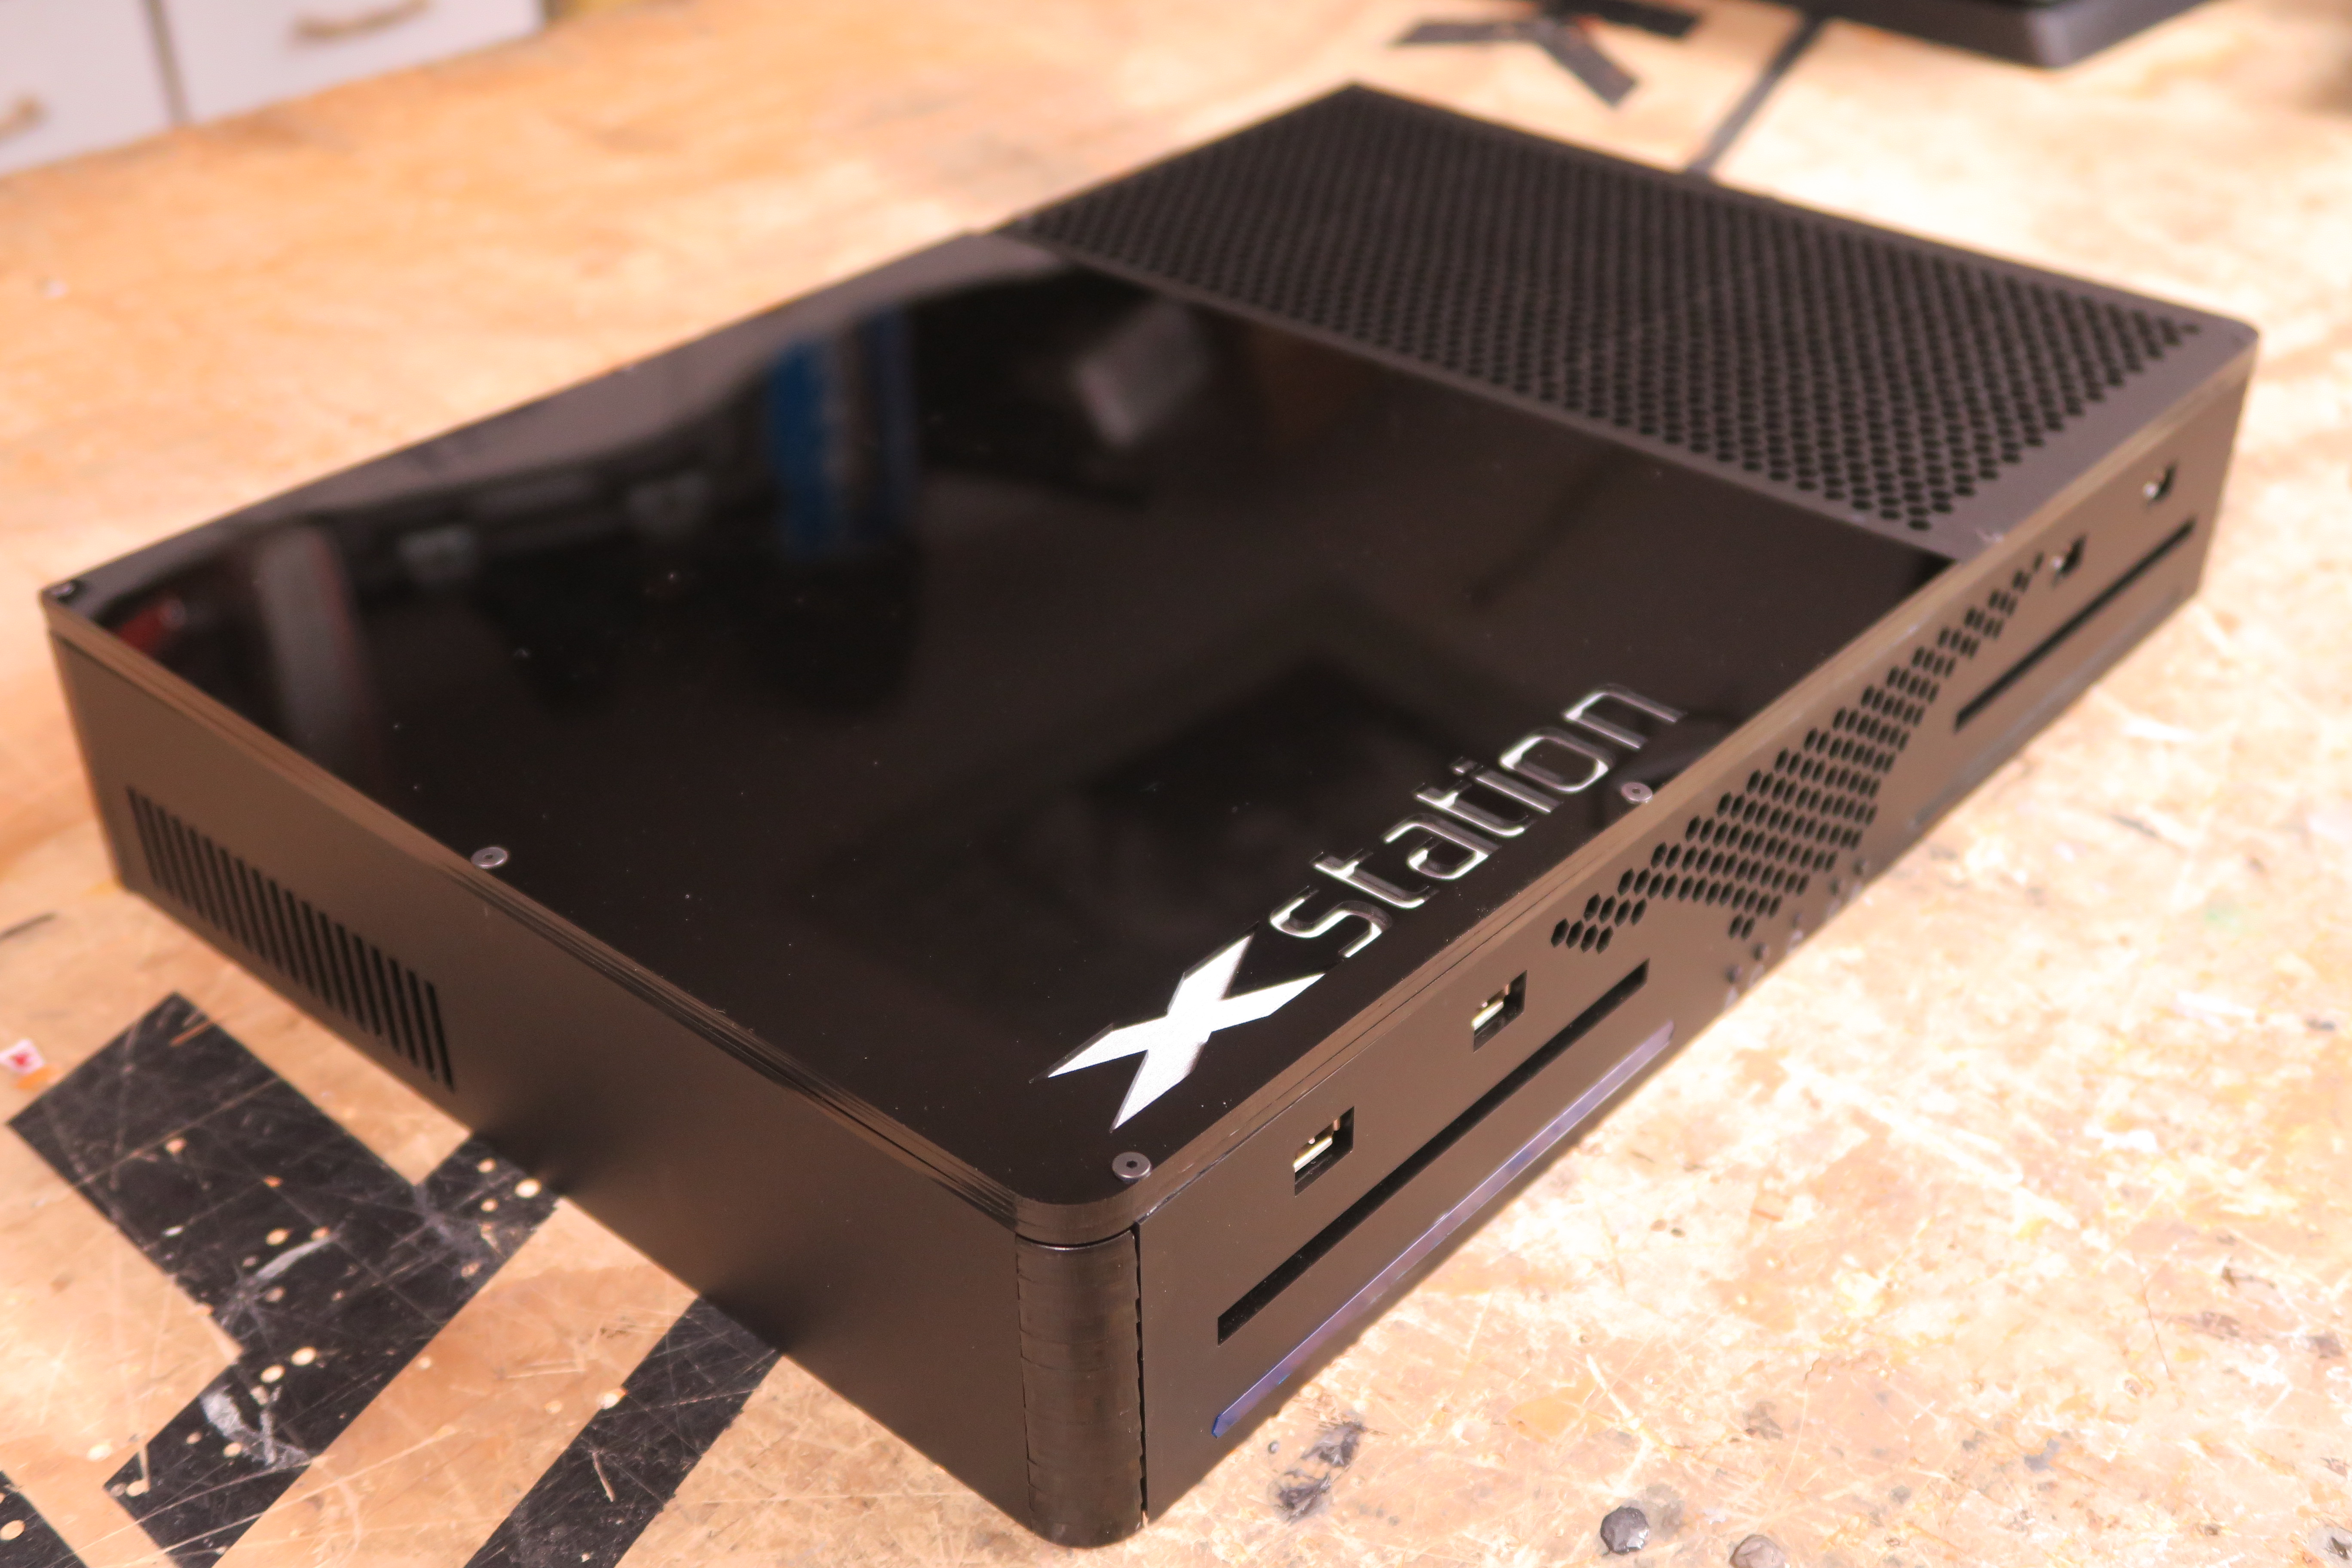
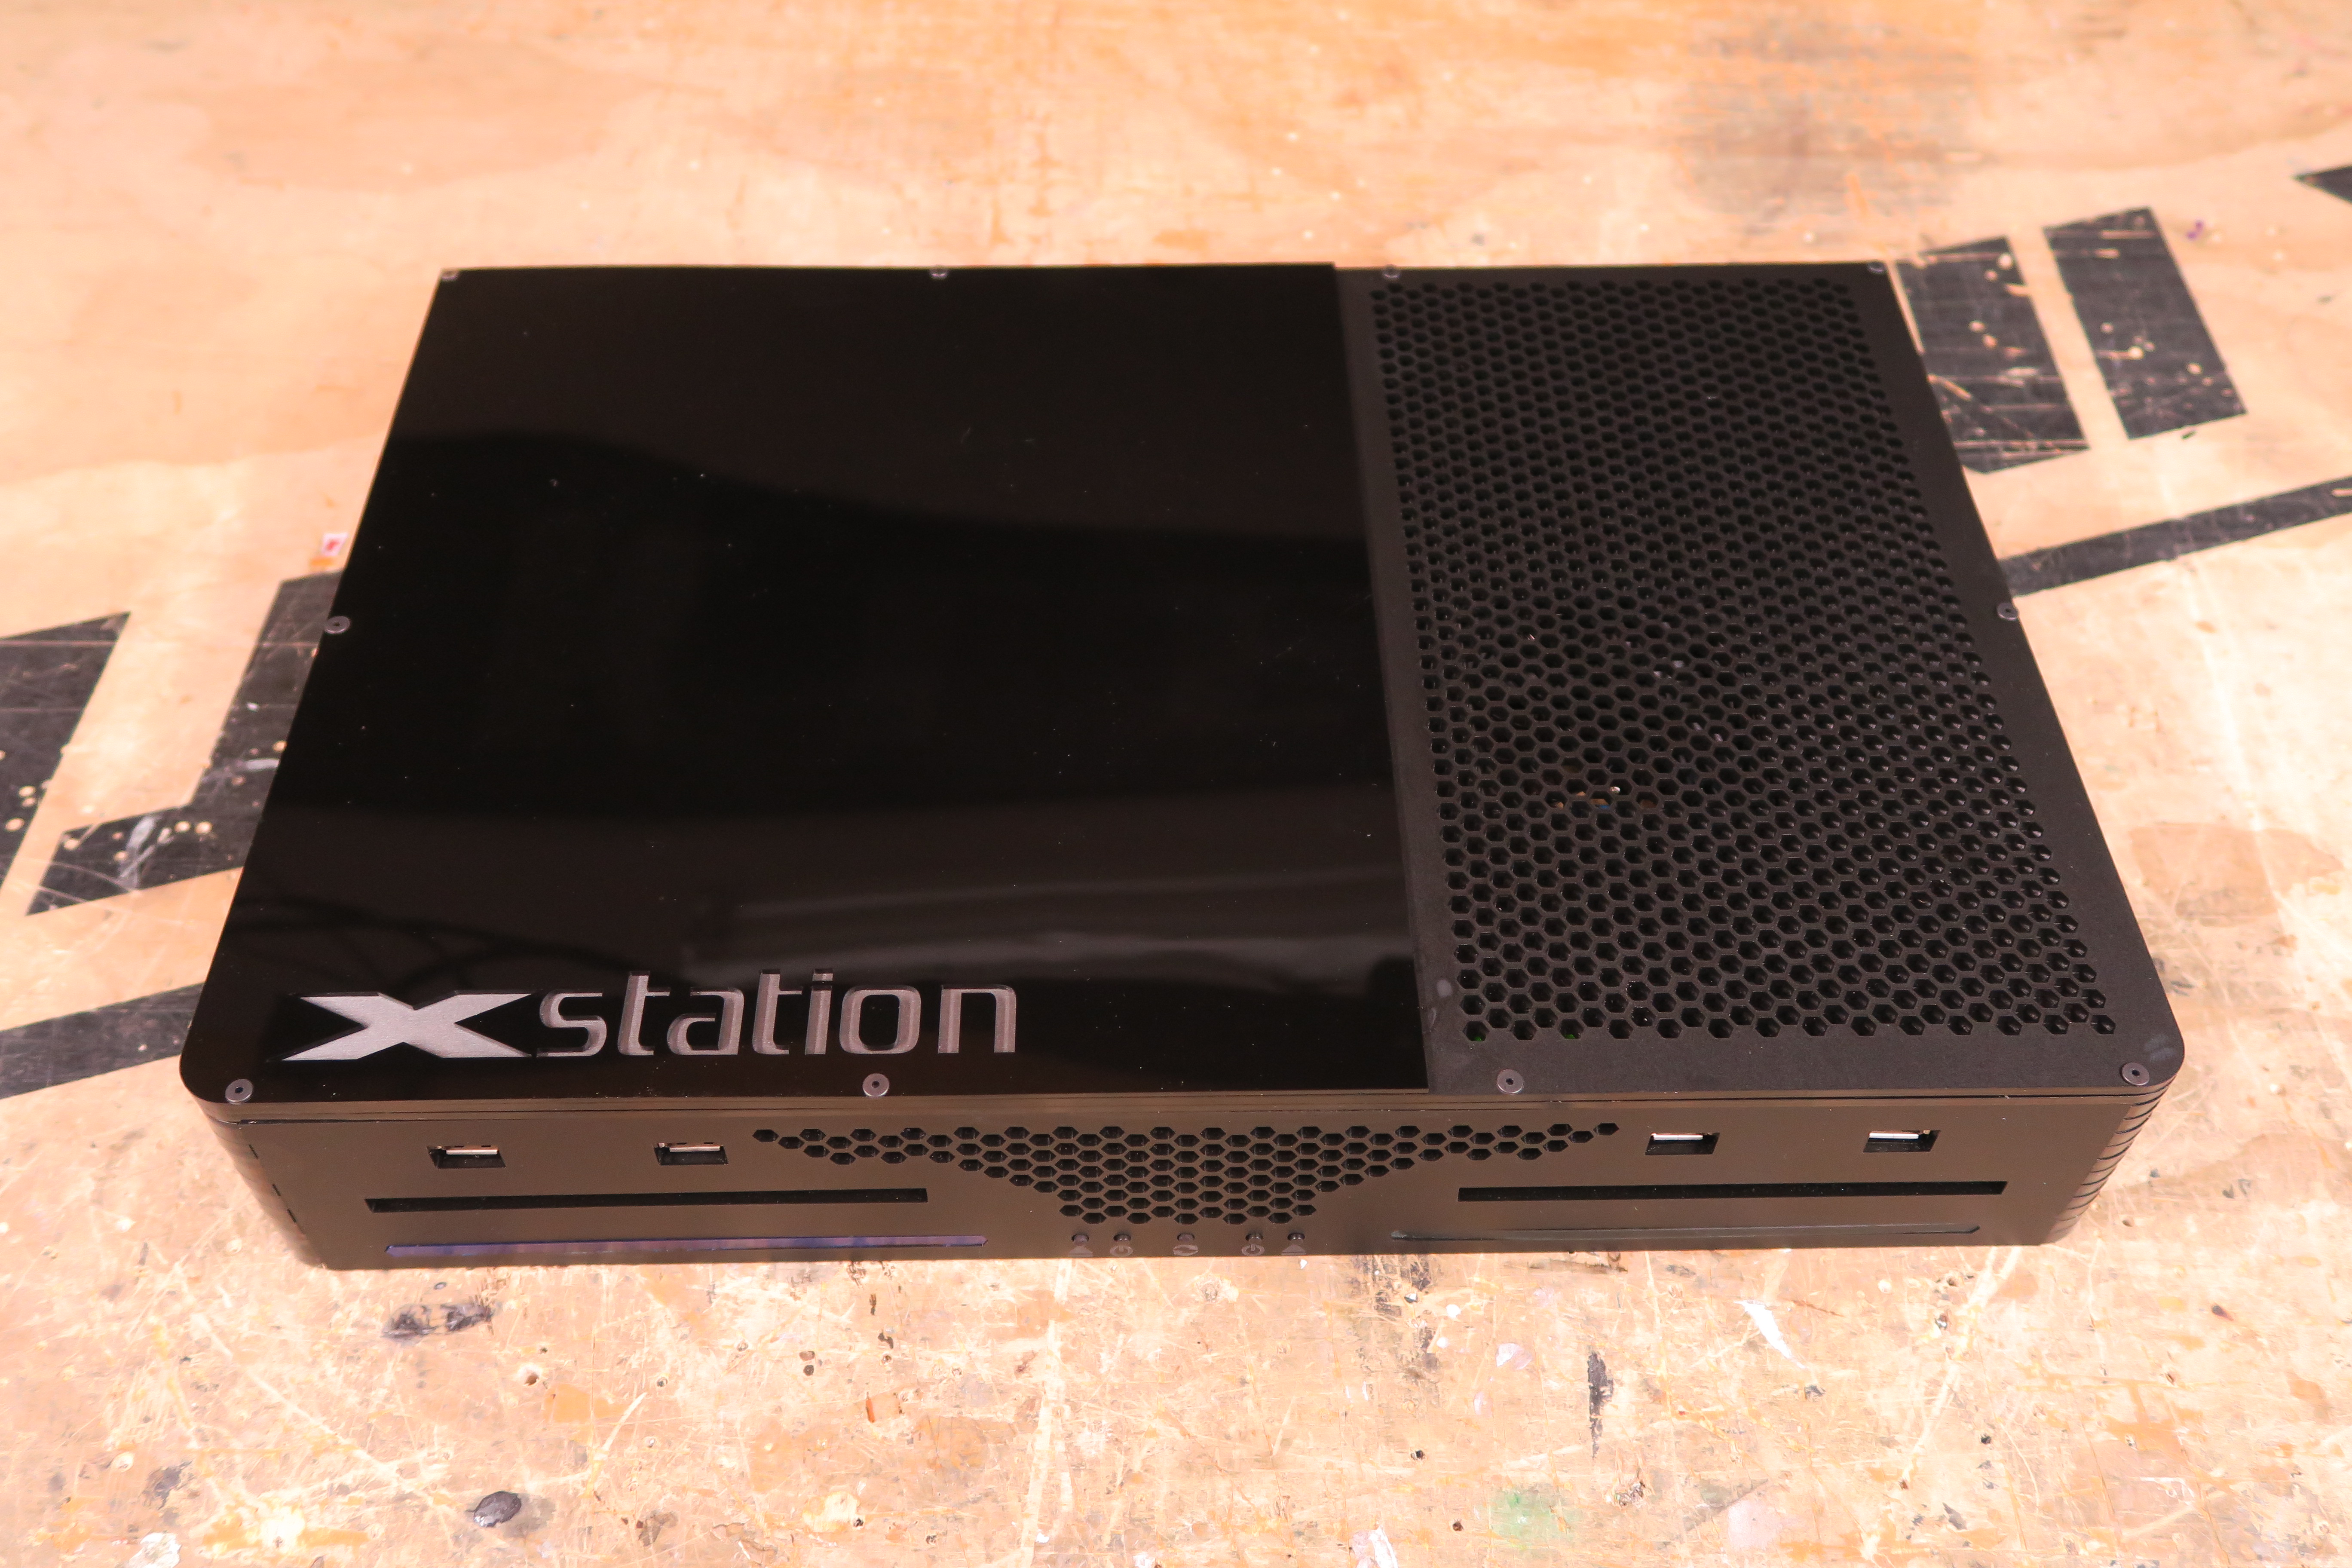
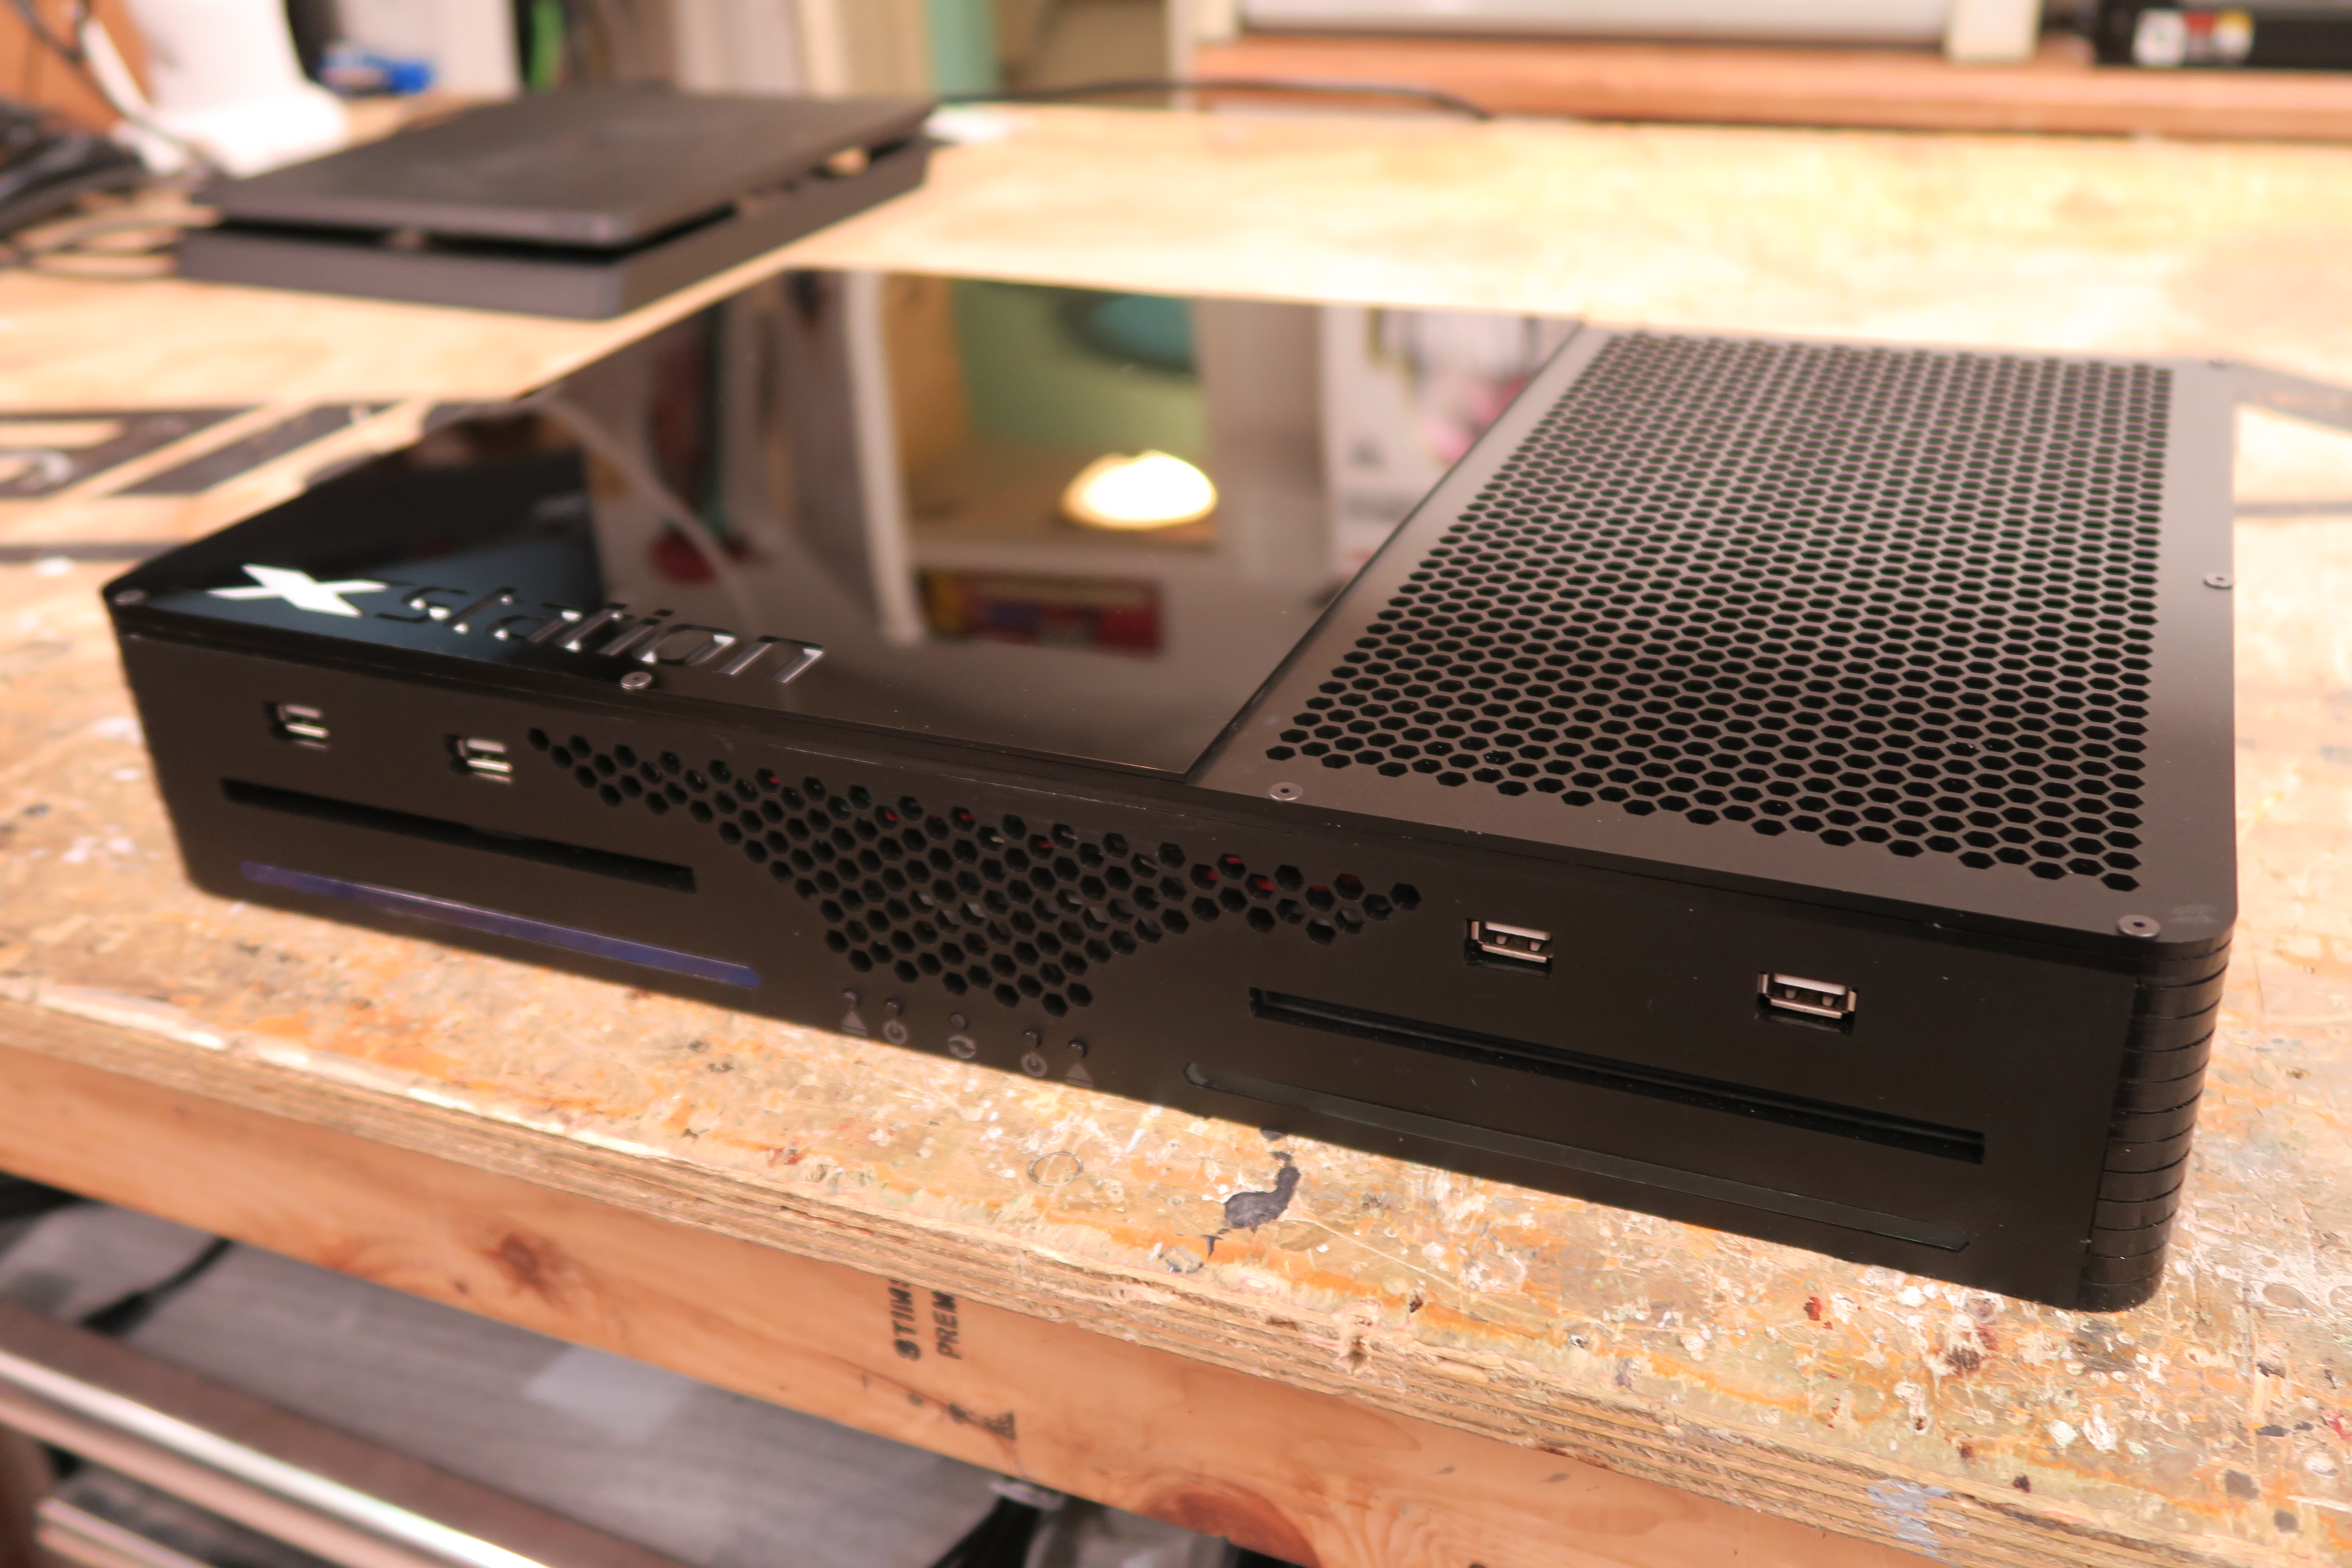
Hey everyone! I wanted to share my newest project! The XSTATION! Unlike the Playbox, this system is a standard home console (no laptop style screen), but has both a XBOX One and a PS4 slammed inside of it! Simply switch between the two systems with the touch of a button!
I started this project about 2 weeks ago with the idea in mind that I wanted to have both of my home gaming consoles put into one housing. I was not sure how I was going to accomplish it, but I went ahead and tore apart both of my systems and started playing what felt like a puzzle on how I could fit all the parts together inside the smallest case possible. After I got the right idea of how I waned it laid out, I went to cutting acrylic and ordering parts. After about 2 weeks and some problem solving, the Xstation was born!
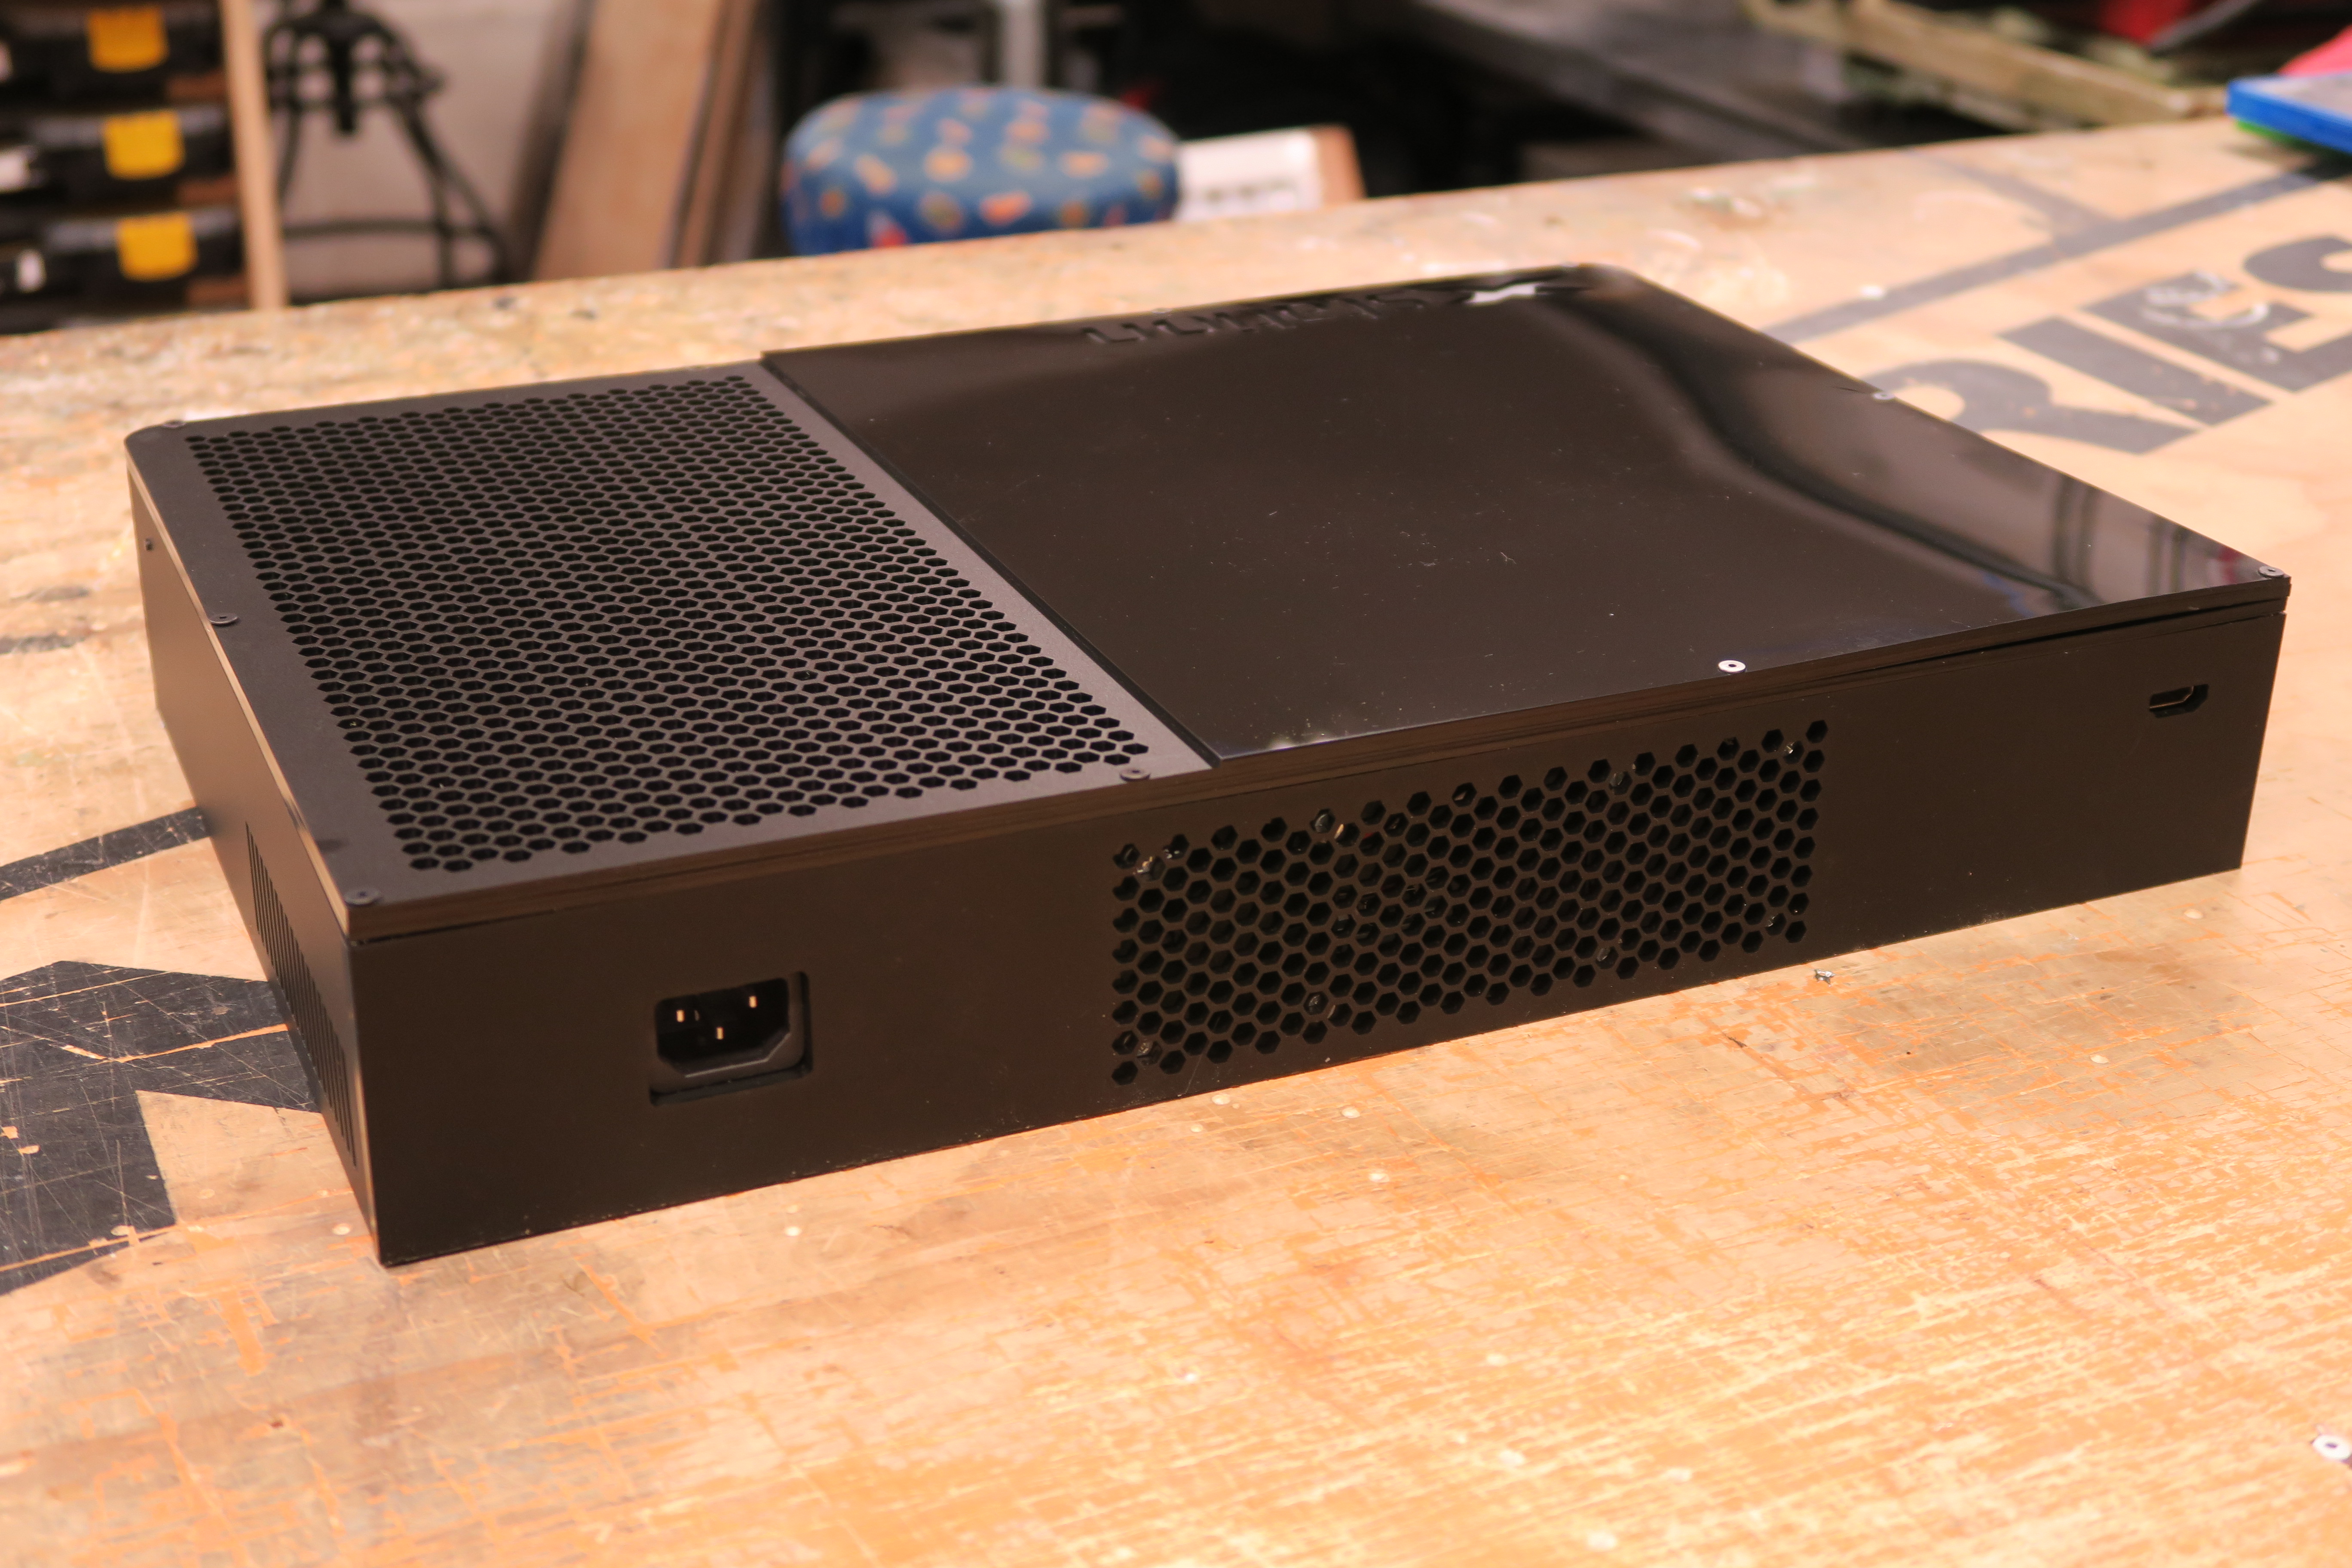
I was able to get both systems to fit into a case not much bigger than a standard XBOX ONE S and almost the same size as the 1st Gen XBOX ONE. There is no external power supply either, that is also inside the system. Both consoles are run into a 2×1 HDMI switch which is controlled by an Arduino. The Arduino also controls the status LEDs and the relay inside. When you push the switch button, it will swap between the two systems. It will only provide power to one system at a time though. This is what keeps it cool, it would be a oven if both were running at the same time i’m sure!
I explain and show in detail the system in my video above, and you can also check out the photos below. This system works just the same as any console. Simply turn it on and go, but now I don’t have to worry if a game studio is only releasing a game for a specific console! I am really proud of this one and hope you guys enjoy it!
*PLEASE NOTE* I am in no way affiliated with Sony, Playstation, Microsoft or XBOX. The Xstation is simply a console modification for a Sony Playstation 4 and Microsoft XBOX ONE. This is not a licensed Sony or Microsoft Product and should not be confused as such. It is a custom made item by EdsJunk.
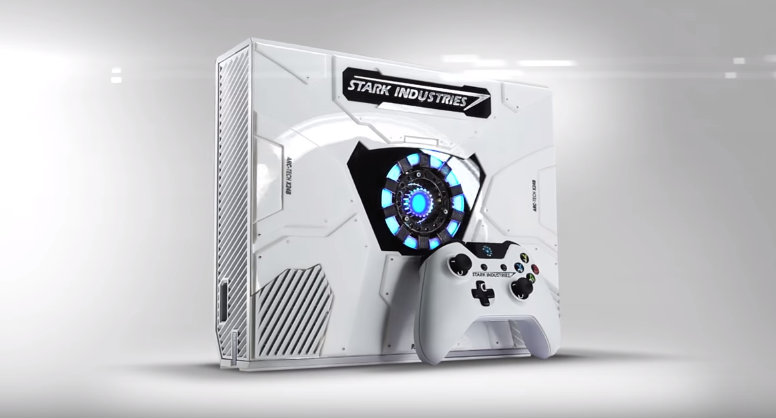
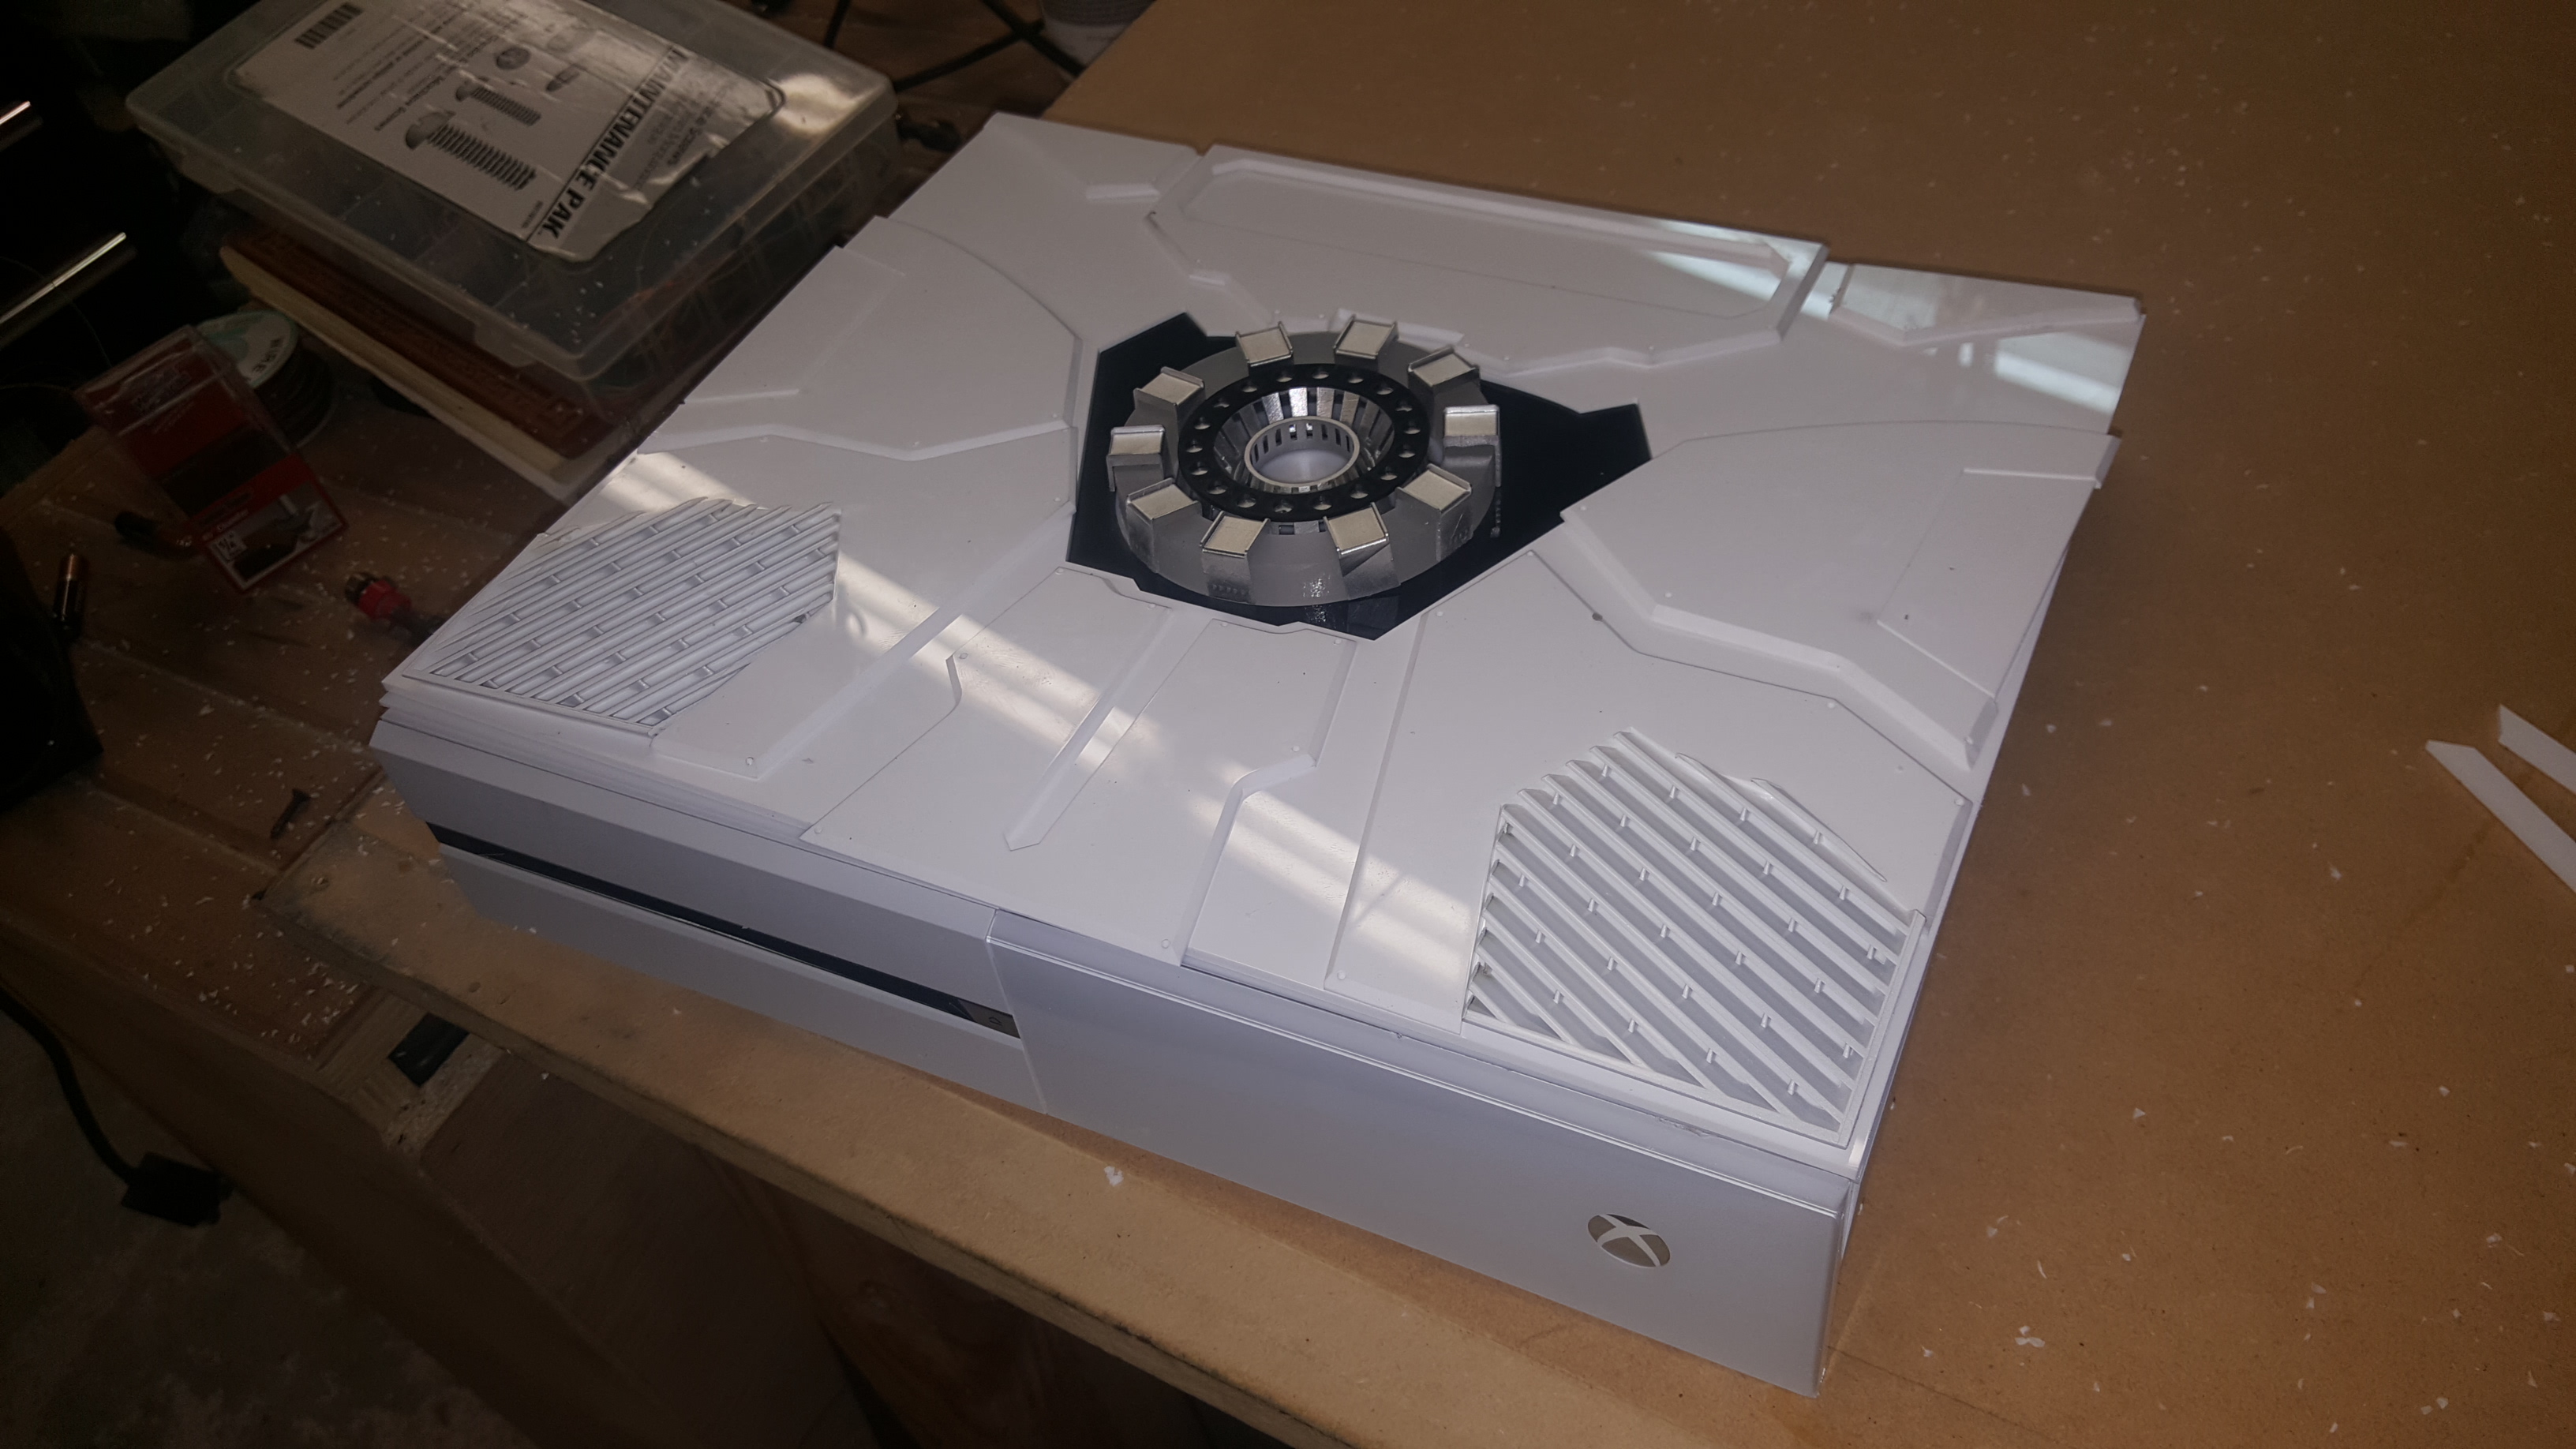
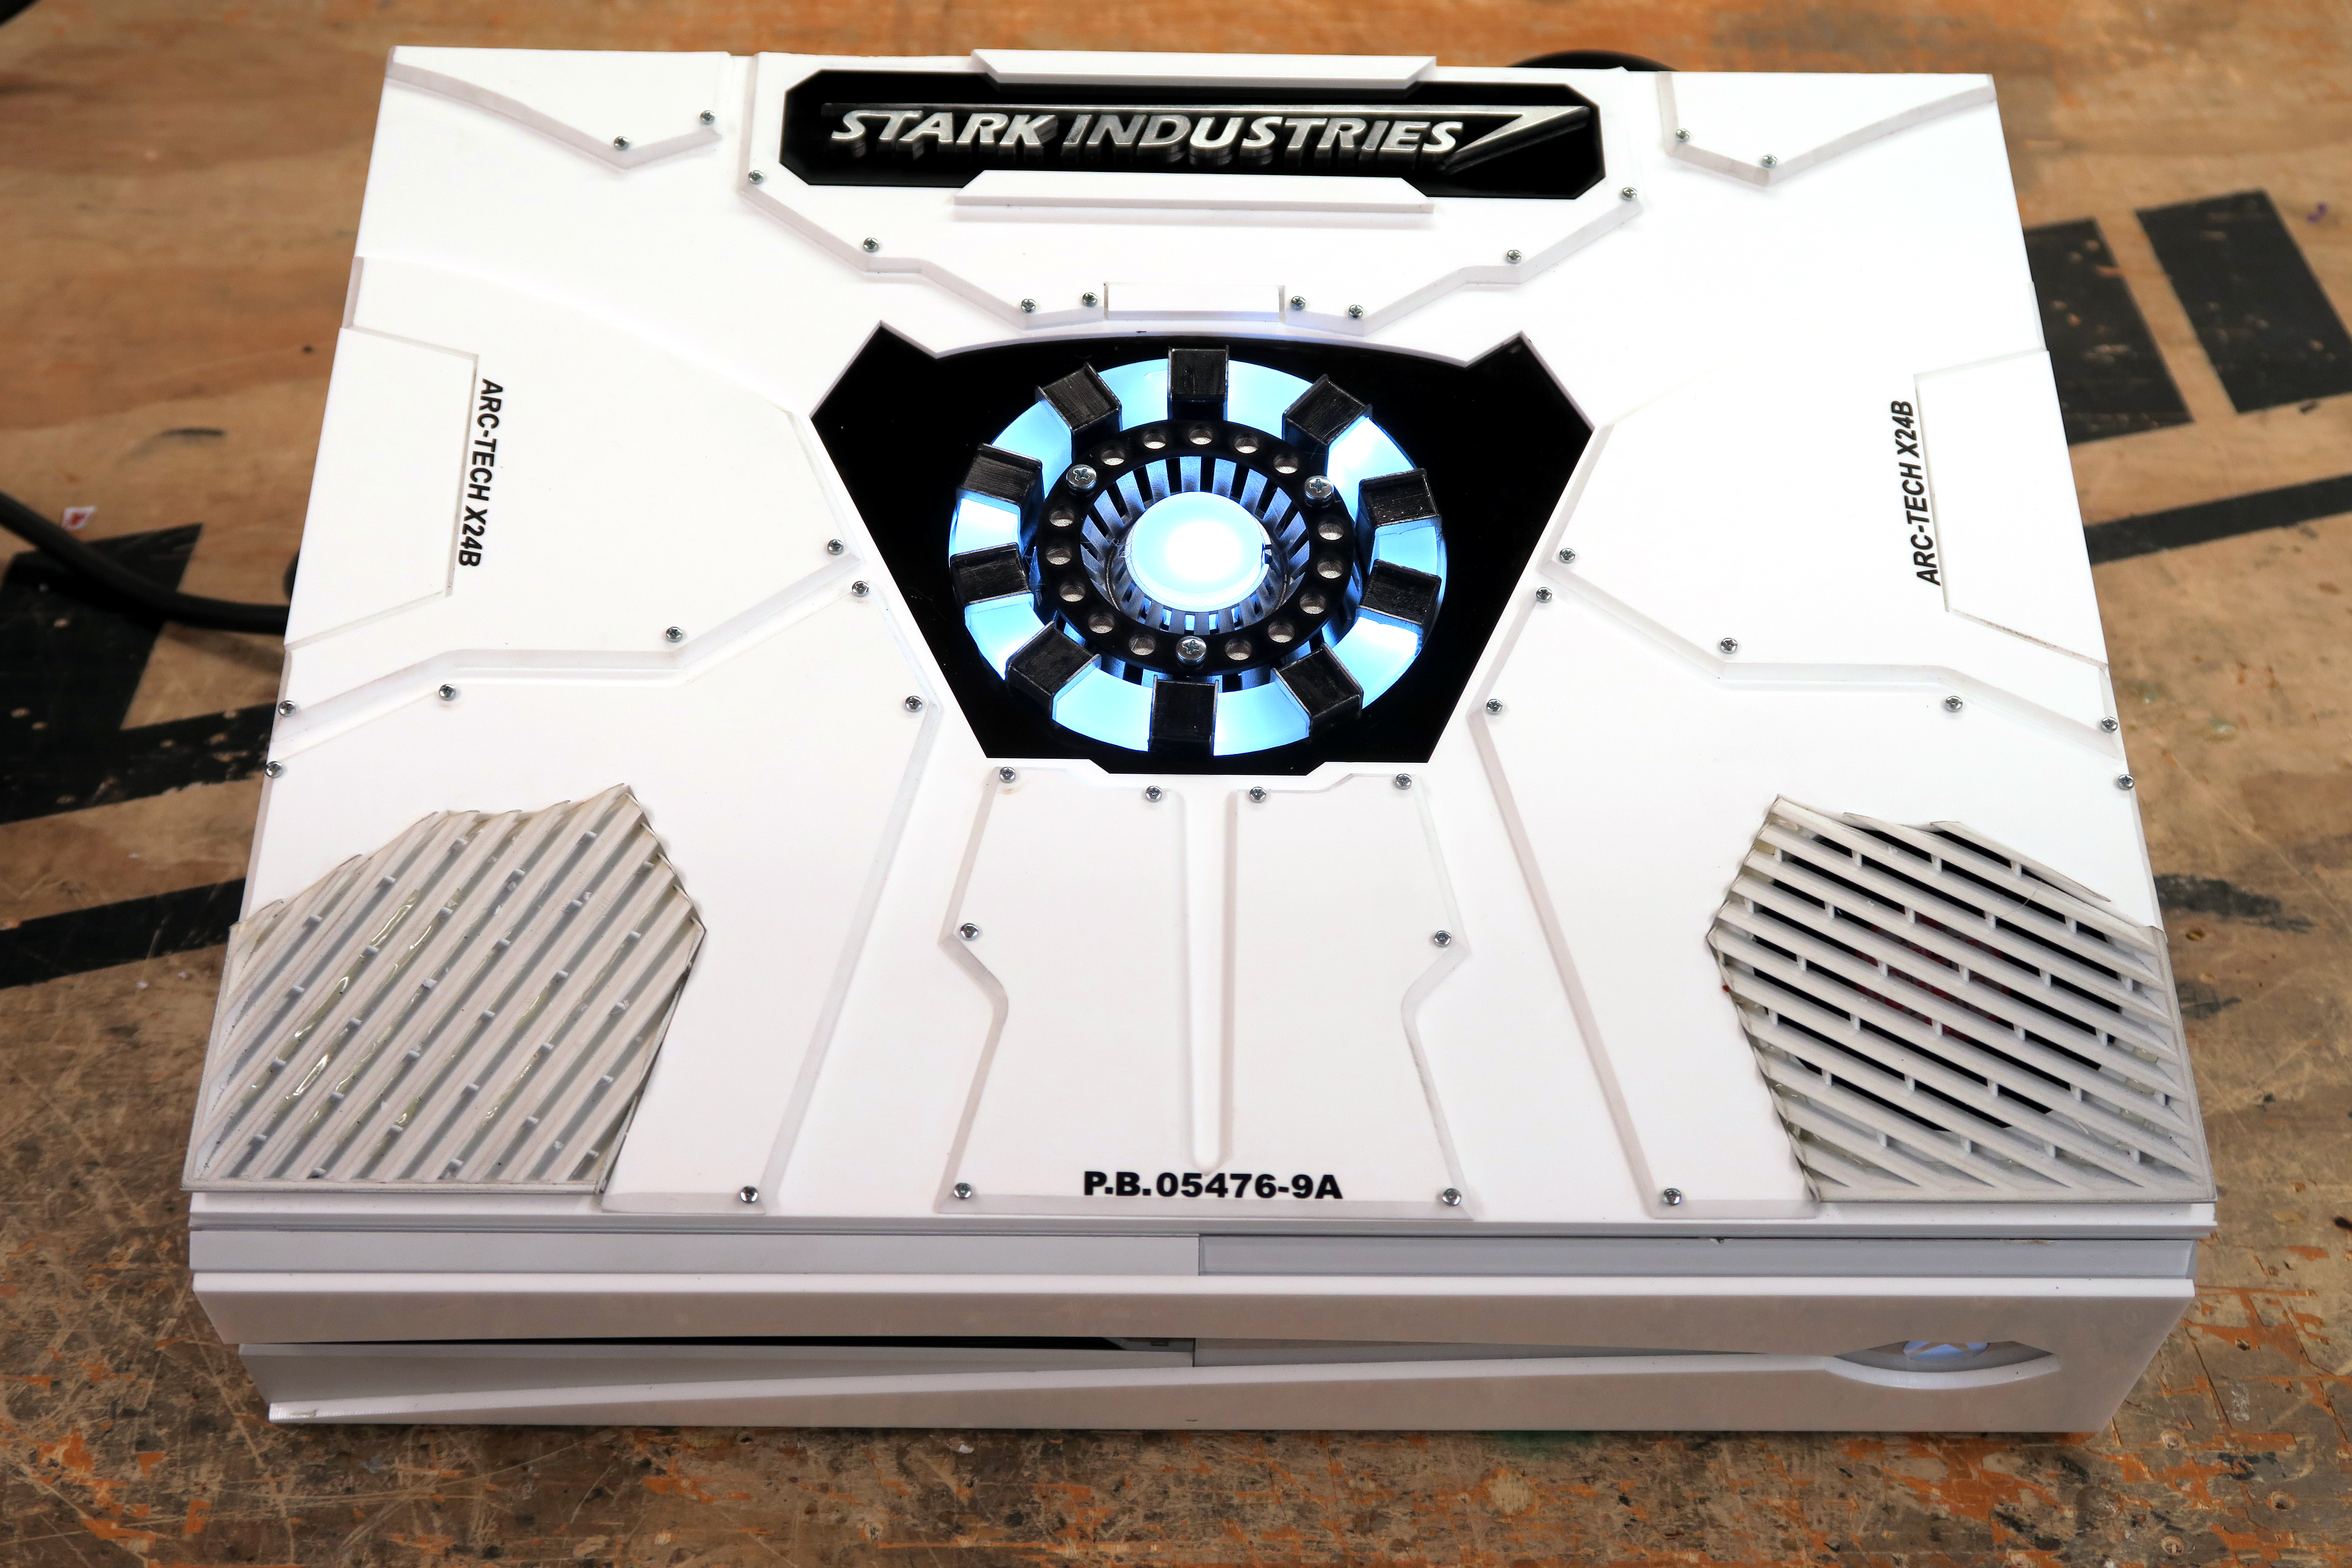
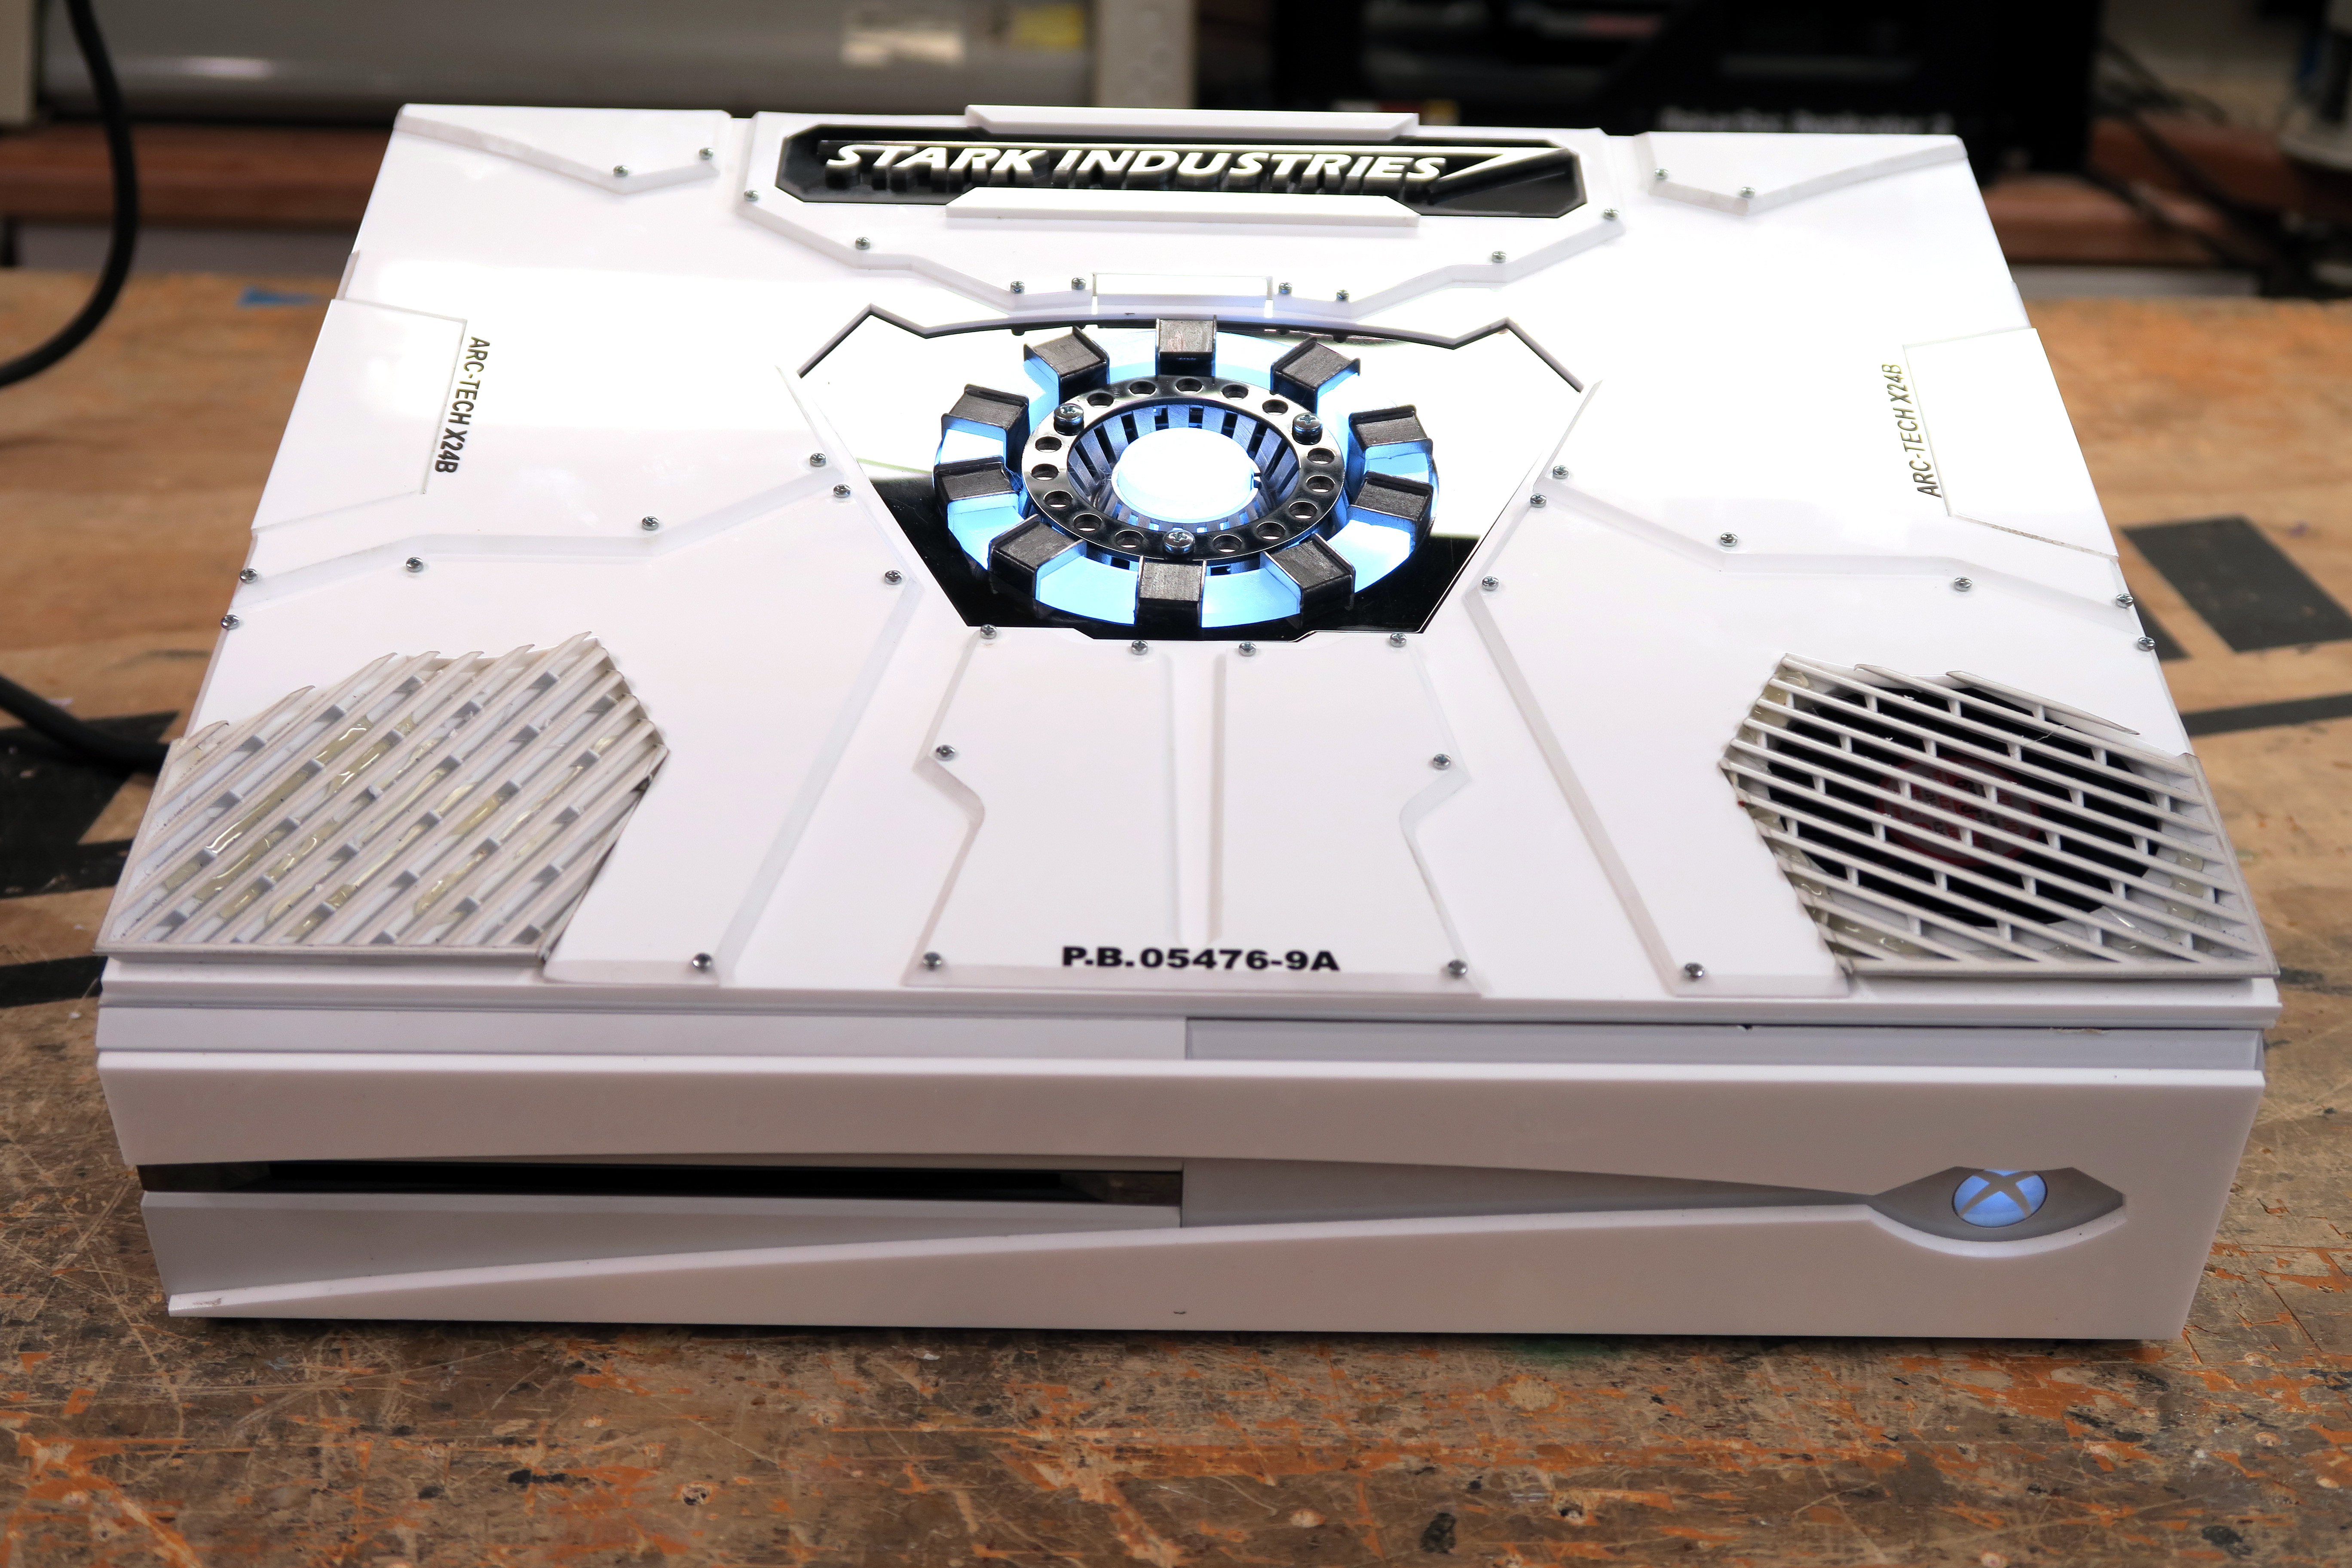
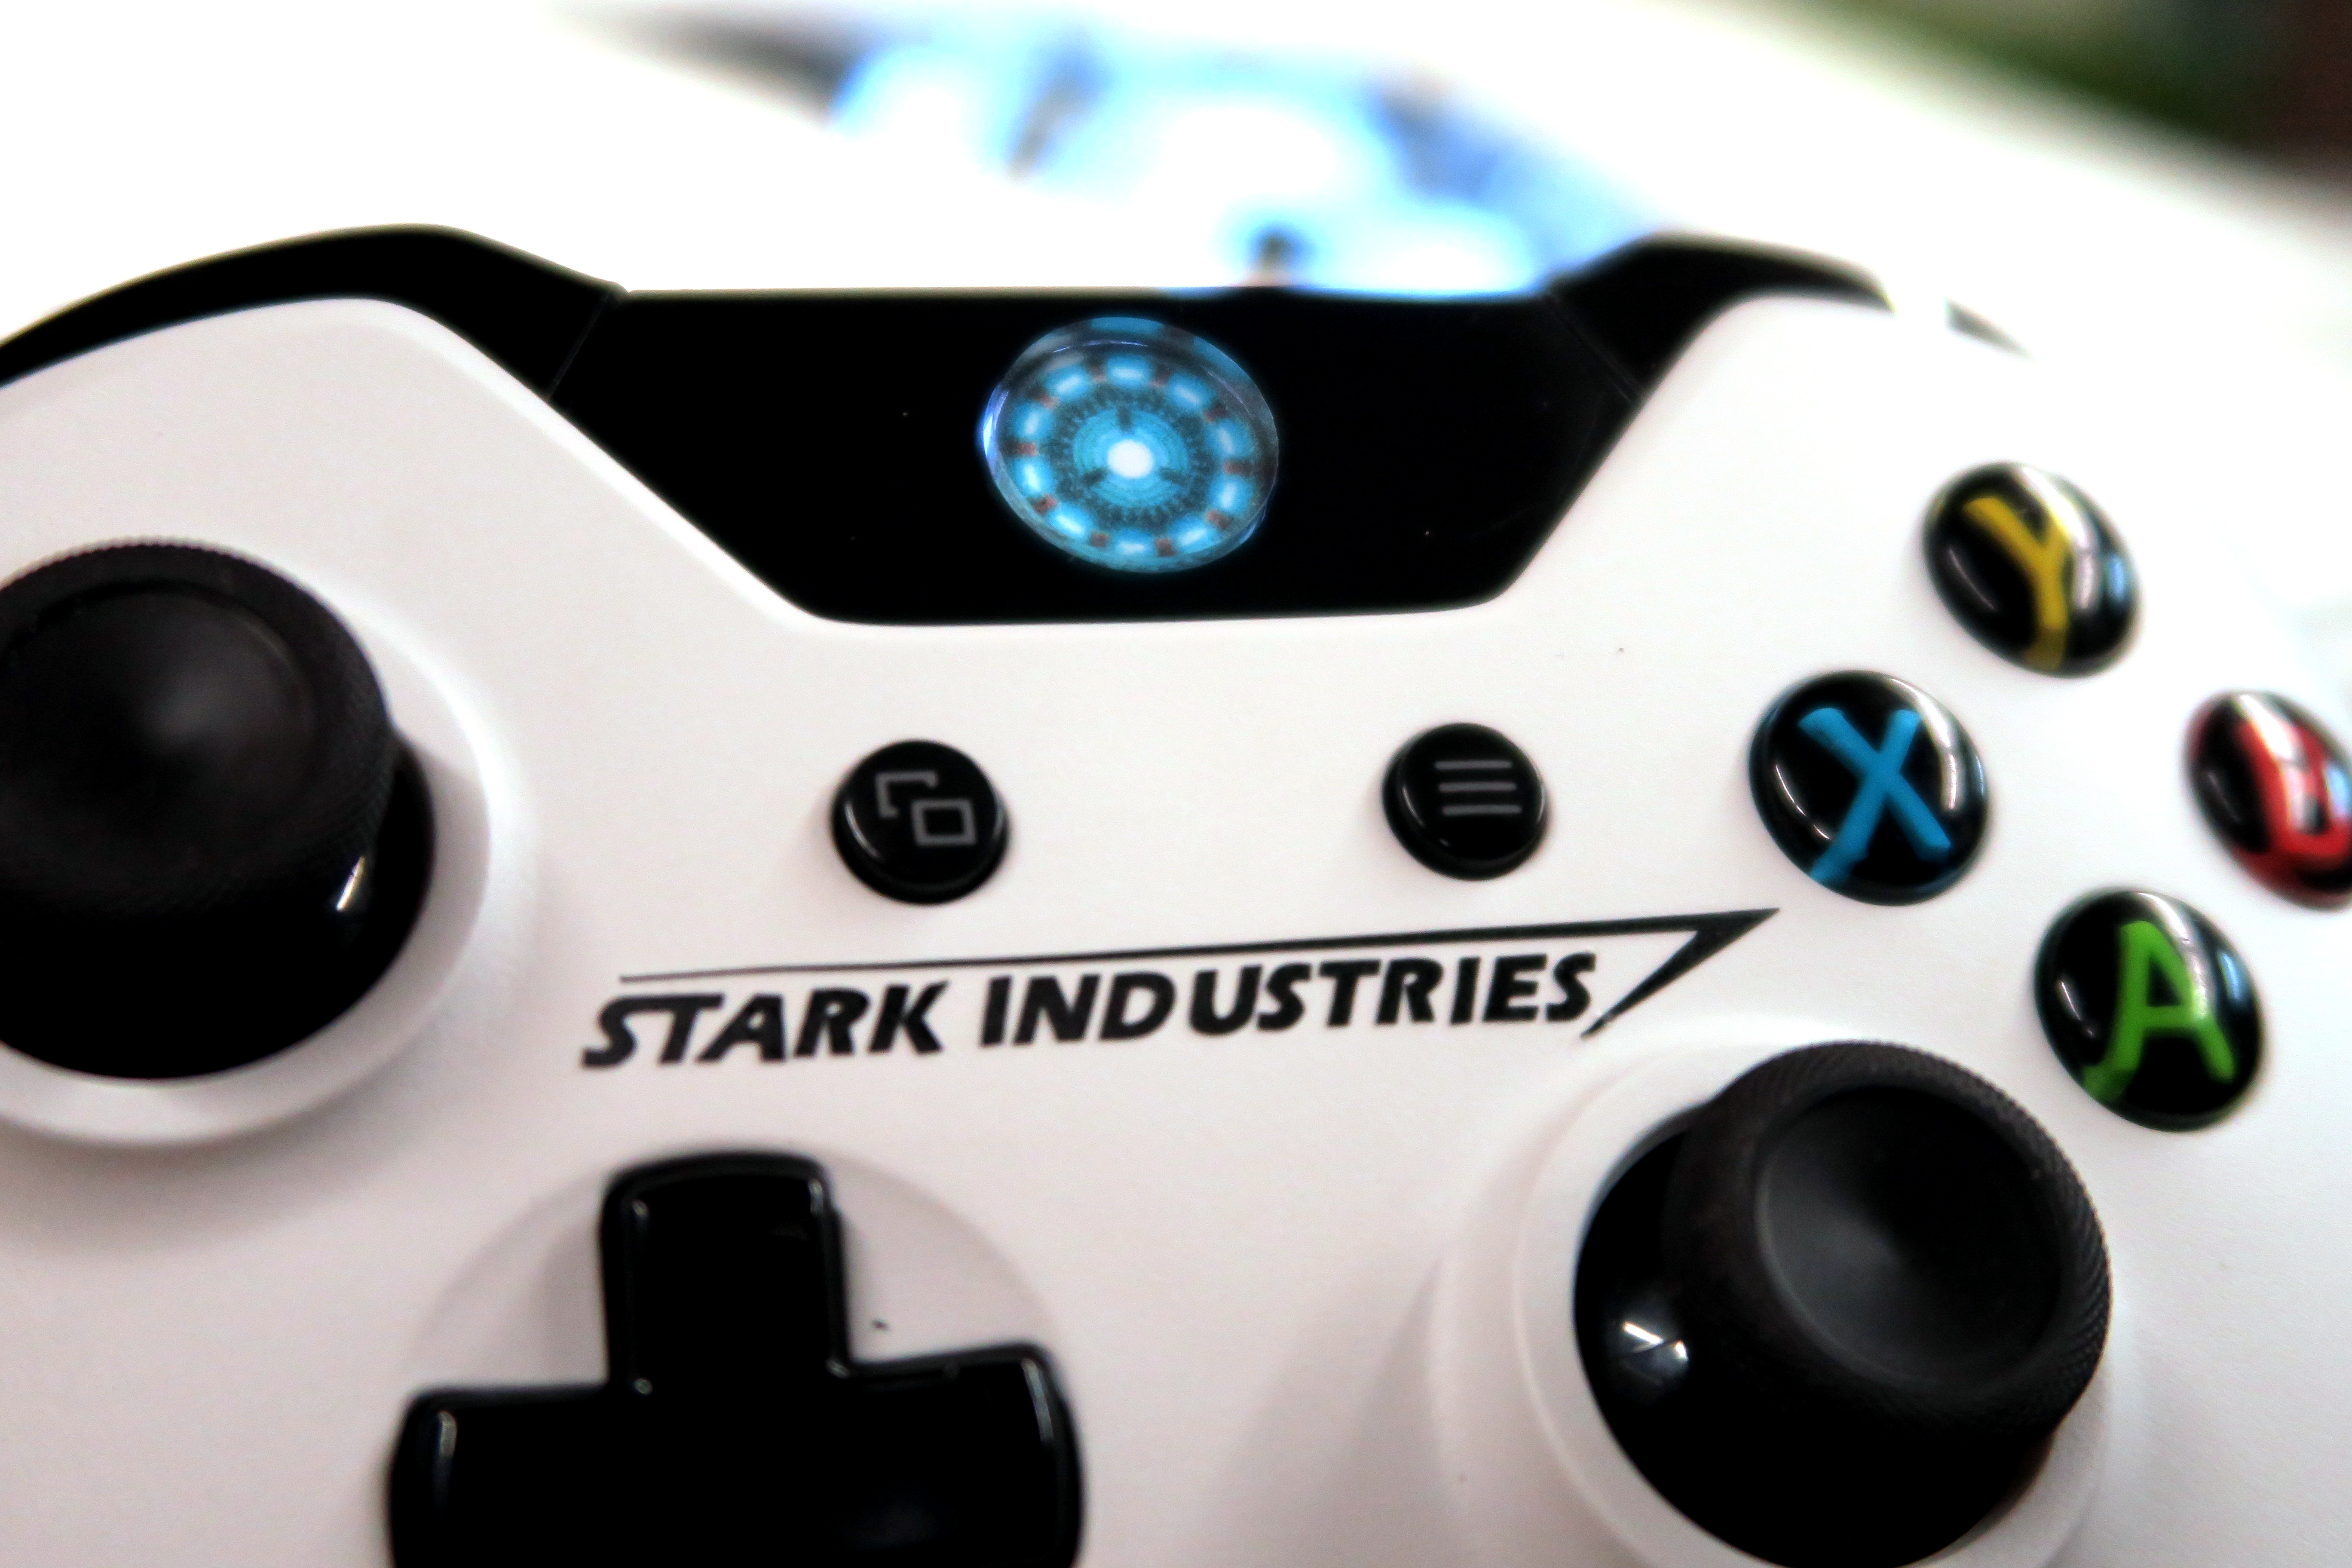
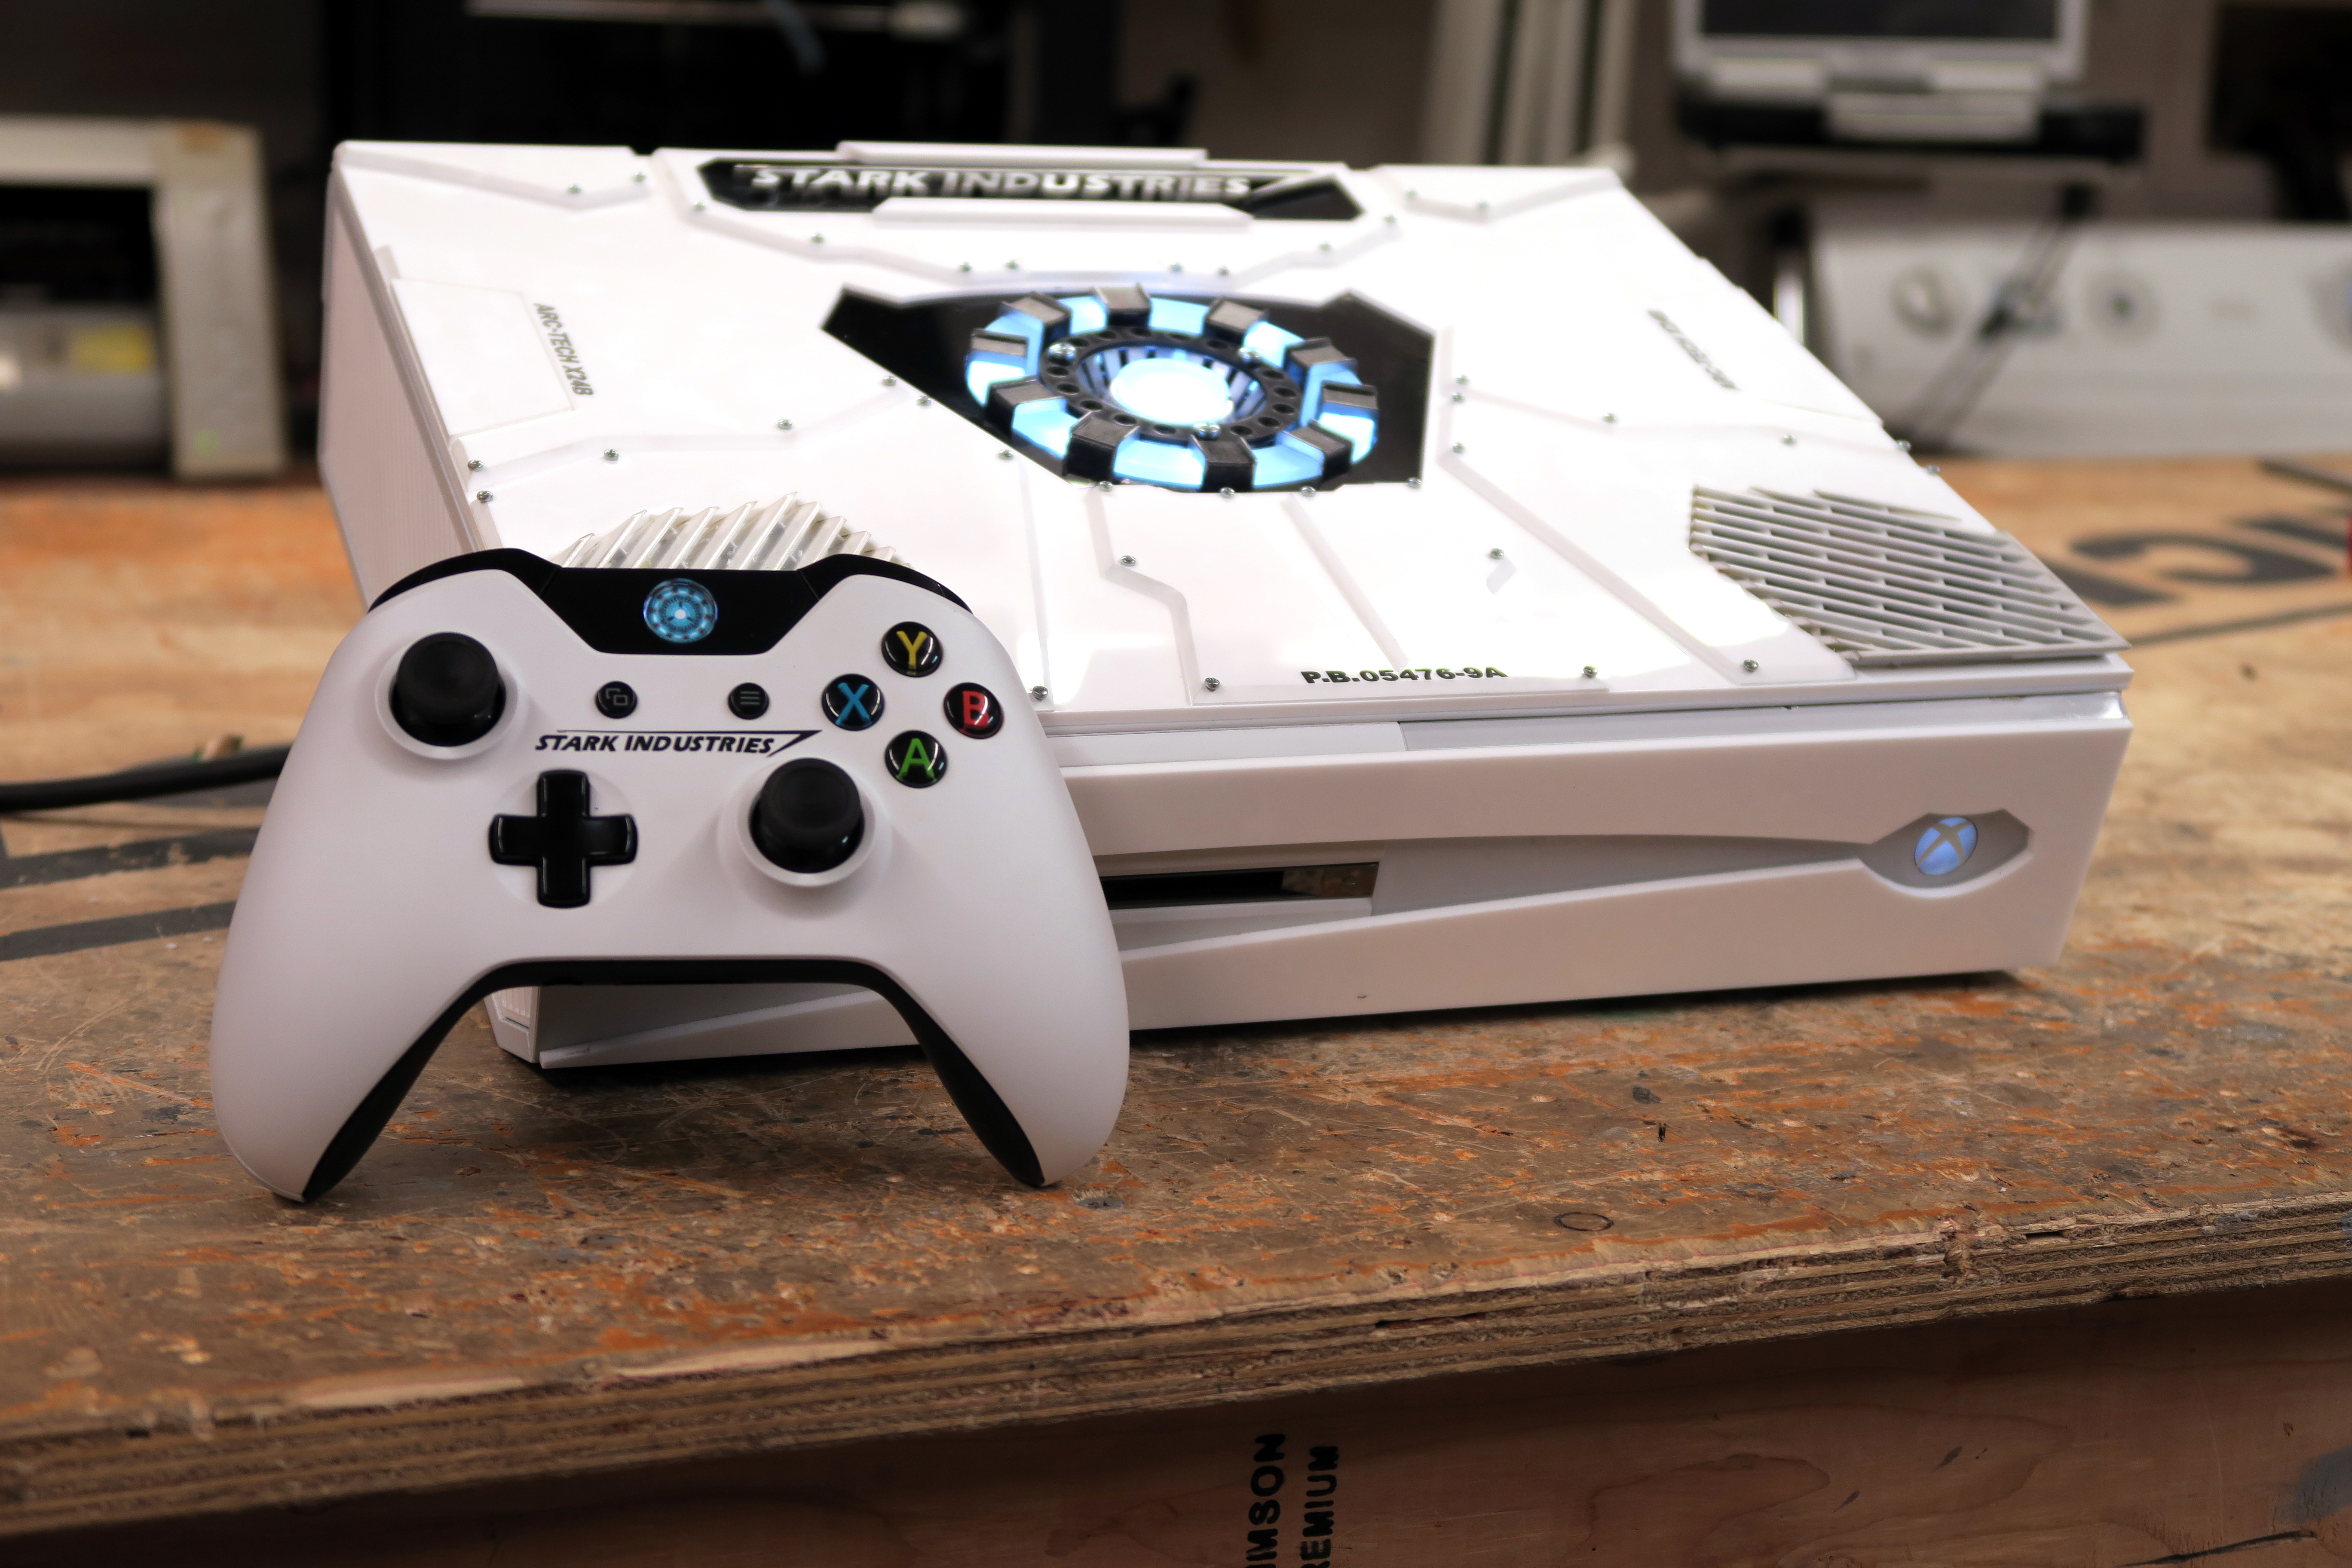
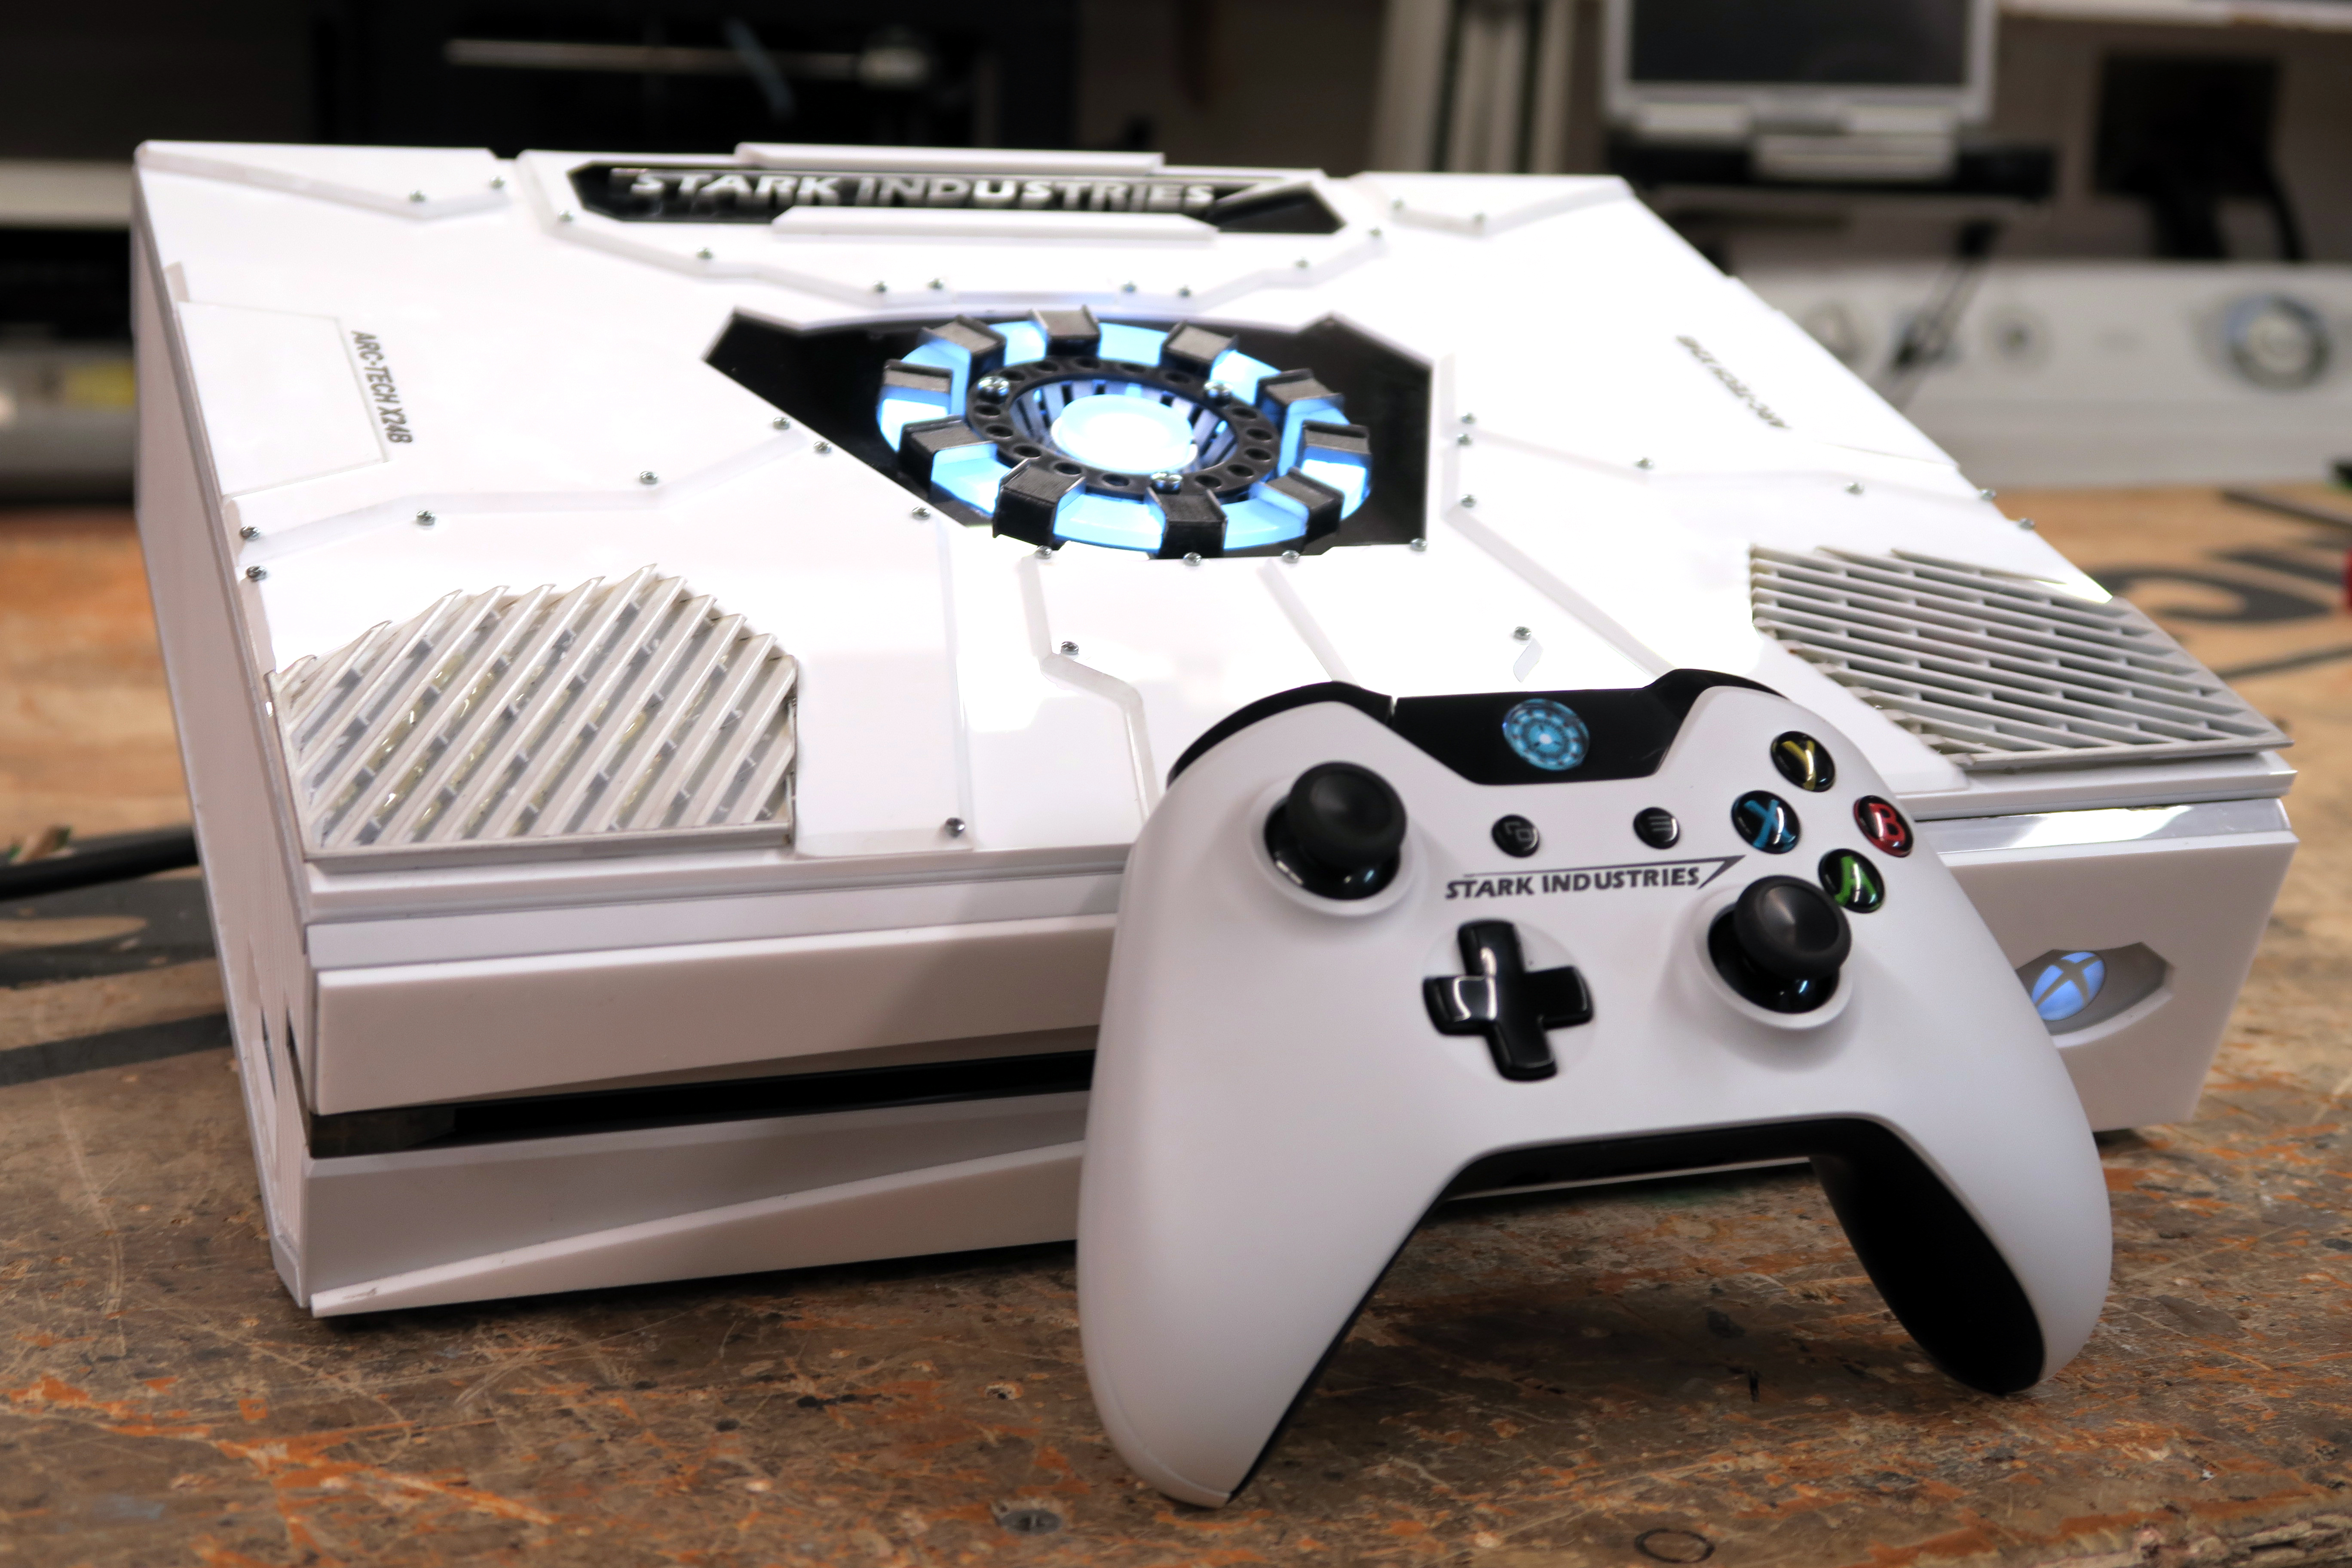
I am sure all of you have seen that gorgeous Stark Industries XBOX ONE that was a giveaway over seas somewhere and was unable to buy… The one that was a tease and made you want something you just could not have… No? Well here it is…
This was an amazing XBOX ONE that was stated to be designed by “Tony Stark” himself. I mean, he is the only one with a chest sized arc reactor correct? Well this XBOX was almost as unobtainable as an Arc Reactor itself. It was a giveaway and could not be purchased. Well.. I wanted to make one myself and see how close I could get to it!
I purchased a white XBOX One (not a slim model, since the original wasn’t a slim) and got to work designing the system. The first problem was of course not having a huge vent on top for airflow. I am still not exactly sure what they did to solve that problem, but I had my own ideas. You can see in the video above everything I went through to figure it out. I basically installed 7 fans to make up for the one large stock fan. 6 of them directed air from one side of the heat sink to the other. They 7th was a larger fan that I had to push air out the bottom right vent that was part of the design.
Now I started to design the acrylic and the Arc Reactor. This was pretty straight forward as I simply used Adobe Illustrator to redraw all of the shapes. The Arc Reactor was designed in 3D and printed as well. But the bottom vents were interesting to me. I could of course 3D print them, but after looking at the original I realized they simply cut the stock XBOX ONE Vent into the right shapes. So thats what I did. Threw it into the laser cutter and it fit perfectly into the design (I did have to repaint them since the laser left an ugly burn on the plastic.
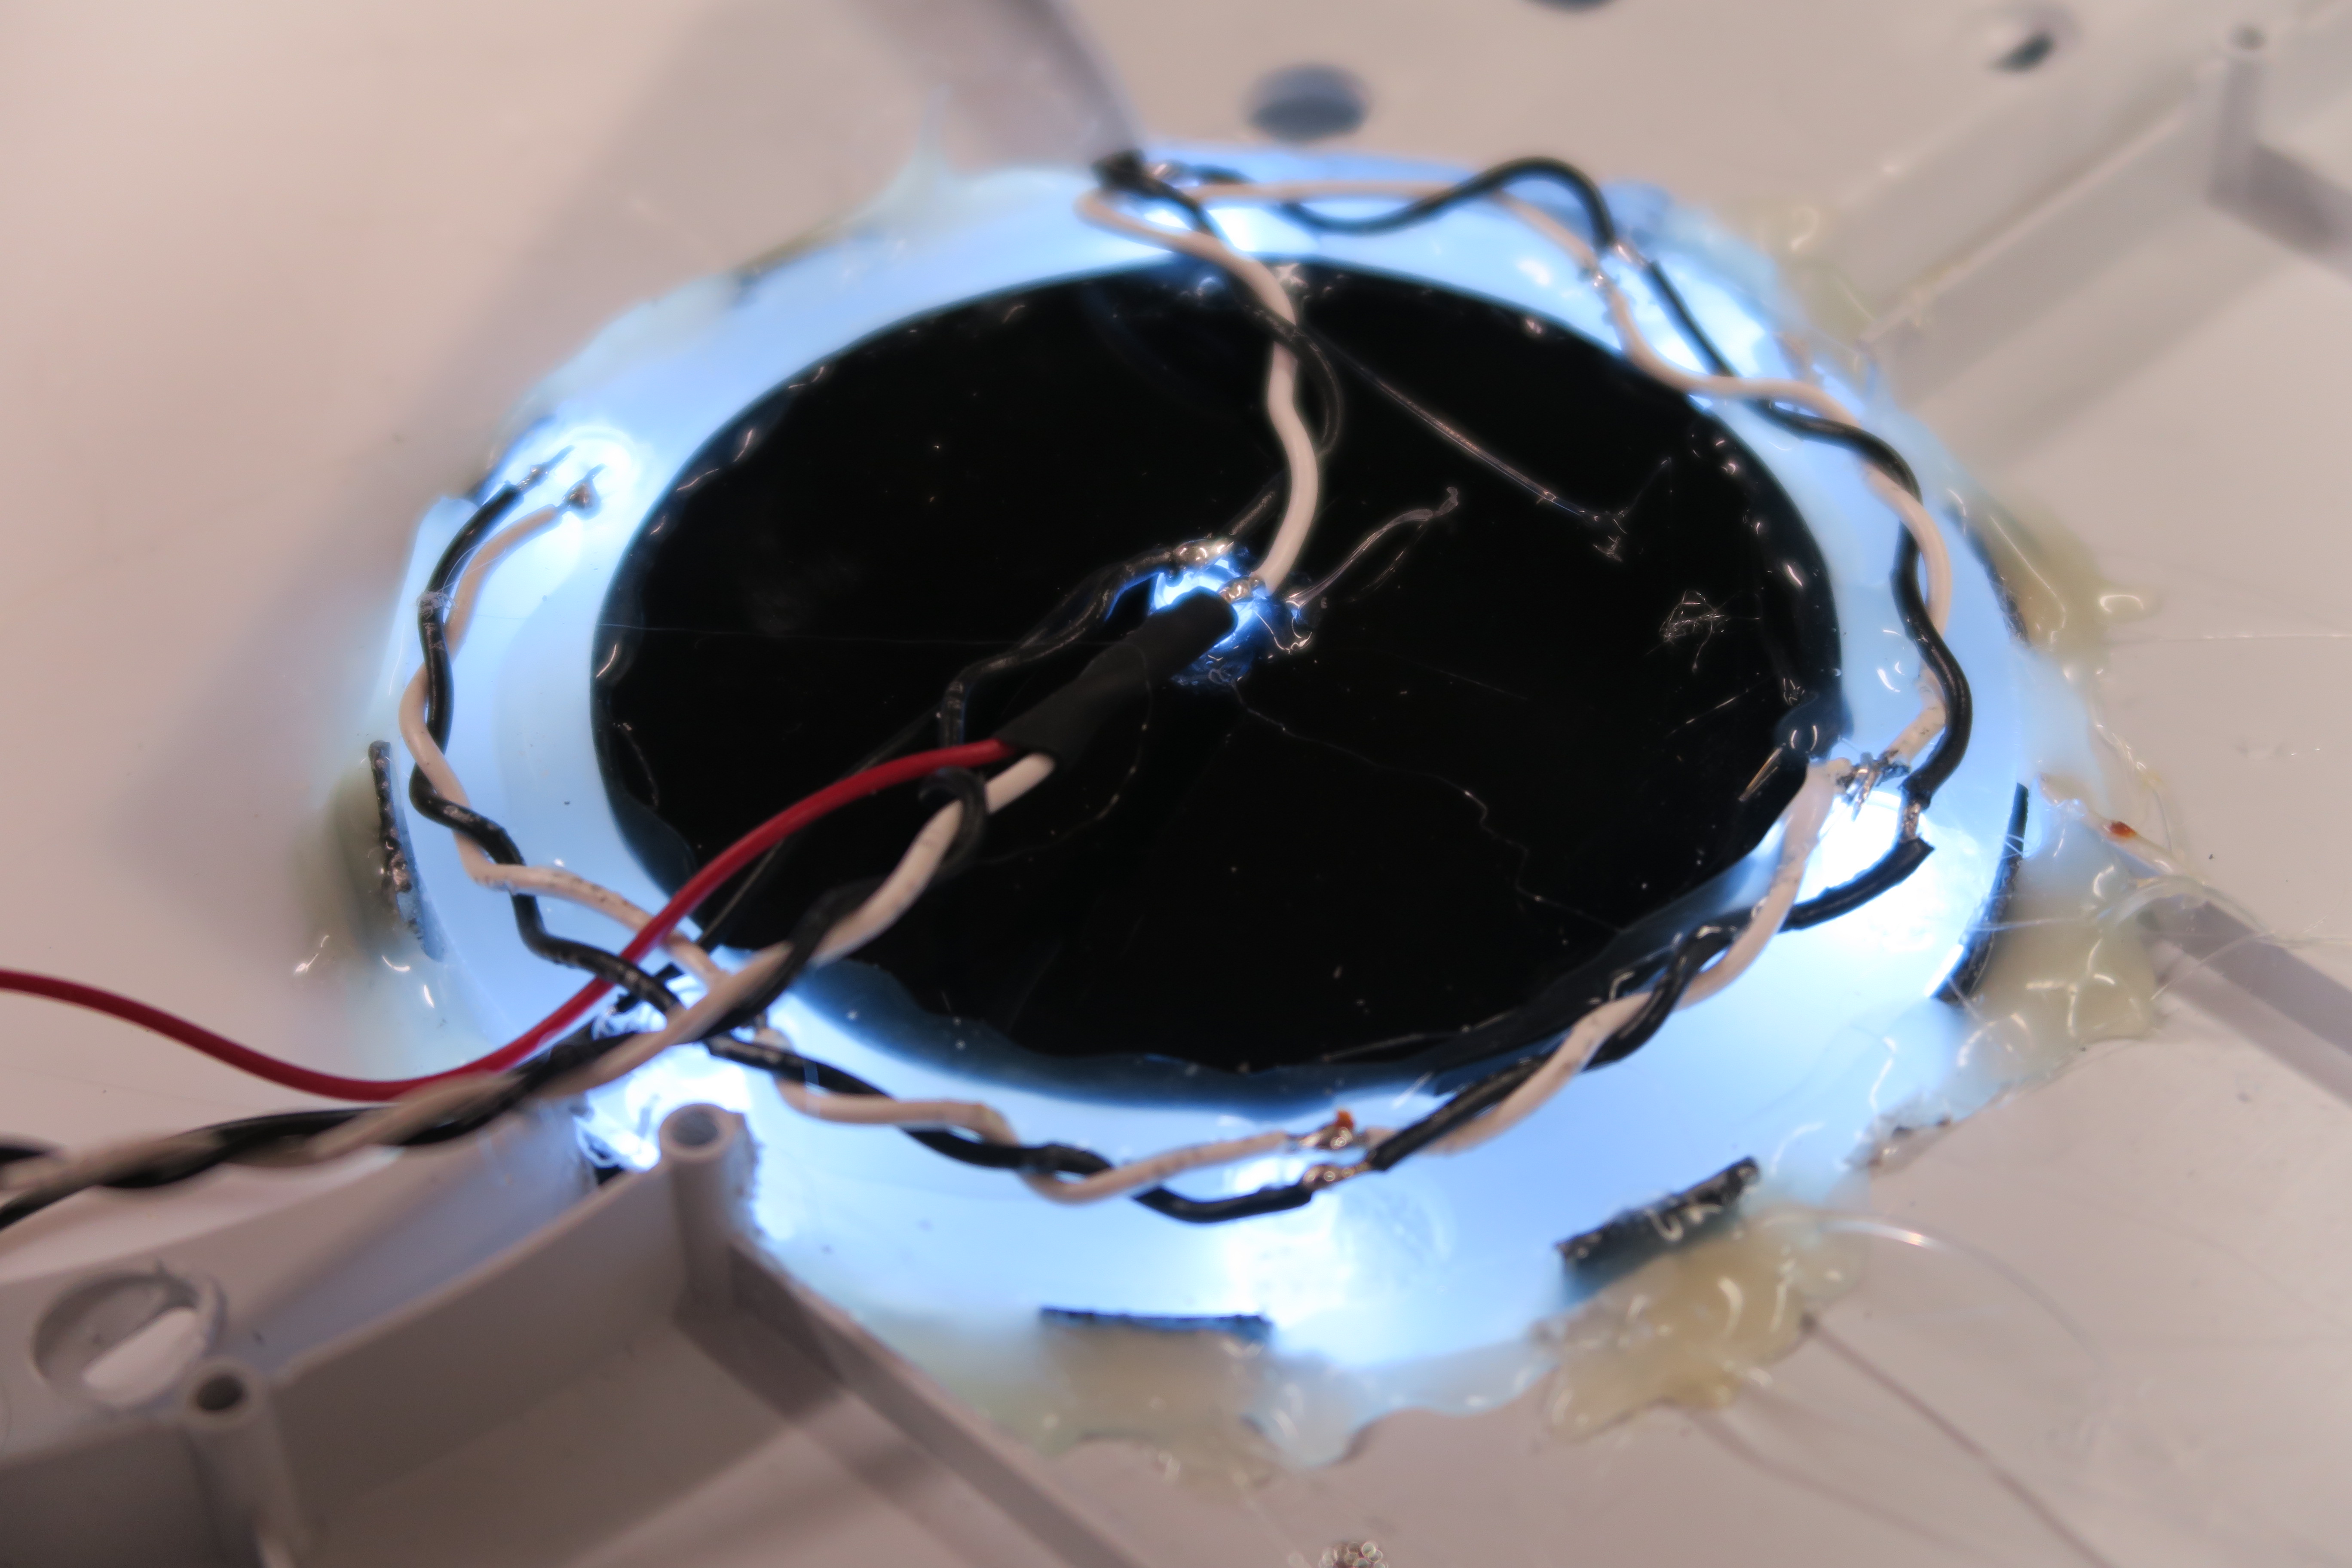
After making sure all of the parts would fit nicely on the system, I went ahead and started glueing them using an acrylic solvent. This basically chemically bonds the material to itself. I then put in the screws that were more for looks than practical. The Arc Reactor was painted up, LEDs installed and inserted into the middle. I used 12v power from the fans to power the LEDs.
Once it was all put back together, it looked IMO, almost exactly what I would suspect the originals to look like. It had a nice white mirror finish with the Light up reactor and metallic Stark logo on the top. It was almost perfect… Only needed now to figure out the controller!
The controller wasn’t to bad. The Stark logo on it was a simple vinyl decal. Now it was pretty small and I had a hard time getting my machine to cut such a small logo, but it work. The interesting part was the small arc reactor that replaced the Microsoft XBOX “X” power button on it. After removing the internal plastic button, I ground it down and basically sandwiched a small print of a reactor in between it and a small acrylic circle. It was a success!
All in all I am pretty happy with this console mod. It was nice doing something different than my standard laptop mod. It all came together nicely and I think it looks pretty dead on.
*PLEASE NOTE* I am in no way affiliated with Sony or Playstation. The PlayBook is simply a console modification for a Sony PS4. This is not a licensed Sony Product and should not be confused as such. It is a custom made item by EdsJunk.
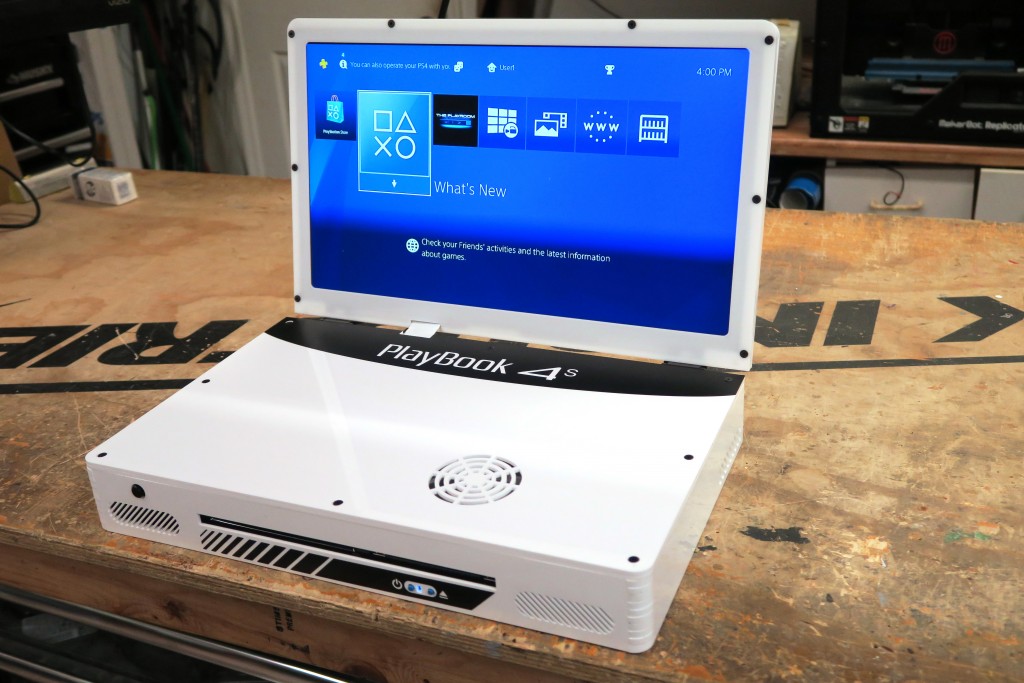
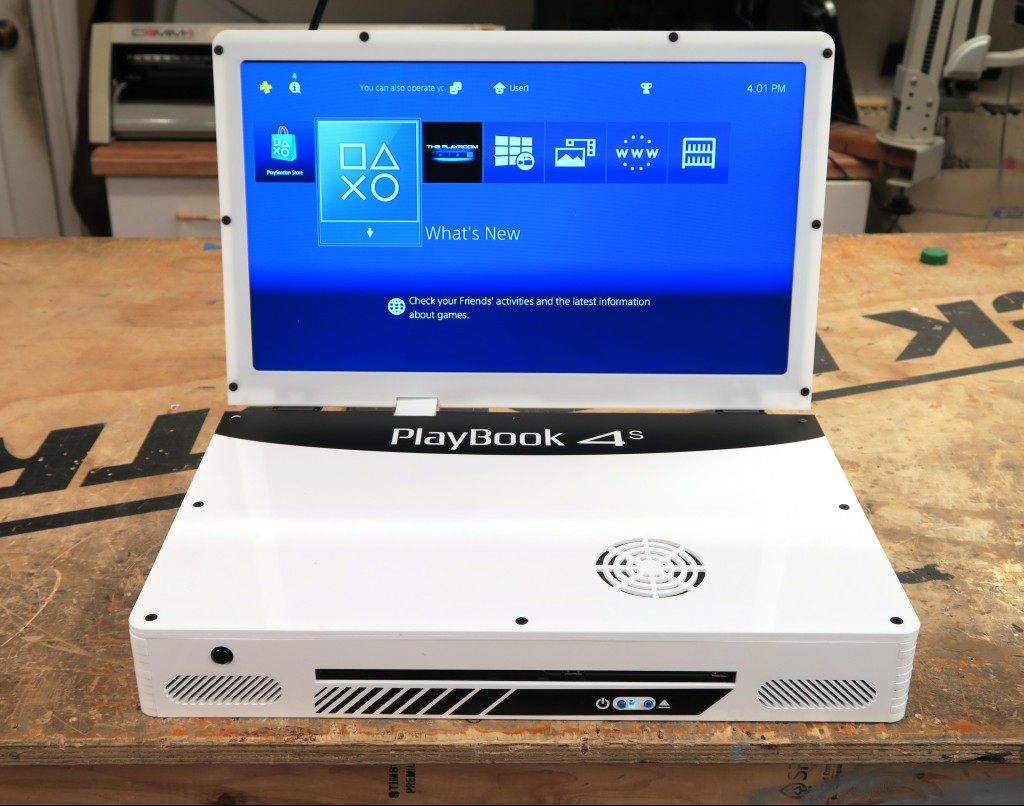
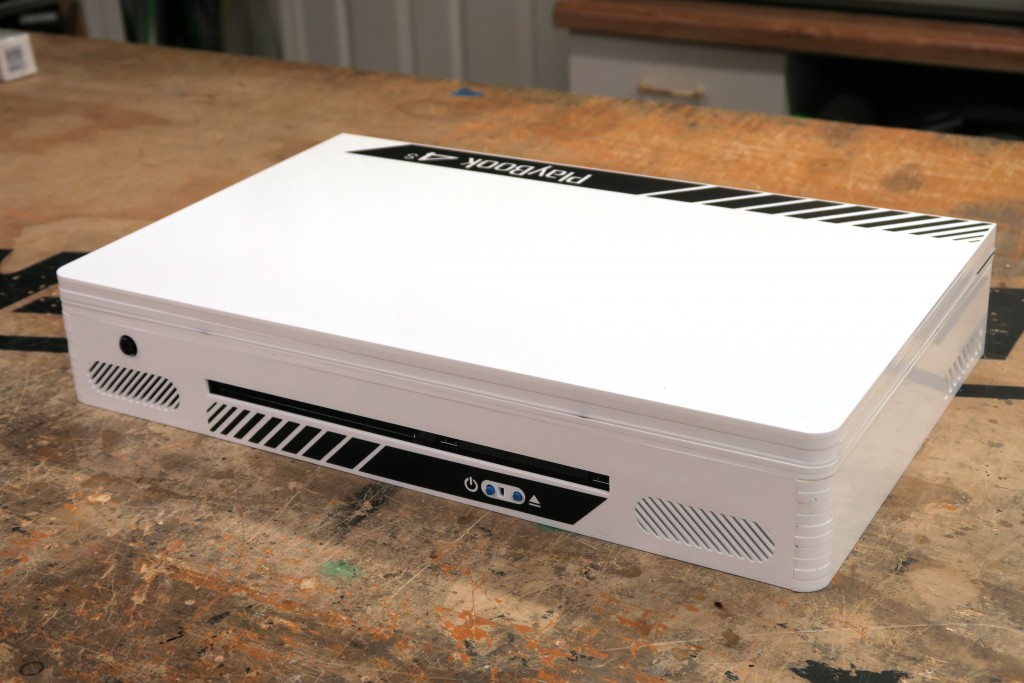
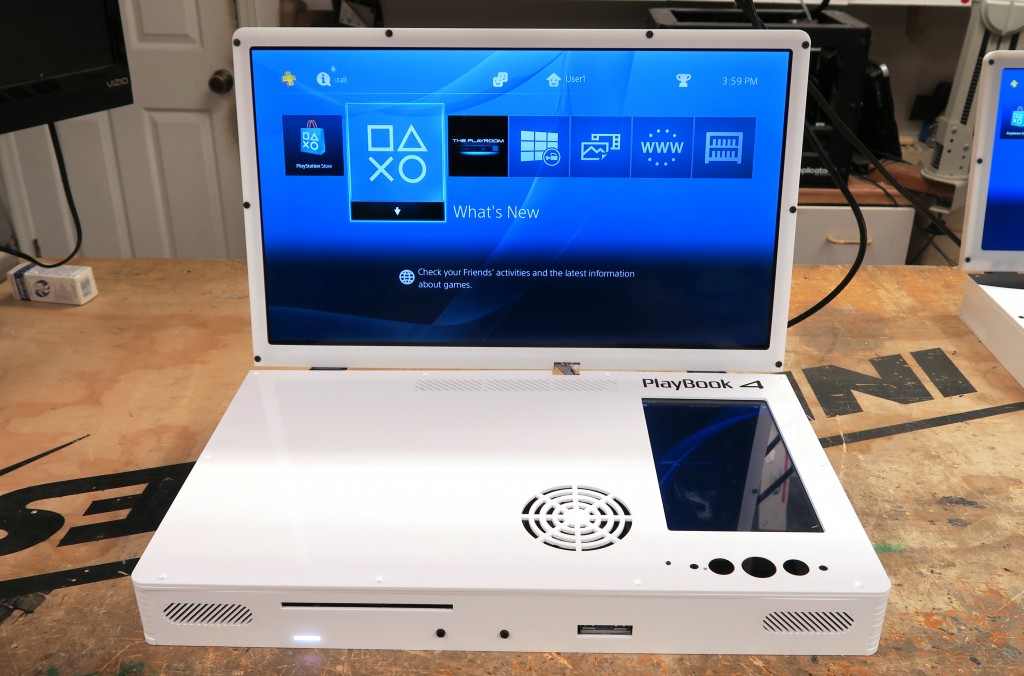
Well for all of the Sony Fans out there, the wait is over! I now introduce the PlayBook 4 Slim! The new 19″ LCD portable PS4 Laptop by EdsJunk! This thing is not only sweet, but practical and has really been a fun project to work on!
So I have been making these for about a month or so now trying to figure out exactly how I was going to come up with it. I took a lot of what I designed for the XBOOK ONE S and redesigned it to fit the new PS4. It ended up, like the XBOOK, very portable and clean.
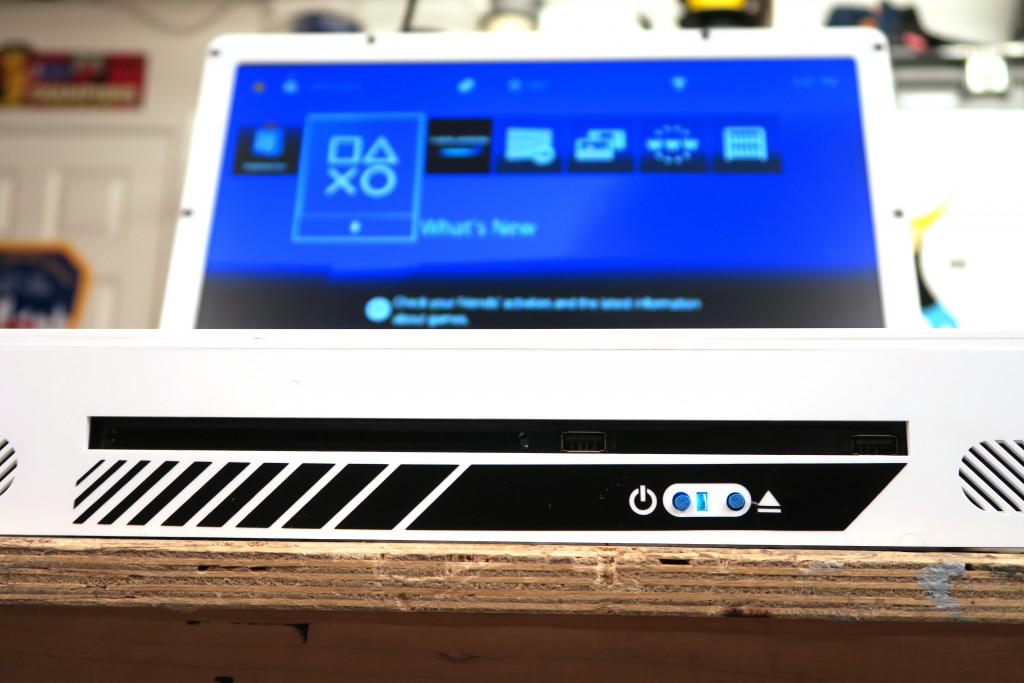
Once you open up the PlayBook 4 S you will be surprised at how big the 19″ screen actually is for the size of the system. I tried my best to keep as small as a bezel as I could around the LCD without compromising the integrity of the case. The screen sits at a good height while the hinges provide enough tension to be able to adjust the angle of the screen as you wish. Below you will notice a couple of stereo speakers and TV control along with the BluRay drive, 2 USB and a power and eject button.
The speakers provide loud crisp audio, while the small black TV controller button allows you to adjust the volume along with other TV settings, like brightness and contrast. The screen is HD, but only supports 720p. Unfortunately it is next to impossible to find 1080p screens in the 19″ size. But, the HDMI in the back will support full 1080p output to your external Big screen at home!
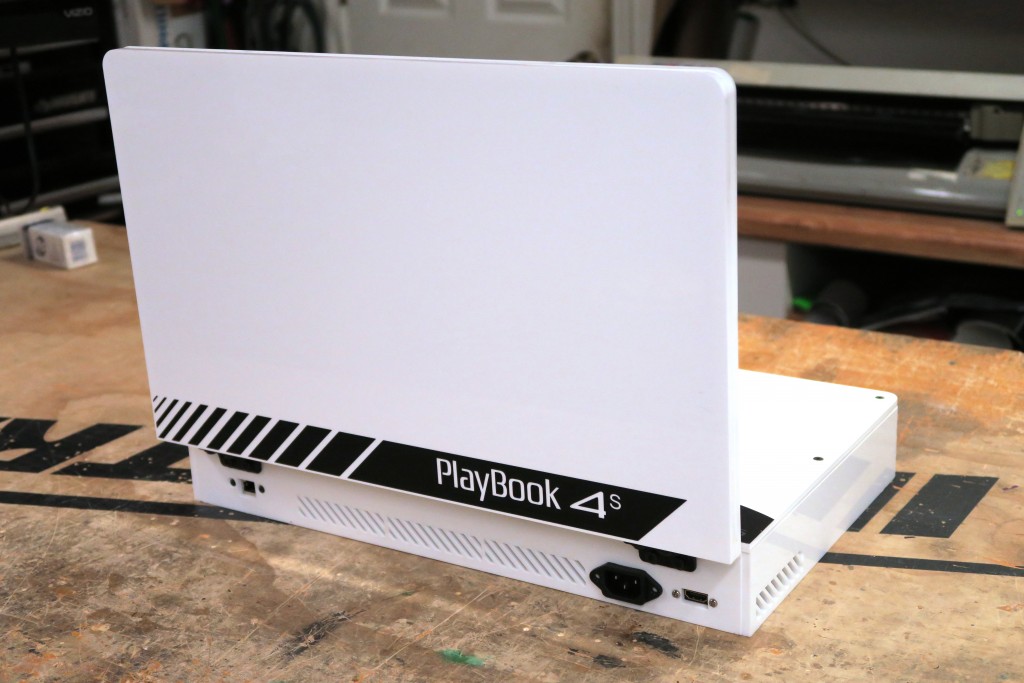
On the back of the system you will notice more air vents to keep the PS4 nice and cool. On either side of the vents you have a ethernet port for wired internet access (and yes, Wi-Fi still works just fine!) and then power and HDMI out. The HDMI out is great for still being able to use the PS4 on your large screen when your at home. Please note, when using it at home, you can turn off the LCD and still get HDMI out, also you must keep the screen open for the PS4 to keep cool.
So can you get one of these PlayBooks? Of COURSE! I build these to order and you can have your own custom PS4 that you can not get in the store! Make your friends jealous when you have your PS4 on trips and they don’t! Although you can still share 😉
You have some options for your custom PlayBook. First off, you may choose either white or black for the main case color. Then you can also choose the color of the accents, for those pretty much any color can be chosen. Also I will offer to put your Gamertag on the system if you choose. After you place your order, please email me the details of your system. Also you may put in the colors under the notes section of PayPal. If you want a custom themed PlayBook, you will need to contact me directly as pricing on those system is more.
Also New to this system is the ability for it to be used overseas. The internal components are all rated at 110/220v power so there should be no need to used a step down transformer for this. Please note over seas shipping is much more than in the 48 states.
Pricing is simple. Here is the breakdown.
Complete PlayBook 4 System is going to be $1,495.00 plus shipping. If you want to ship me your PlayBook 4 S console, the cost will be $1,195.00. For a small fee, I will upgrade the HDD to a bigger size, price depends on size and if your looking for a HDD or SDD. Flat Rate Express Shipping of $150.00 to 48 US States Please contact me first if your international or at a APO or similar.
Heres how the ordering will work. Click the Paypal button on the bottom of this site and you will pay $750.00 upfront nonrefundable deposit. This gets your name put on the list (trust me, its gets full quick) and gets me working on your PlayBook. After its completed, you will pay the remainder and shipping and your PlayBook will be shipped out! Once I start on your unit, it will take 2-3 weeks to complete. There may be people in front of you, so be aware of that and it could take longer. If you have any questions at all, please go to my contact page HERE and send me a message! I will be in contact with you through the building process and will make it personalized for you!
So total is $1,495.00
Use Paypal to pay the $750.00 Deposit
Remaining due before shipped
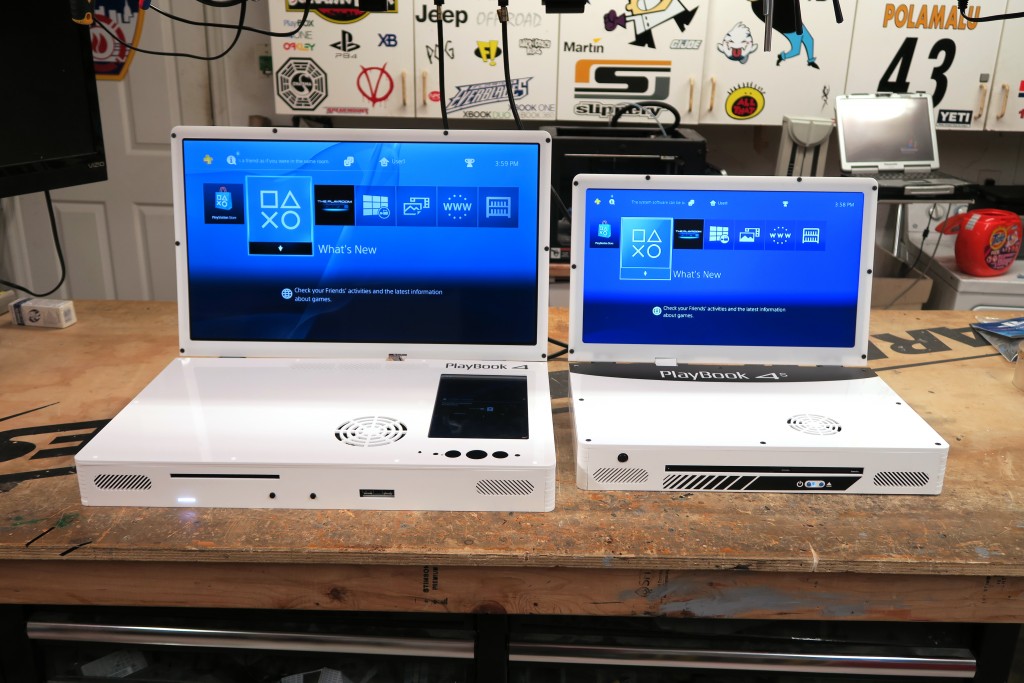
Here is also a peak at the PlayBook 4 Pro. I did this as a commissioned job from one of my clients. Has no detail work on it yet, still figuring that out. I don’t have these setup to sell right now. That being said, if someone is interested, we could do another commission for a 24″ PlayBook 4 Pro! Note that the price will be more than the slim system.
Inside this unit is a Sony PS4 Slim. The PS4 has not been altered in any way that would be illegal on PSN. It has no performance modification or enhancements. The PlayBook is simply just a plastic case that holds a PS4 inside with a LCD Screen. I am in no way affiliated with Sony or Playstation. It does not have a ps4 warranty as you loose the warranty as soon as you take a PS4 apart. I will guarantee it will not be DOA. It is non returnable as these are custom made for each individual buyer. Also, please note any overseas shipping may be subject to import tax for your specific country.
*PLEASE NOTE* I am in no way affiliated with Sony or Playstation. The PlayBook is simply a console modification for a Sony Playstation 4. This is not a licensed Sony Product and should not be confused as such. It is a custom made item by EdsJunk.
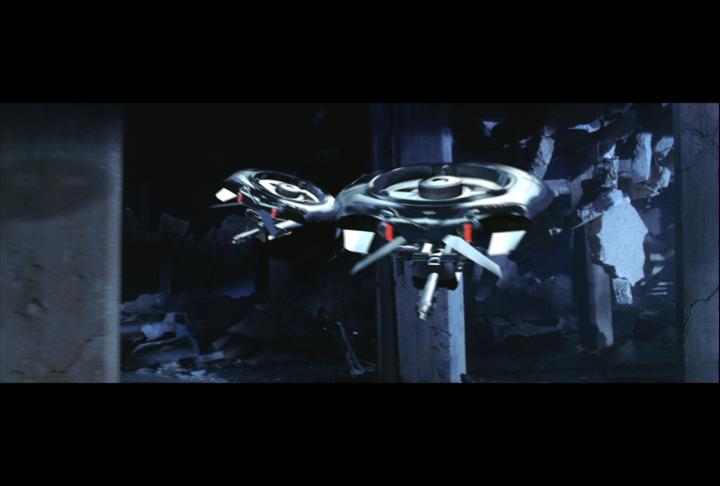
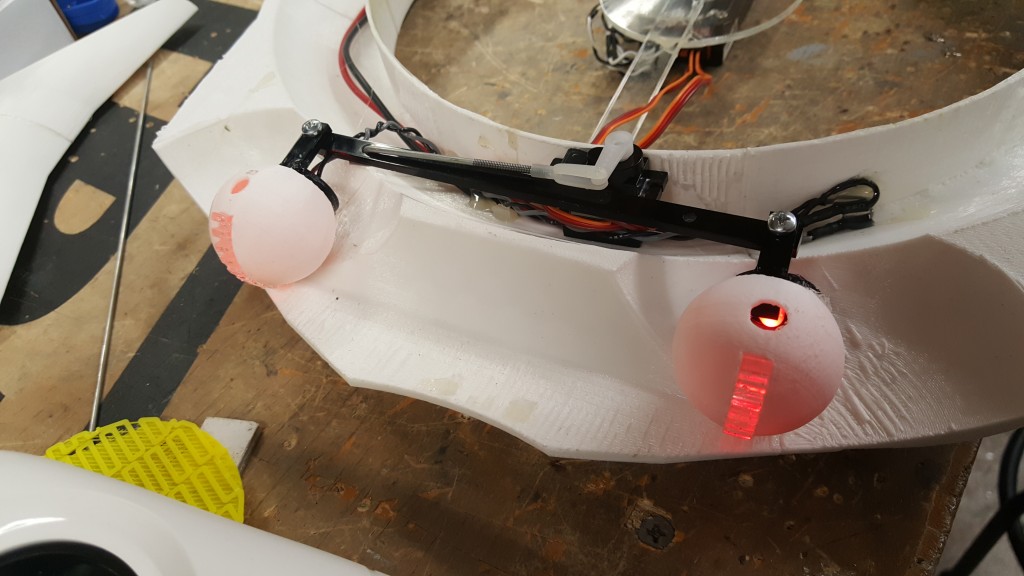
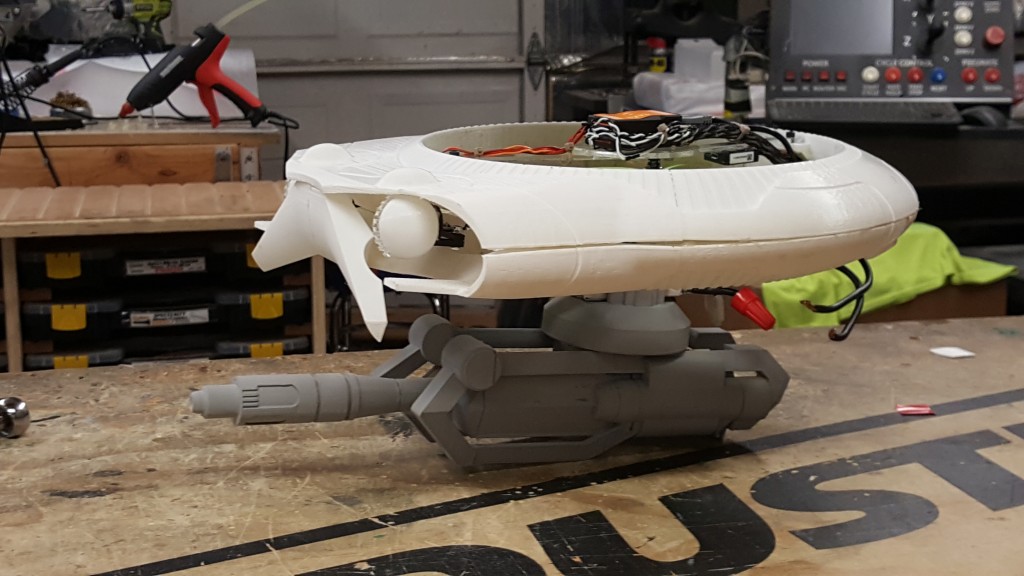
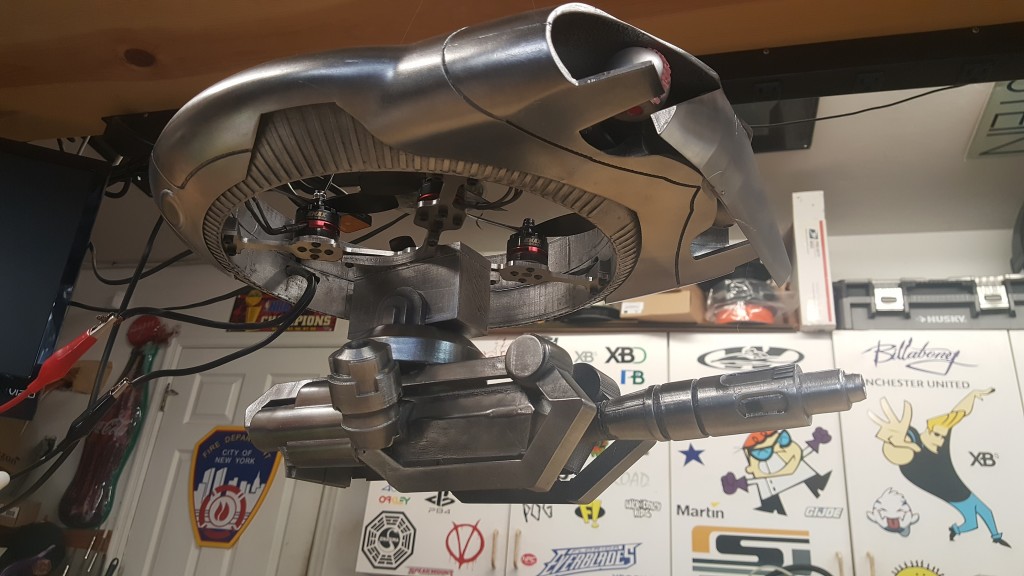
Is anyone else’s favorite movie series Terminator? I LOVE the Terminator story and can remember the first time I went to see the live action show in Universal Studios Orlando years ago. Great to see those killing machines in life! Something that struck my eye though was the flying mini-hunters. These were the 4 small drones that chased John Connor and the t-800 into the parking garage. Although they were easily destroyed by our favorite T-800, I still loved them. It was just recently that I visited Universal Studios again and thought, I may be able to build one of these, 3D print it and then actually make it fly… Well so I did.
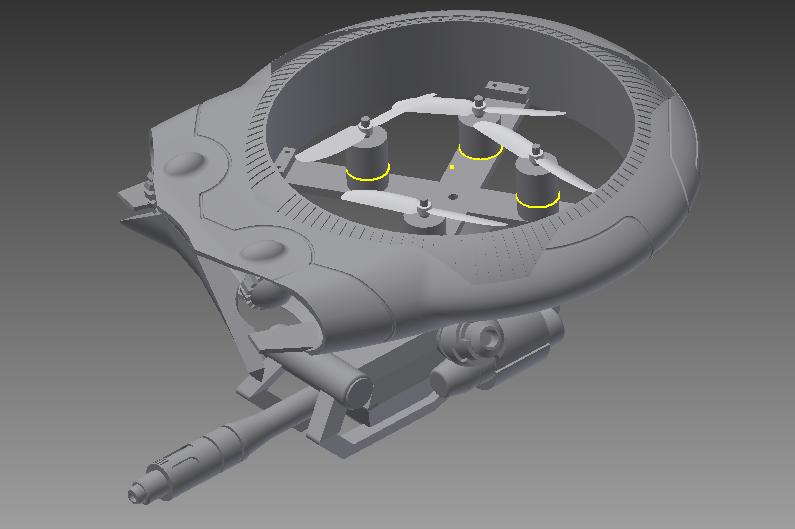
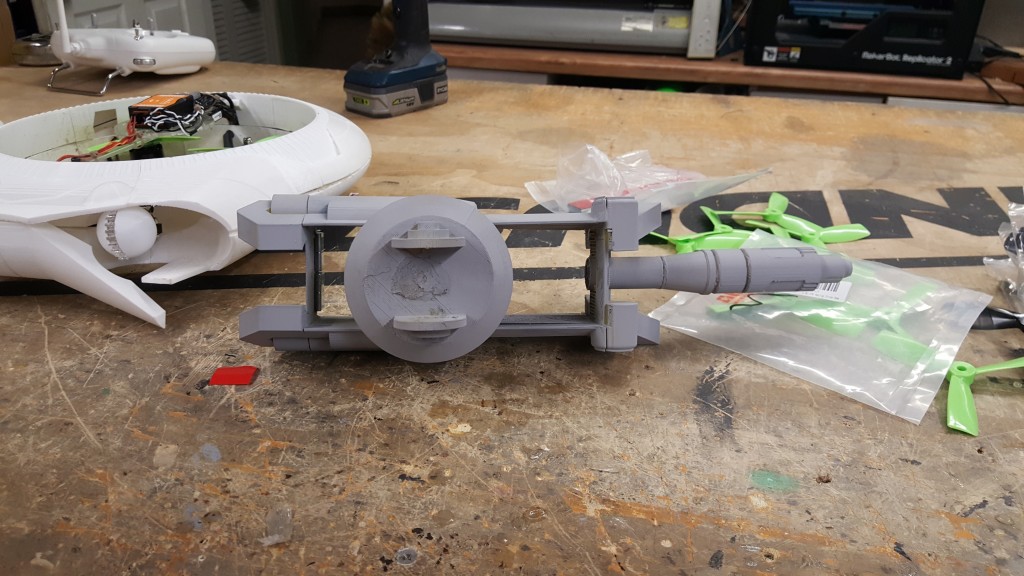
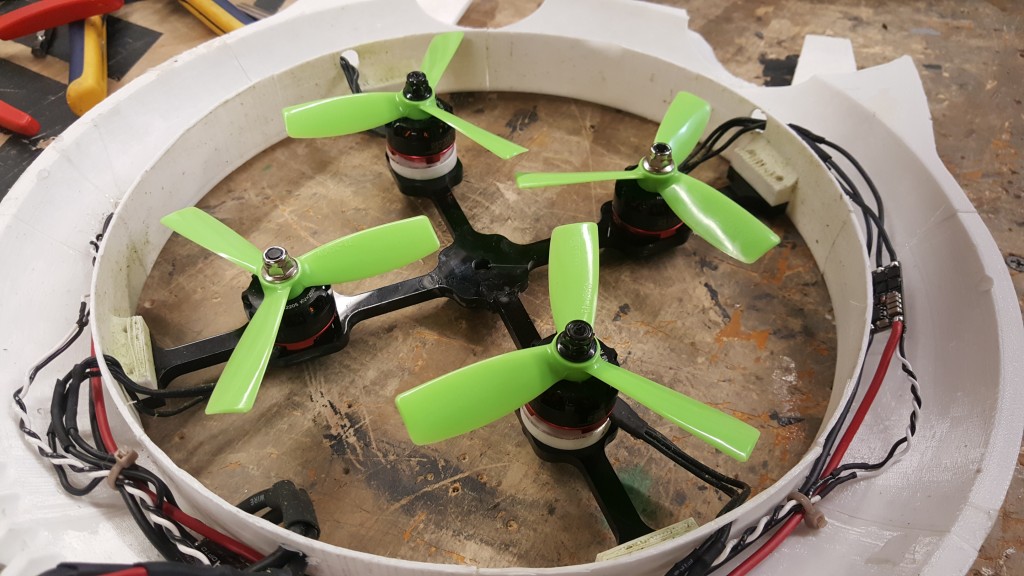
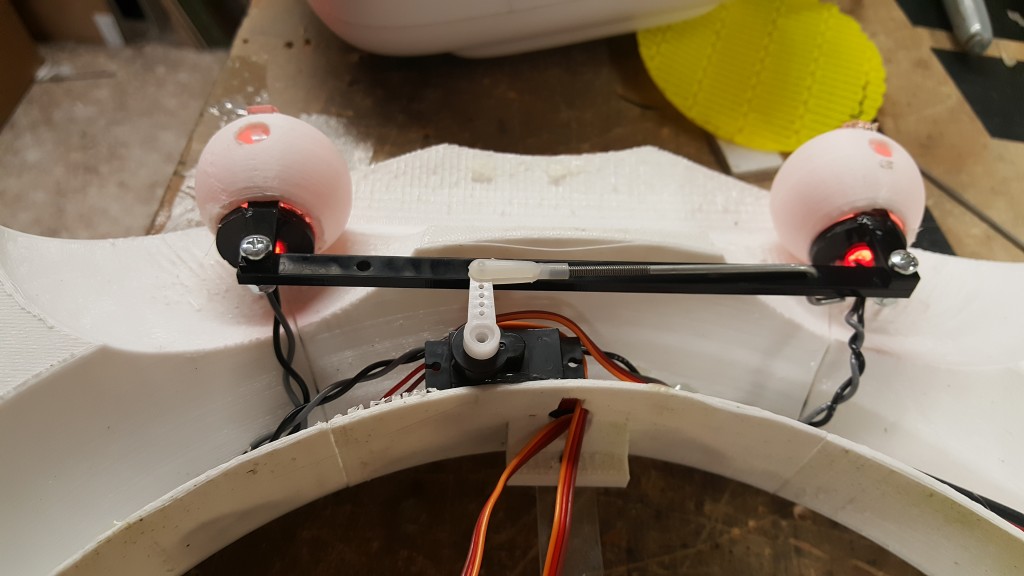
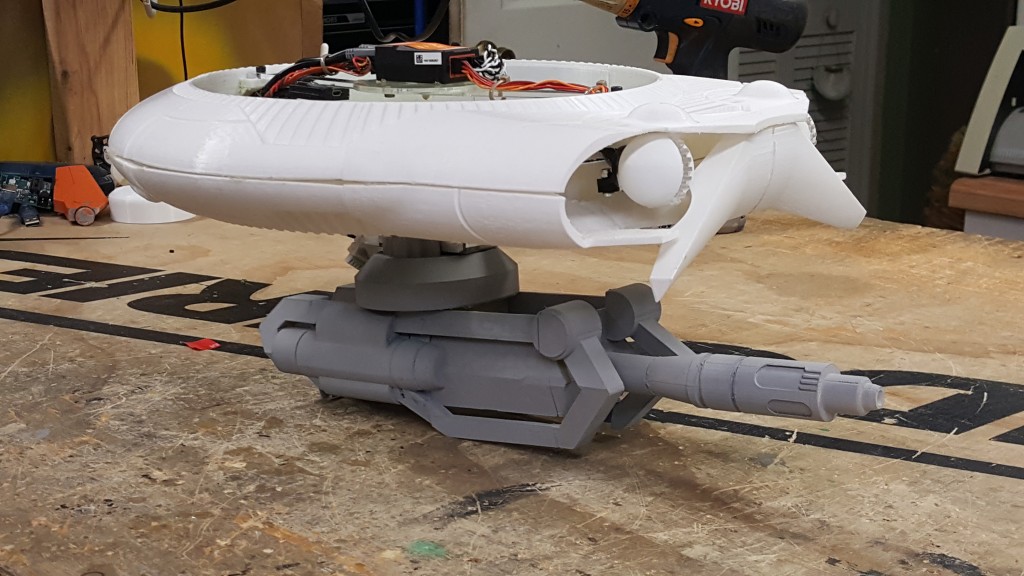
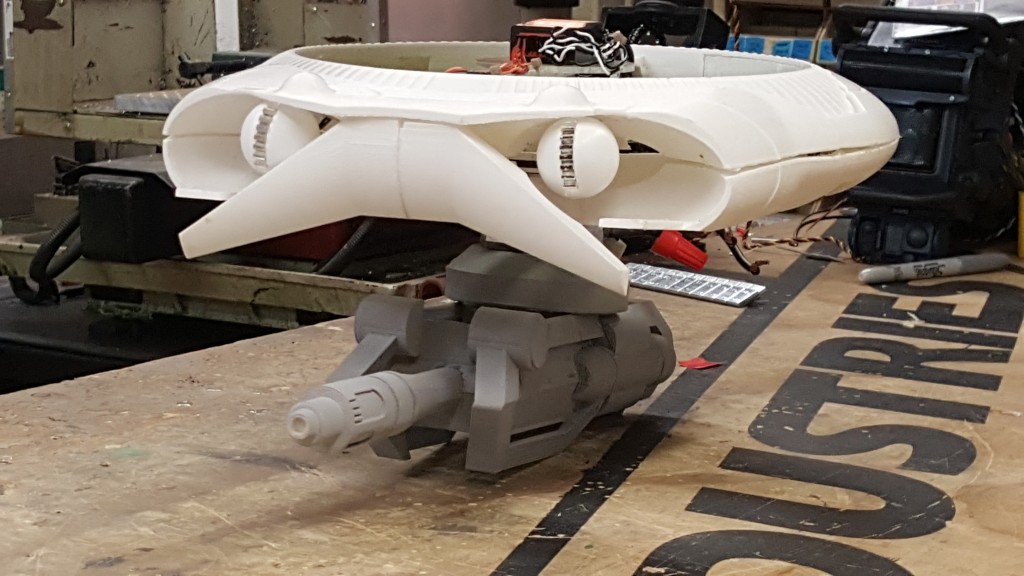
It took a lot of time to design in the 3D software to pull this off. I am not very good at 3D design and this would be my third big project to design using Autodesk Inventor. I also knew that this would never print to 1:1 scale using a standard Makerbot Printer, So I broke it up into multiple parts and was then assembled. I also wanted this to fly, So I needed the 4 motors and props to fit INSIDE of this drone. Most drones the props on the outside of the weight, but in the real Mini-Hunter that was not the case. So I designed this to use small 4″ props and high speed motors. I had to offset two motors to be above the other two to allow clearance, and that has not caused any problems so far.
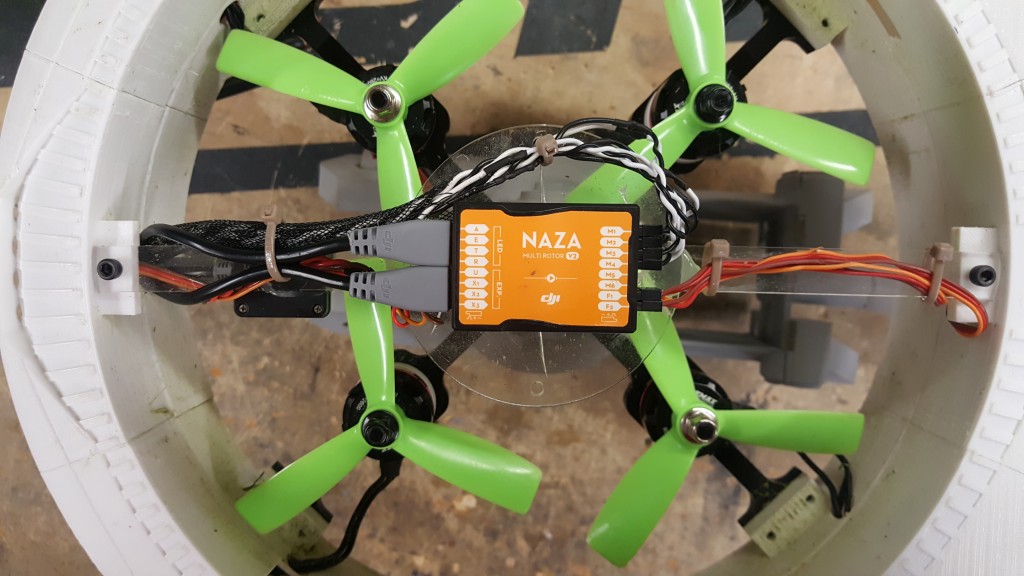
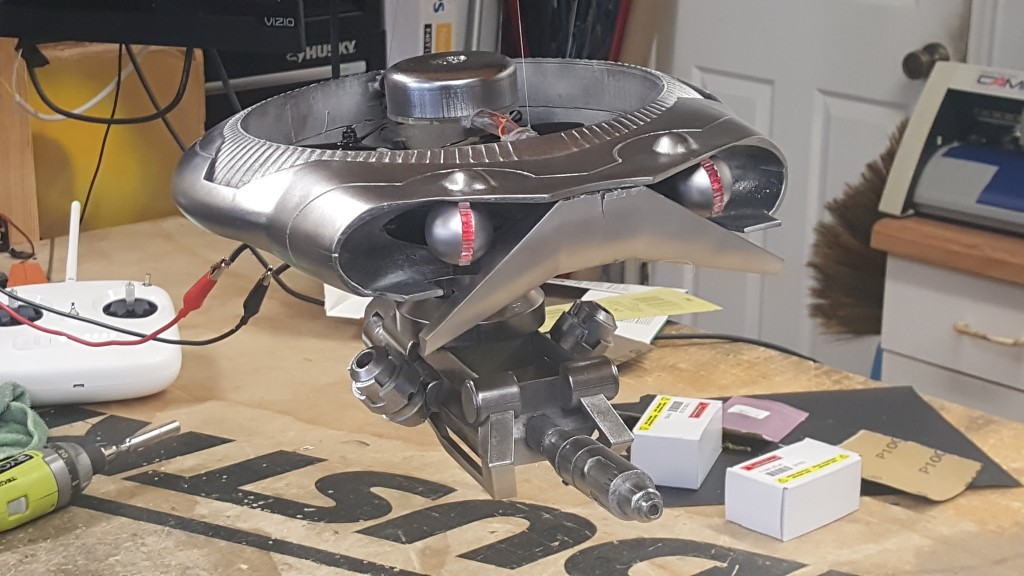
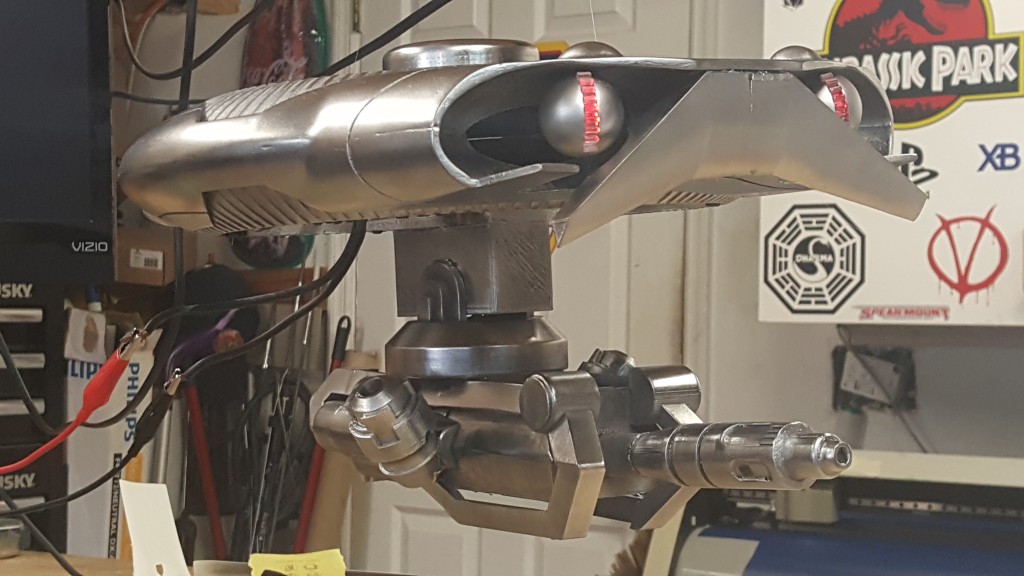
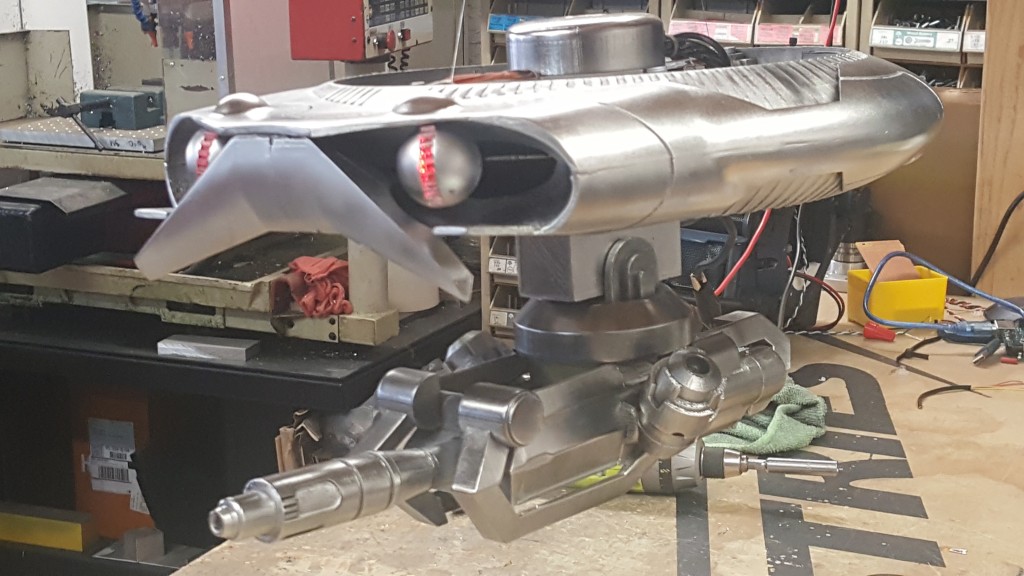
I started printing this drone and testing it out. I used a DJI Naza V2 to be my controller for my quad system. I used 2900kv motors and 4″ Tri-Props for the lift. The entire frame was original laser cut acrylic, but ended up making it out of aluminum for better strength. It fly well without the gun attached to the bottom, but as soon as I attached the gun, It had issues staying up. I assumed this is because it blocked the airflow from the propellers. So I ended up making the gun hollow from the top down.
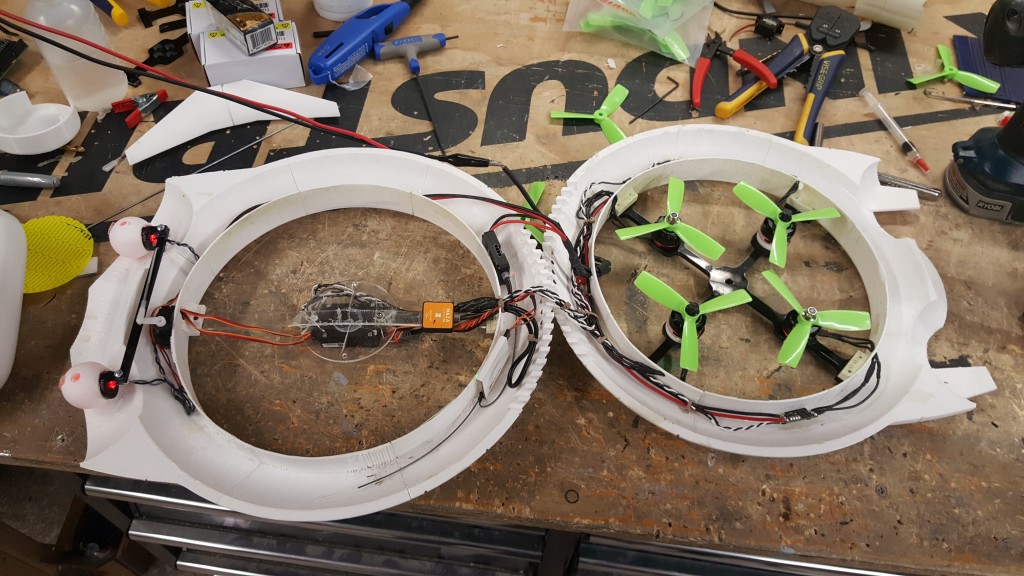
I needed to get all of the electronics inside of the Drone body. So I made the entire main body hollow to allow the fit of the electronics. Now the main controller with the sensors really needs to be in the middle of the system so that it can measure the movements better. So that was mounted to the top above the Motors.
Now for the eyes, I was able to use a servo connected to the Naza’s camera tilt servo. That way when I used the lever on the DJI controller, the eyes could move left and right. This really gave it the feel of being alive and looking for John Connor! I used a simple mechanism to make the eyes move together with one servo.
After all of this and testing out its flying capabilities, I glued the two halves together and filled in all the gaps (which there were plenty of). This little drone got a lot of sanding, priming and more sanding. I wanted it really smooth so that the metallic paint job would work well. The Mini-Hunters from the movie were mirror like chrome. I am not a big fan of chrome, and stuck with a more metallic look.
*PLEASE NOTE* I am in no way affiliated with Microsoft or Xbox. The XBOOK is simply a console modification for a Microsoft XBOX One. This is not a licensed Microsoft Product and should not be confused as such. It is a custom made item by EdsJunk.
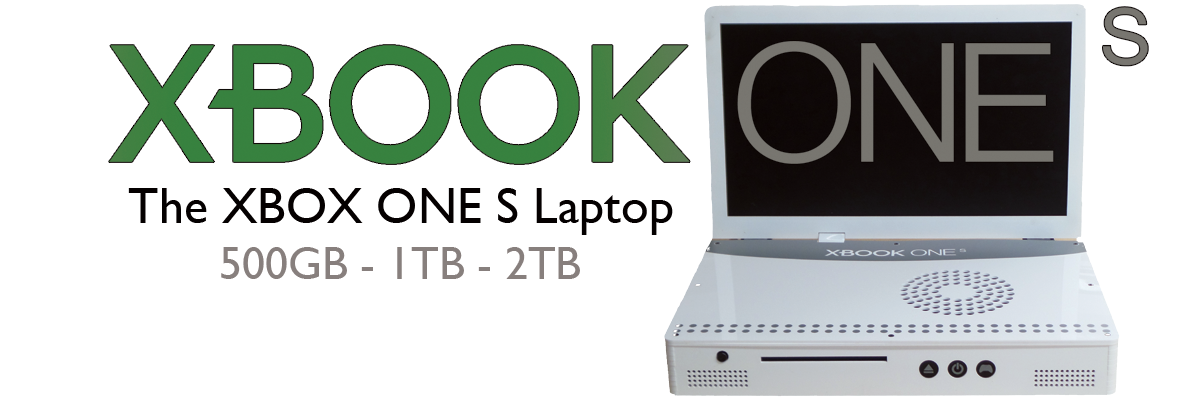
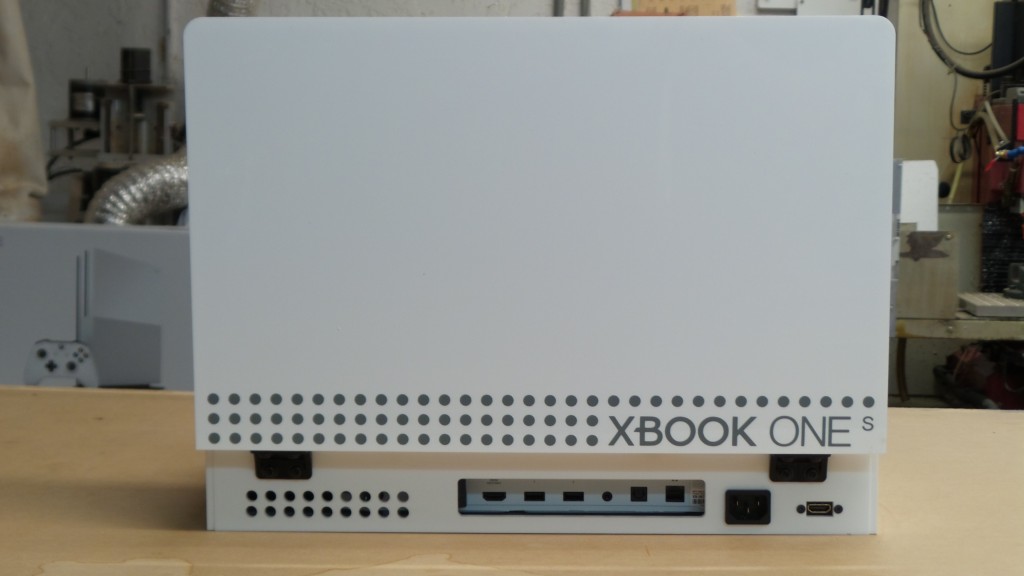
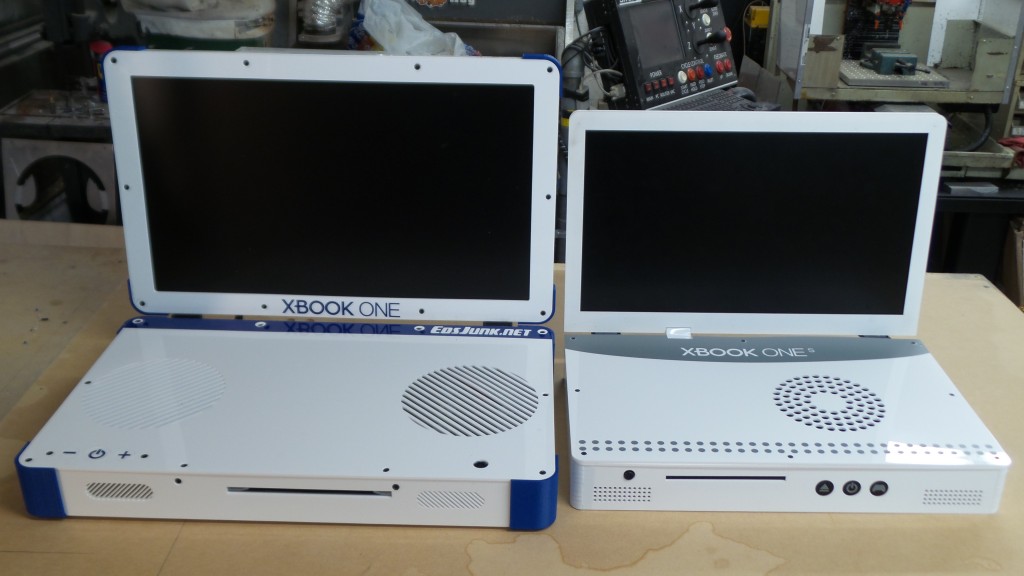
Well everyone I am back at it! I just finished up the new slimmer, smaller and sleeker XBOOK, the XBOOK ONE S. Of course you guys can guess why… the XBOX ONE S came out just last week and I had to tear one apart! So I did. And the new XBOOK was born.
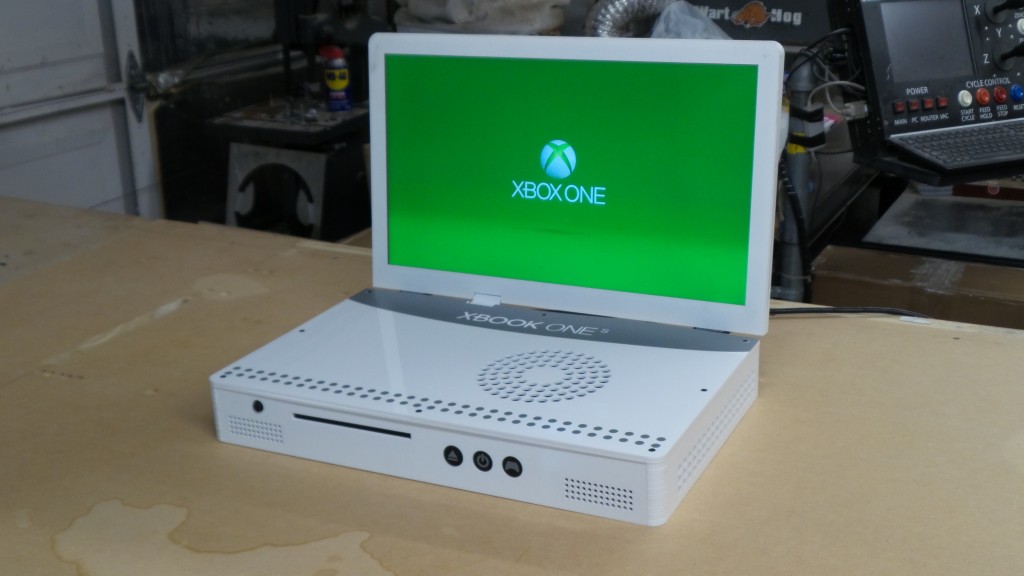
This new system is beautiful! I wanted this new system to have a simplistic and professional feel about it. I did my best to get it as slim as possible using thinner materials where I could, but adding thicker/stronger material in important areas. This is a technique found in all laptops and I wanted to adapt that. The XBOOK is made almost entirely out of strong acrylic, although I wont say its rugged but it is a solid system.
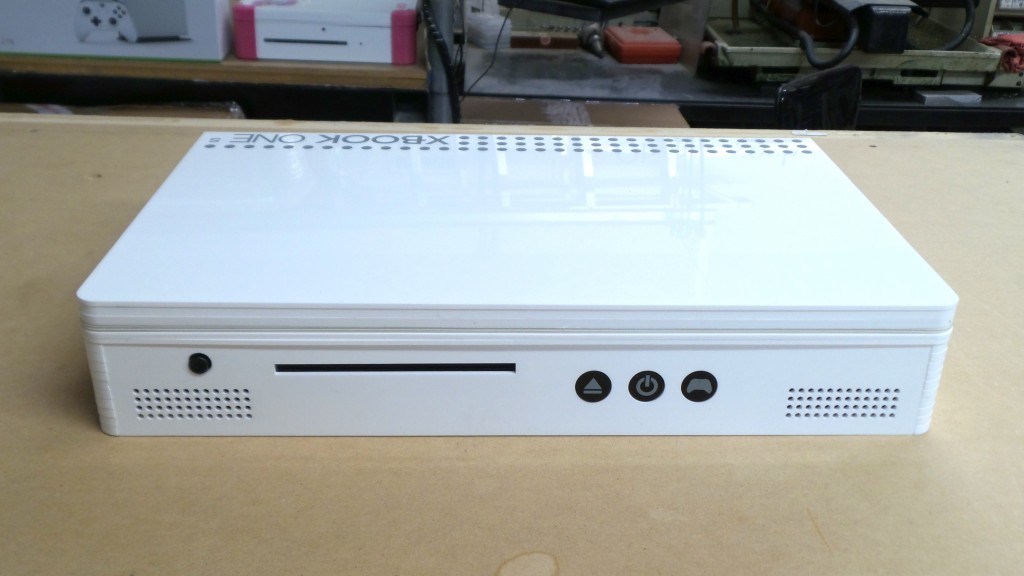
On the front of the XBOOK you will see the two speakers, these were designed to point right towards you and can get pretty loud! above the left speaker is a small black joystick, this is the TV control. This allows you to turn on and off the LCD, adjust the volume along with menu controls. Included is a remote for the TV for fine tuning. Next the that is the XBOX Bluray drive. This system is capable of 4K video (through HDMI out to a compatible TV) and does look good. Next up is the disk eject, power and controller sync for the XBOX inside. All you have to do is plug in power and push the power button and your off to gaming! This system is not battery operated due to the large power consumption of the components. It would end up making this system heavy and not giving you much play time if I added batteries inside.
Onto the rear of the system we can see air vents on the left and then all of the ports. You have access to all of them. You have HDMI IN – Two USBs – IR Blaster – Optical Audio Out – Ethernet – Power in – HDMI Out (4k). The two normal plugs you would see that are covered up on the left would be the XBOX HDMI Out and Power. Well those are both used inside the system to give power and video to the LCD. But because we all want HDMI Out, a 4K HDMI splitter is installed inside and then routed to the far read HDMI port. So no worries everything is there!
I have been making XBOOKs for awhile now and for a lot of people. I normally get very good feed back and everyone loves them. I have been asked though for a smaller screen. When I put in the 22″ LCD into my previous XBOOK, I thought the bigger screen would be nice, but what turned out to happen was the system was slightly to big to be truly portable. A lot of people want to bring them on planes, or on tour buses and had a hard time with the 22″ system. So I am here to announce it is much smaller in size and weight! I used new techniques to get it lighter and slimmer and when you add that with the 19″ screen and the smaller XBOX ONE S, you get a pretty good looking system! Here is the new XBOOK next to the older version. The 19″ LCD is a Samsung HD TV. Now, being that it is only 19 inches, it resolution is at 720p. I had a hard time finding any LCD at that size with 1080p and the reason being that you can not tell the difference between the two at that size. Either way this system is designed specifically for on the go gaming. To have the full 4k XBOX ONE S resolution, plug it in at home to your big TV and sit back and enjoy!
So can you get one of these XBOOKs? Of COURSE! I build these to order and you can have your own custom xbox that you can not get in the store! Make your friends jealous when you have your XBOX on trips and they don’t! Although you can still share 😉
You have some options for your custom XBOOK. First off, you may choose either white or black for the main case color. Then you can also choose the color of the accents, for those pretty much any color can be chosen. Also I will offer to put your Live Gamertag on the system if you choose. After you place your order, please email me the details of your system. Also you may put in the colors under the notes section of PayPal. If you want a custom themed XBOOK, you will need to contact me directly as pricing on those system is more.
Also New to this system is the ability for it to be used overseas. The internal components are all rated at 110/220v power so there should be no need to used a step down transformer for this. Please note over seas shipping is much more than in the 48 states.
Pricing is simple. Here is the breakdown.
Complete XBOOK ONE S System (500GB) is going to be $1,495.00 plus shipping. To upgrade to the 1TB system, it will be an extra 50 dollars (upcost of the XBOX). If you want to ship me your XBOX ONE S console, the cost will be $1,195.00. Flat Rate Express Shipping of $150.00 to 48 US States Please contact me first if your international or at a APO or similar.
Heres how the ordering will work. Click the Paypal button on the bottom of this site and you will pay $750.00 upfront nonrefundable deposit. This gets your name put on the list (trust me, its gets full quick) and gets me working on your XBOOK. After its completed, you will pay the remainder and shipping and your XBOOK will be shipped out! Once I start on your unit, it will take 2-3 weeks to complete. There may be people in front of you, so be aware of that and it could take longer. If you have any questions at all, please go to my contact page HERE and send me a message! I will be in contact with you through the building process and will make it personalized for you!
Use Paypal to pay the $750.00 Deposit
Remaining due before shipped
Inside this unit is a Microsoft XBOX ONE. The xbox has not been altered in any way that would be illegal on xbox live. It has no performance modification or enhancements. The XBOOK is simply just a plastic case that holds a XBOX inside with a LCD Screen. I am in no way affiliated with Microsoft or Xbox. It does not have a xbox warranty as you loose the warranty as soon as you take a xbox apart. I will guarantee it will not be DOA. It is non returnable as these are custom made for each individual buyer. Also, please note any overseas shipping may be subject to import tax for your specific country.
*PLEASE NOTE* I am in no way affiliated with Microsoft or Xbox. The XBOOK is simply a console modification for a Microsoft XBOX One. This is not a licensed Microsoft Product and should not be confused as such. It is a custom made item by EdsJunk.
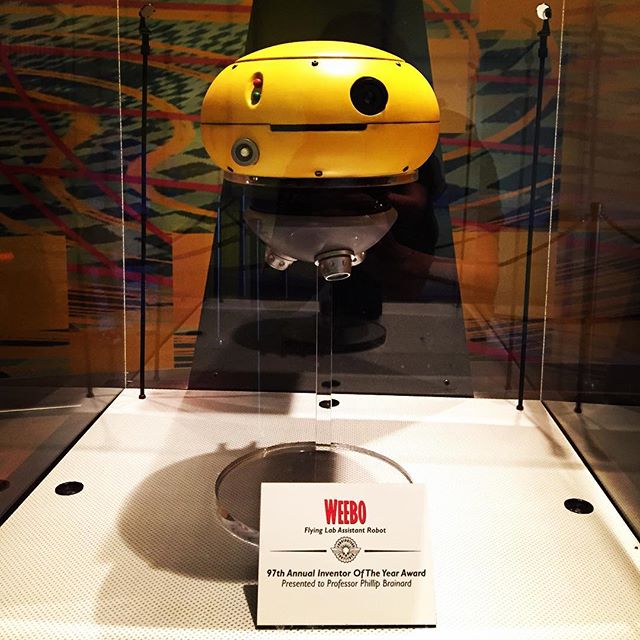
This is a build log of my most recent project, Weebo! Weebo was Dr. Brainard’s assistant in the 1997 Disney film “Flubber” with Robin Williams. I always loved this little flying robot as a kid and recently while working on another project of mine I hit a road bump that gave me a couple weeks to work on something else, so Weebo started to be born. (read more below)
This Project was not meant to be a step by step easy guide for someone to follow along and build like Legos. It still takes a lot of modifying and figuring out yourself. This is more of a rough walk through of what I did. That being said, It can be done! Its not hard, but takes time and some skill. Its a great little robot to get started learning animatronics. Check out the links and files below!
So I first started this project by watching the movie for the first time since I was a child. It made me fall more in love with the film and Weebo and only encouraged me to start building. I searched around the internet for any reference material I could find. Not only was there almost nothing out there on Weebo other than some screen grabs, there was almost no built to scale replicas. I did find a couple though. Found on that someone built for fun, but was not accurate at all. Found another one on PropMasters that sold years ago and did not have much information on her except for a dimension of 10 inches, but no telling what that 10″ actually was.
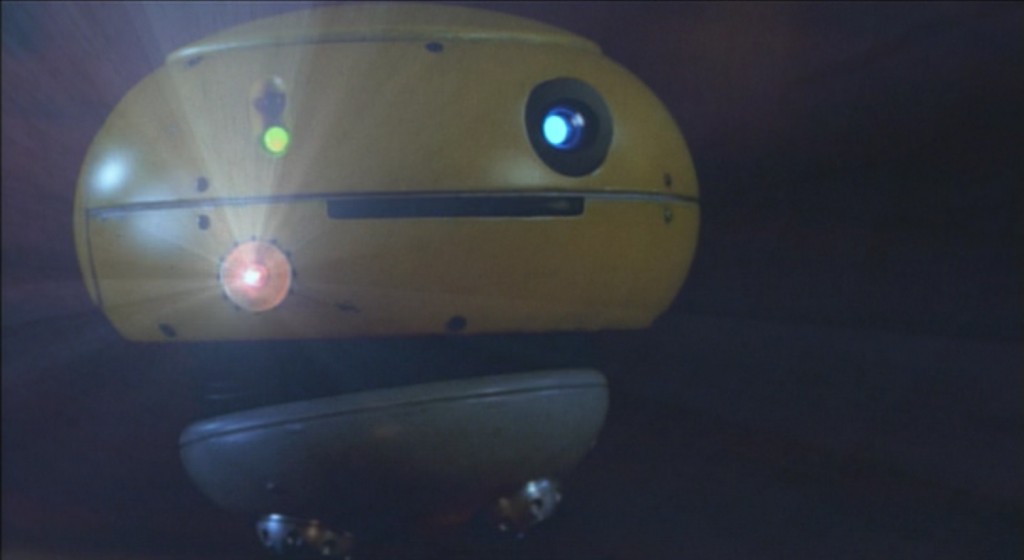
I then discovered that Epcot at Disney World Orlando had a Weebo on Display. Well what do you know! I am only a couple hours south of Orlando so why not go check it out. Unfortunately she is behind glass beyond some rope that I couldn’t cross. But I got some photos and realized that this was not movie accurate. It must have been a replica made for Disney and wasn’t from the film.
As you can see in the photo above, its pretty convincing! Maybe it was a prototype made before the film?
I am not sure. But a dead give away are the Jets. They are just no accurate in the least. Also the LEDs are not LEDs, just painted. But that’s ok with me, any little bit helps. So I figured I had to come up with it on my own.
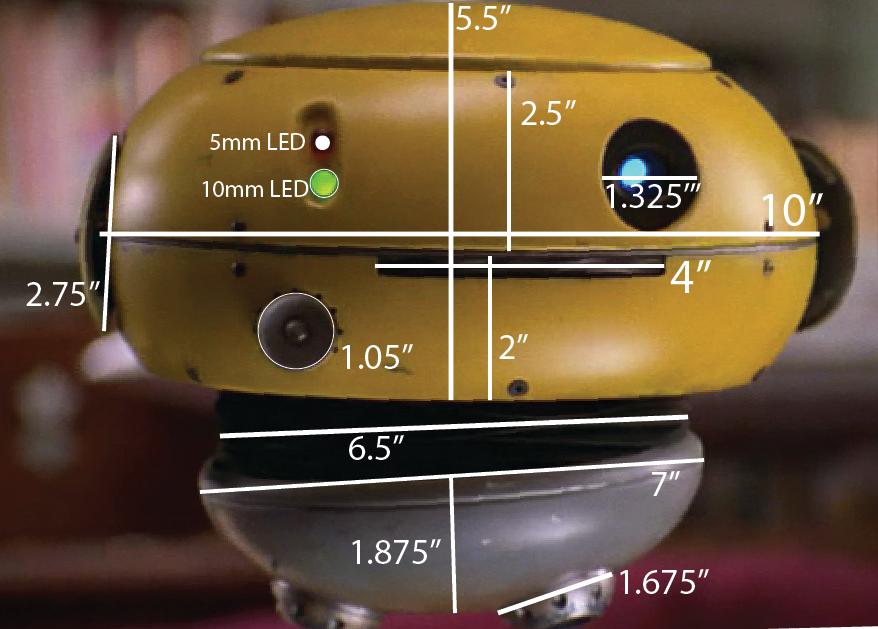
Going off what PropMasters stated, that Weebo was 10″, I started using a screen grab as a measurment reference. What I knew a size had to be was the Green/Red LEDs. They come in a couple common sizes, 3mm, 5mm and 10mm. So I used a 5mm reference to see how wide weebo would be… about 5 inches.. Not big enough, but at a 10mm LED would make Weebo 10 inches, a number that matched up with PropMasters. Now we are getting somewhere! I can use that information to get a good idea of the size of most of Weebos parts as seen here.
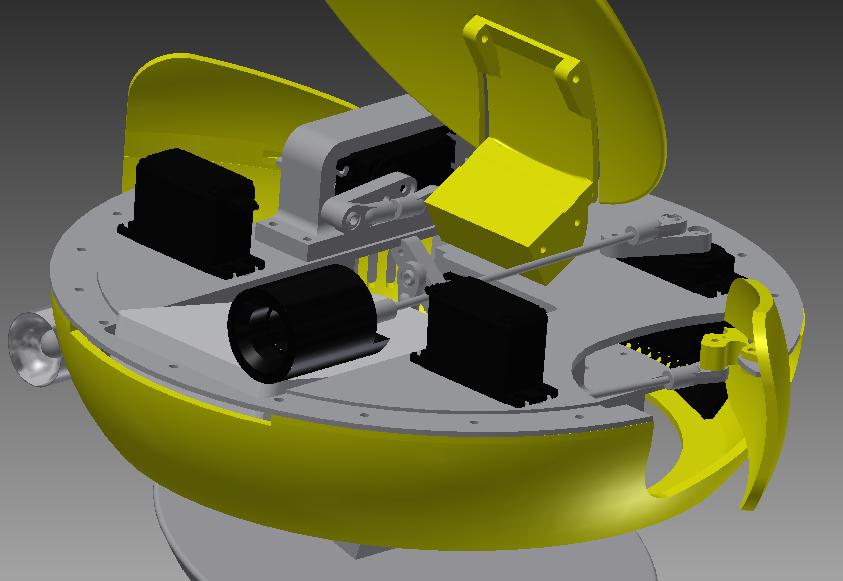
So now I have a solid base to work off of and get my dimensions. Yes its all estimated and is by no means accurate to the thousandths, but it will definitely work. So I took this information and started designing Weebo in Autodesk Inventor. I have done some work with inventor, but have been looking for a reason to really understand 3D design and also assemblies within Inventor. Assemblies allow you to put all of your parts together and see how they align and move according to there pivot points ext. This is perfect for trying to design a animatronic like Weebo with servos and linkages.
So I started with her head, adding details and parts as I went. I knew this wouldn’t fit on a 3D printer in one shot, so I designed it in a way that would be easy to print and the least amount of overhang. It consisted of some main parts like the frame, top half of head, lower half, screen lid and lower engines. (more information on all of this in my build logs)
Well it was at this point that I started printing some parts and doing some test fitting when somthing funny happened. I was watching videos from Tested.com on YouTube. I normally like to watch these videos, but one I was watching this day was of Adam Savage in his shop. I noticed in the background in his display cases that he had a Weebo! Knowing Adam used therpf.com forum often, I shot him a message with my ideas and that I saw his Weebo prop and asked for some reference information like photos and dimensions. Well being the helpful guy he is he sent me over about 40 photos and dimensions (all of those are here) So I got to modifying the files and getting Weebo printed.
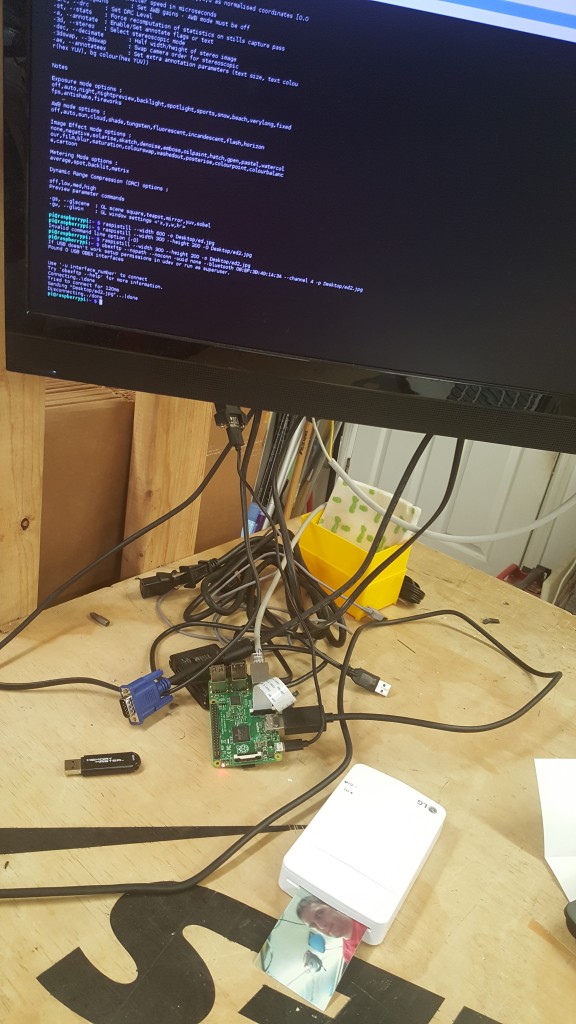
Now to bring Weebo to life was a whole other set of challenges. I knew I had about 13 Servos that needed to be controlled along with Audio, Videos and Lighting effects. I had some background with Arduino programmings, so Lighting and Servos were no problem. Even audio I have done with Arduino in the past, but videos.. that’s a different problem. So the Raspberry Pi came to the rescue. This would be the first time I have ever used a Pi but felt very familiar to my Arduino programming using Python.
Now for Weebos Screen. She used this screen to show data and express emotions though displaying clips from old movies. Very creative and I HAD to have it! Now in the film, it was all added digitally in post, but with newer technology in LCDs in the last 15 years I was able to get a real screen inside Weebo. This took a lot of work. I purchased multiple LCDs to tear down and attempt to get to fit. I broke a couple but ended up having a working LCD inside Weebo’s Lid. EXCELLENT.
So a HUGE benefit to using the Raspberry Pi was the ability to handle a camera. In “Flubber” Weebo at one point took a photo of Professor Brainard (Robin Williams) and had a Polaroid style photo printed out. This was something I thought would be amazing but didn’t think it was possible until I discovered a mini pocket printer. LG makes a small photo printed that uses Bluetooth to print photos from a proprietary app on a phone. Well to my surprise someone online discovered if you take a Raspberry Pi and Bluetooth a .jpg to the printer’s ID number that the printed would just print it out. PERFECT! So now Weebo can take a photo and then spit out a print, just like the movie! After modifying a old GE Magic Cube flash with a newer style flash bulb, I had a working Weebo Photobooth!
Now the one thing I would not be able to recreate is flight. Weebo had the ability to fly around in the movie, but too bad it was just movie magic… because how cool would a real flying Weebo be! Well that’s the one thing that I could not make my Weebo actually do. So instead I used a robotic arm system that I pieced together using parts from servocity.com . The arm comes up the back of Weebos base and holds her up with a mount through the rear vent. This arm has 3 axis of movement to attempt to recreate that “flying” feeling. It has a Roll, Yaw and Pitch controls. This allows Weebo to tilt foward and back, twist side to side and also pan left to right across a distance of about 12″. When you combine these movements with animation from the other servos you get a decently realistic flight simulation.
For the film, they used a system that mounted Weebo to a steady cam type system attached to an operator. She also had a couple other puppeteers controlling her other movements, like lid open and close, her ears and eye with cables. In the video below (@3:07), towards the end, you can see a live video of the operators making Weebo come to life. This is spectacular and was actually requested by Robin Williams as he preferred acting with a practical prop than CGI.
Well the final touch on Weebo is her voice and the videos and images she displays on the screen. I maybe recognized half of the videos she played, but couldn’t tell you exactly which movie or cartoon they came from. That is where the replica prop forum came to the rescue (again). I took screen shots from every time Weebo opened her lid and posted about 15-20 of them on a post asking members if they recognized the footage and if they could tell me where it was from. Those guys rock! They found A LOT of them! Here is the original post on therpf.com ( http://www.therpf.com/showthread.php?t=257895 ). I picked a handful that I liked and started trying to figure out how I wanted the audio.
The first thing that comes to mind for audio, her voice, would be to just take audio clips from the movie itself. This doesn’t work as well as you’d like. You end up hearing background music and noise that just feels out of place when making a standalone prop. So I had to recreate it, but how? Well trying to use the original voice actress is out of the question seeing how it was the talented Jodi Benson (also voice of Arial from Little Mermaid). When trying to figure this out I stumbled across a site called voice123.com. This is a place where you can hire voice actors and actresses for a specific project, like a commercial or radio jingle. Well I wanted Jodi Benson’s voice, so that is what I asked for. I started a project on the site to hire someone who could recreate Jodi’s voice. I included a line from the movie with a reference clip and asked for auditions. I received about 20 and one voice just killed it. Her name is Debbie Gatton ( http://www.debbiegatton.com/ ) and she an extremely talented voice actress that really nailed Weebo’s voice. She actually spent her childhood admiring Jodi Benson and always wanted to be like her. So that was perfect for me. You can see in the video below reference material I sent her and then the related animations and her voice right after in the replica Weebo. I highly recommend her.
Well that pretty much sums up the process I went through to create my very own Weebo. Check out the build logs and reference material I included and you might as well download the free STLs and 3D print your very own! All of the audio and video and coding I have included here to allow you to attempt to build your own. Email me with any questions and I hope you enjoyed seeing the process.
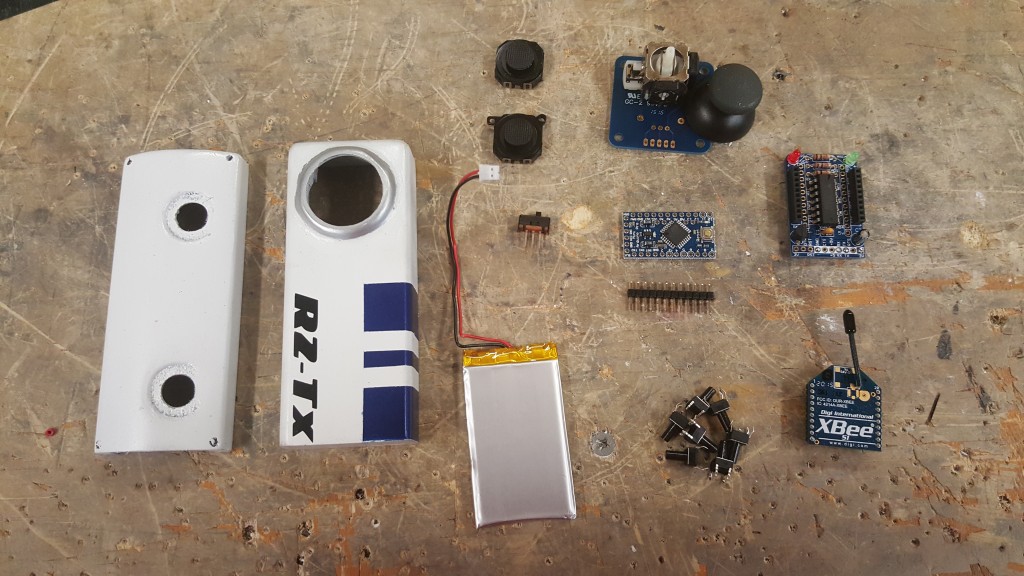
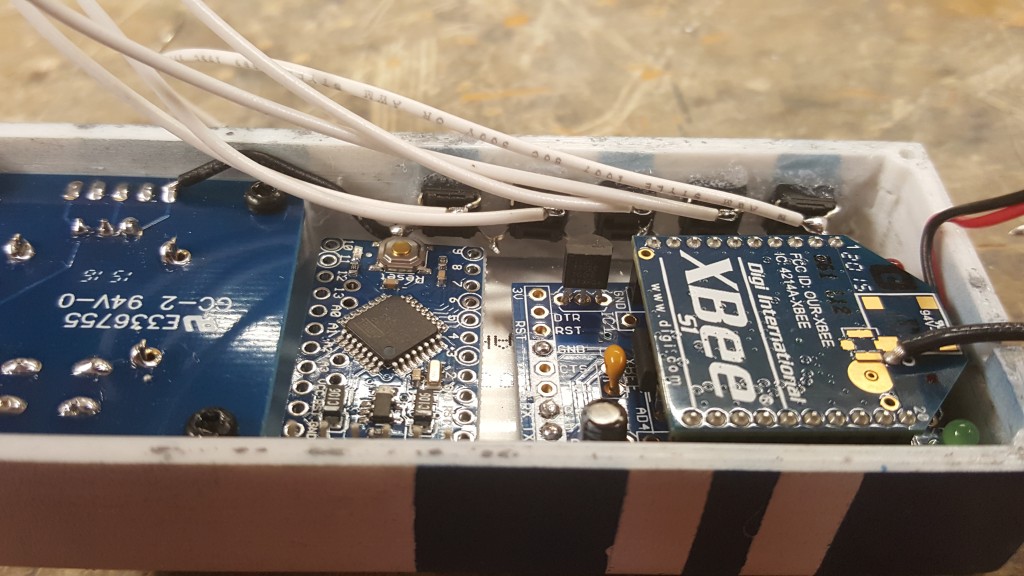
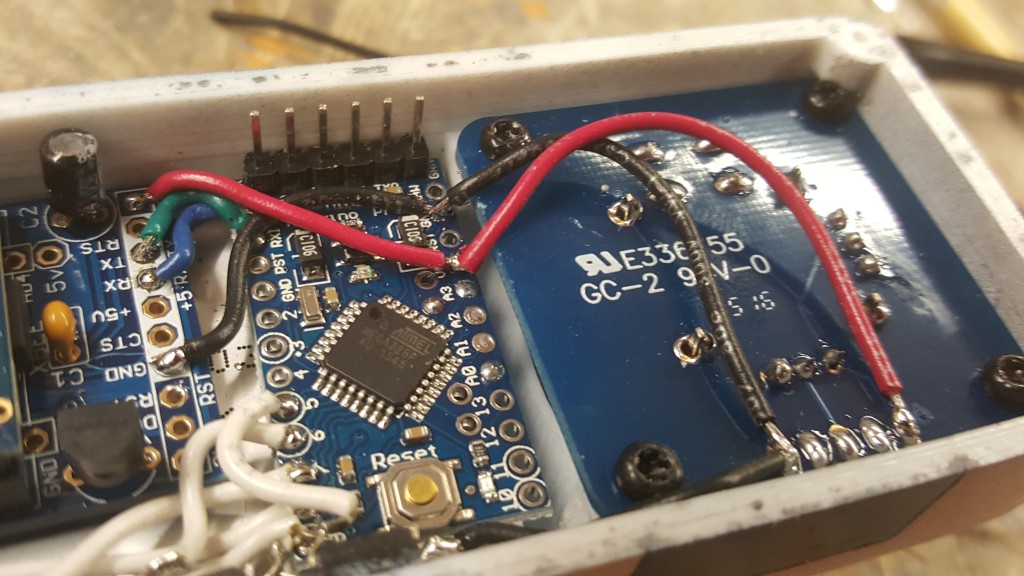
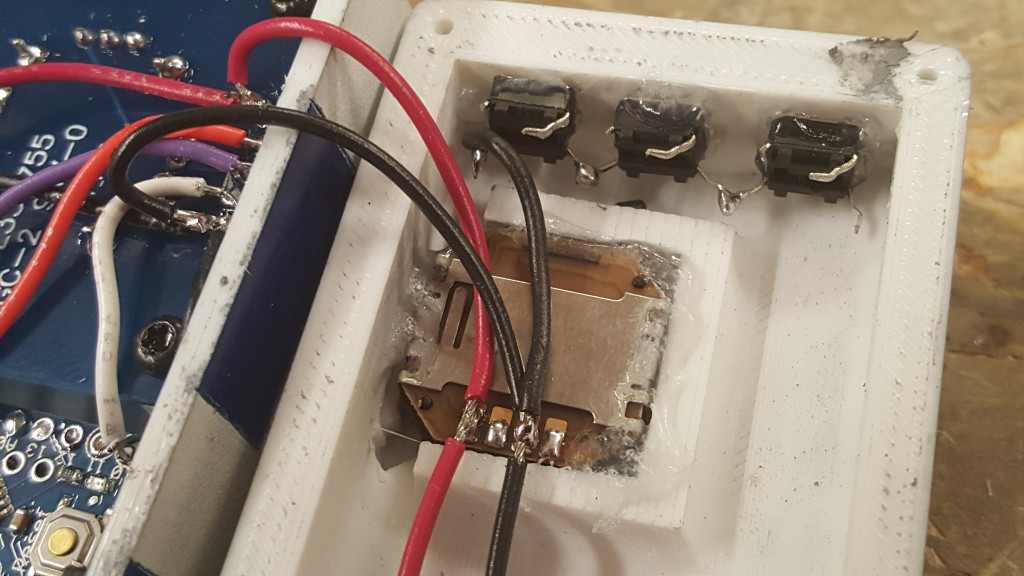
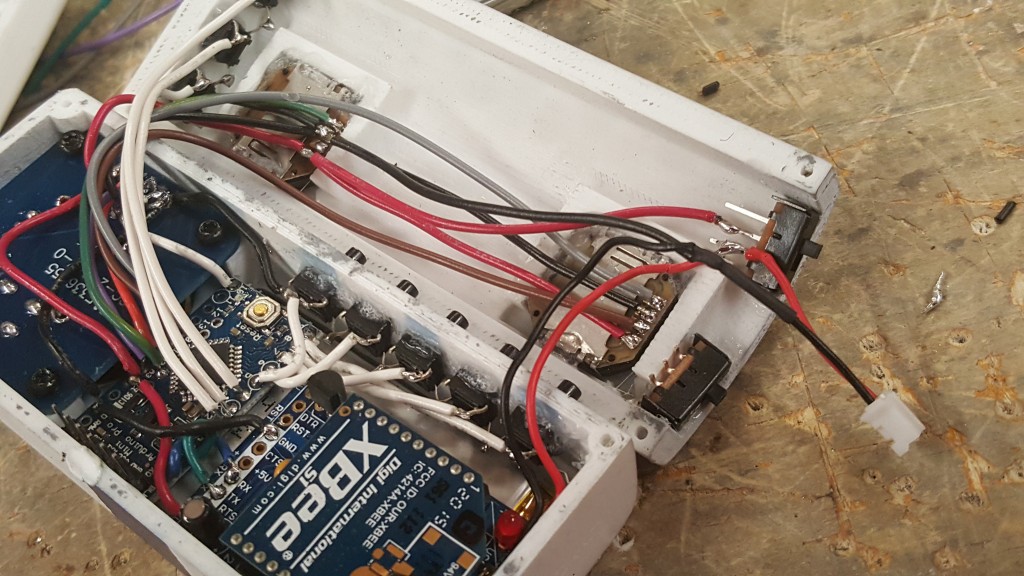
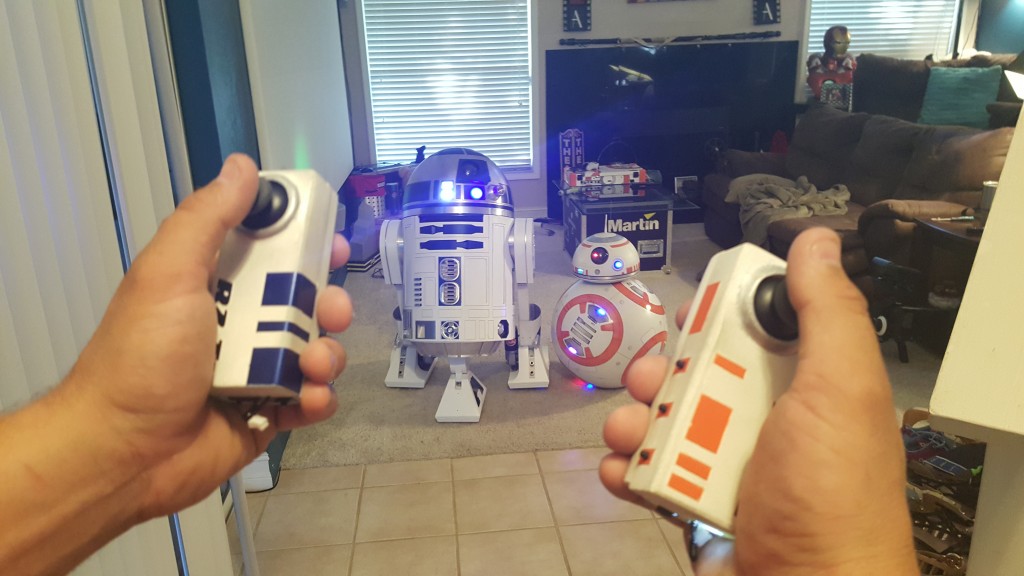
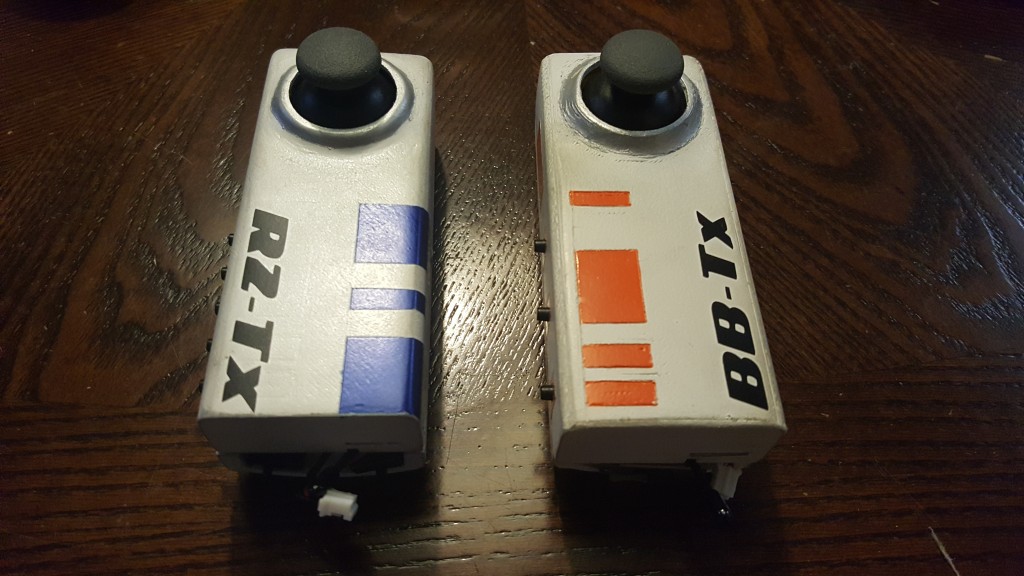
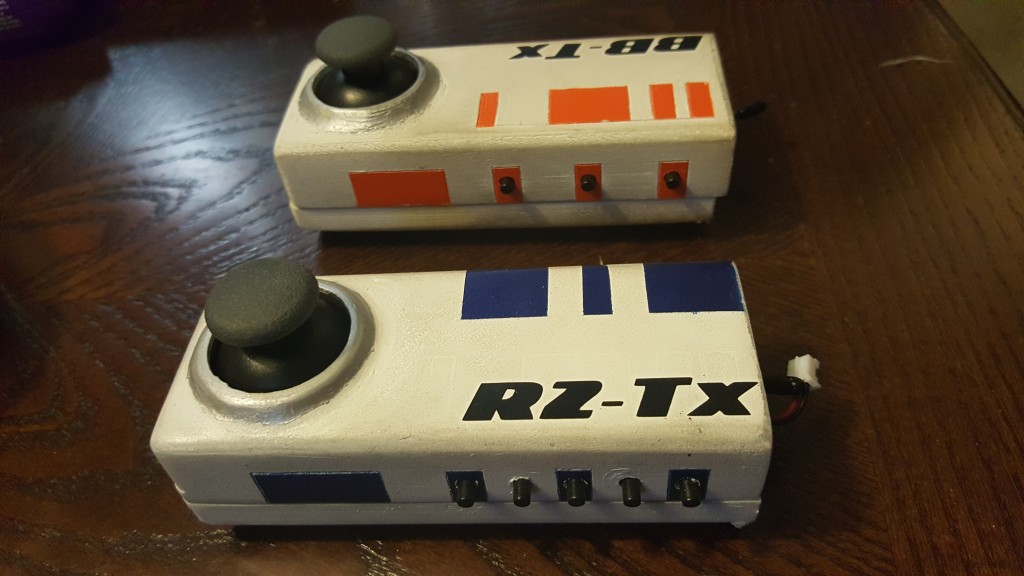
I have gotten quiet a bit of emails of people asking me how to wire the controller for my BB-8. I hope that this post can clear that up. I have just finished my R2-D2 droid and decided to use the same controller system as my BB-8, so as I was making it, I took pictures along the way and took a video at the end. I hope this can be a step by step guide for anyone. First up, the components…
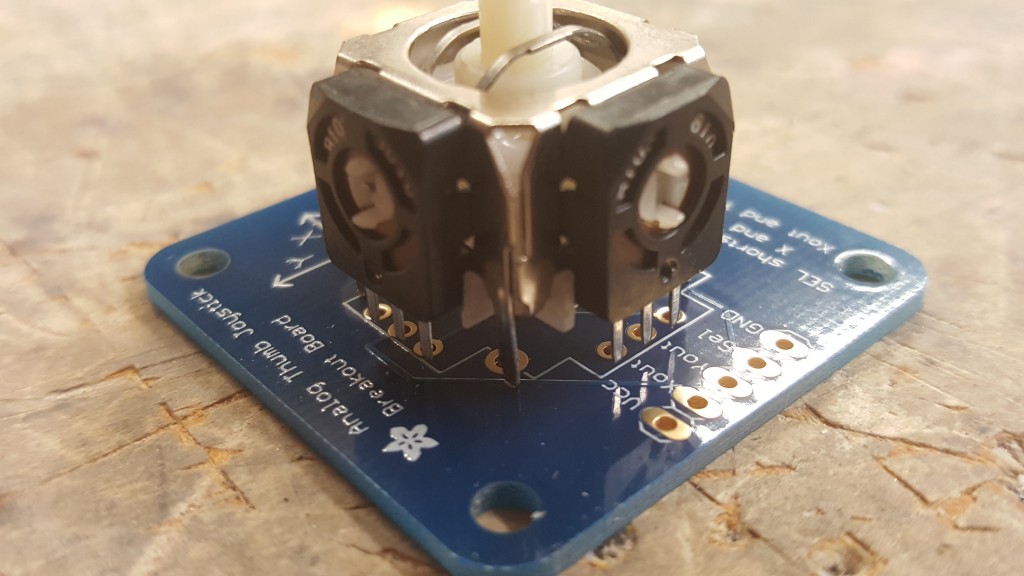
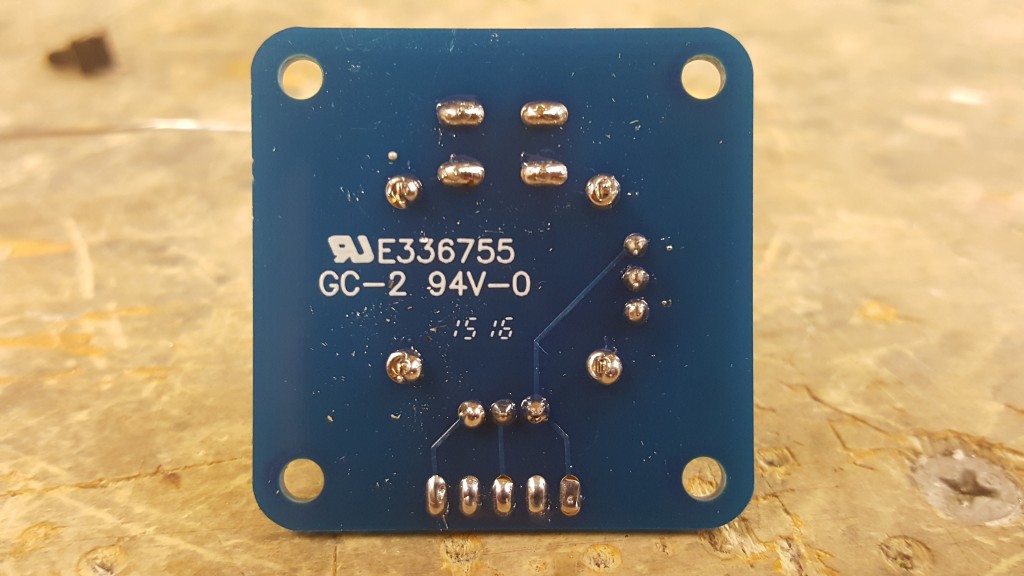
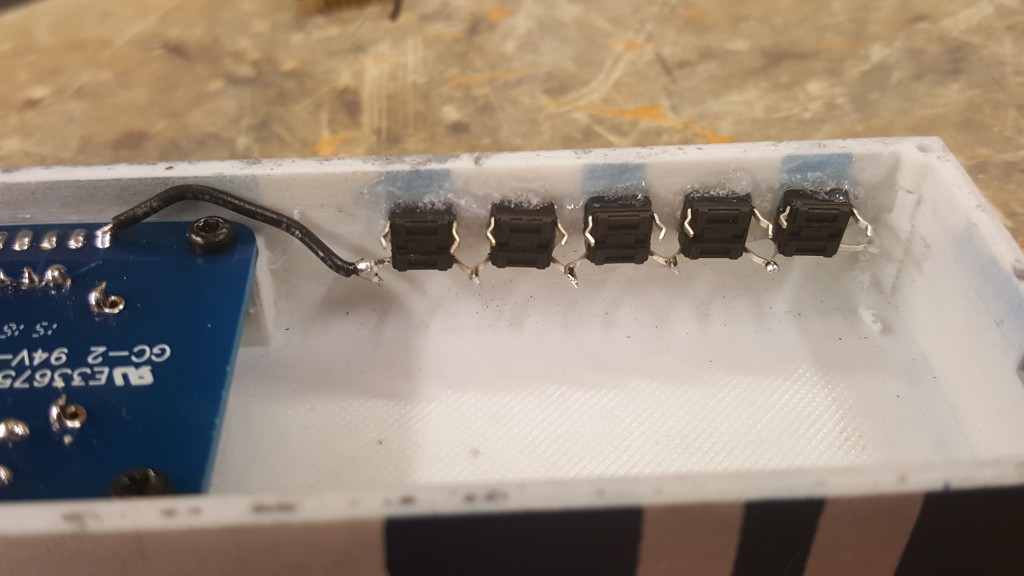
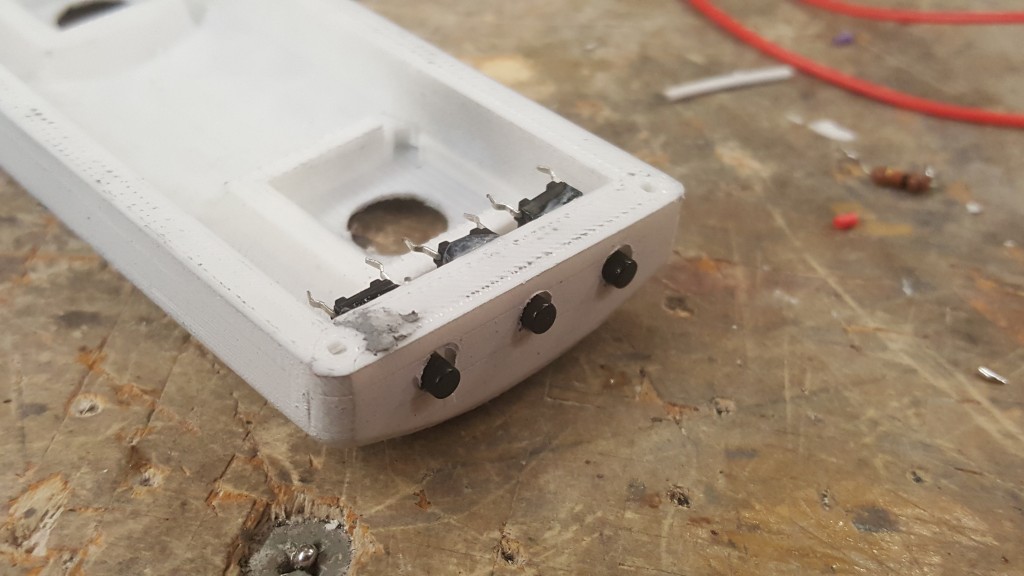
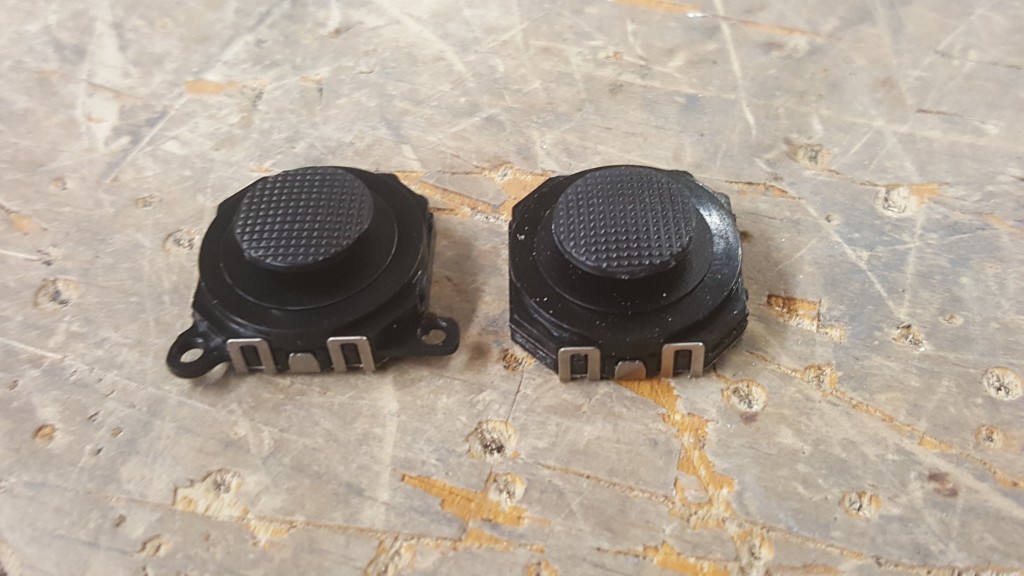
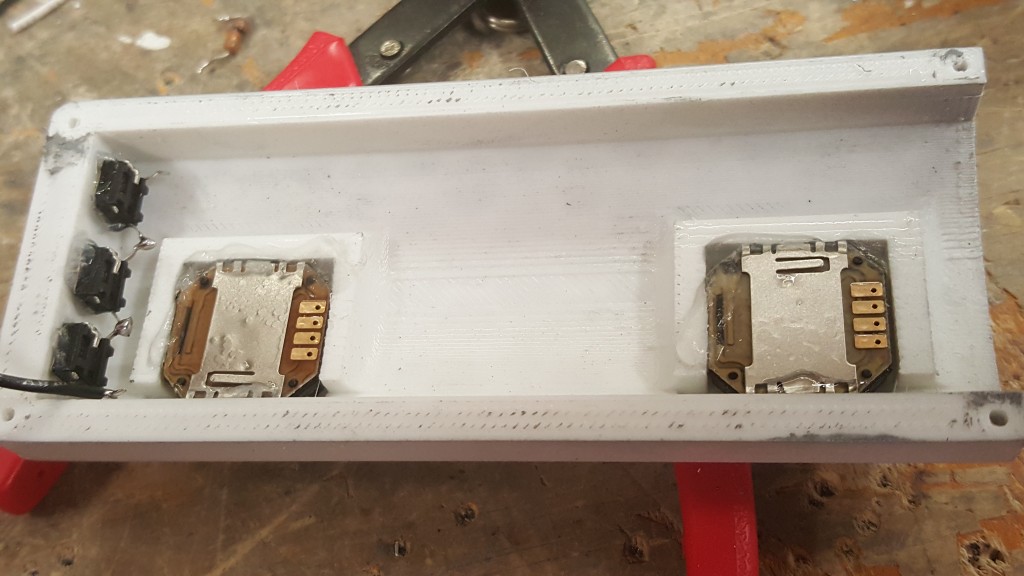
Check and make sure you have all of your parts. I have a few more tact switches in this R2 remote since I am adding more buttons for more audio functions. The controller STL files you printed have only 3 holes for pushbuttons, but you can easily drill more. More on that in the next few steps… For now, Lets get the Joystick soldered into the breakout board.
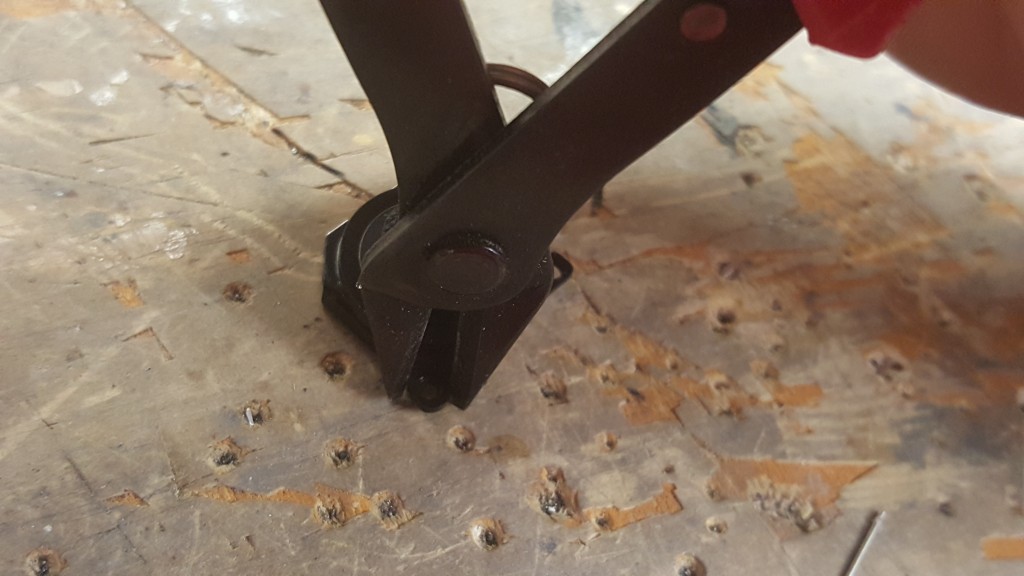
Pretty simple step. Just plug it on and solder it up, nothing to it. We will now install this into the top half of the casing. Sometimes support material is in the way when inserting the joystick, but you should be able to clear that out. The joystick will fit nice and snug. Secure it with 4 small screws.
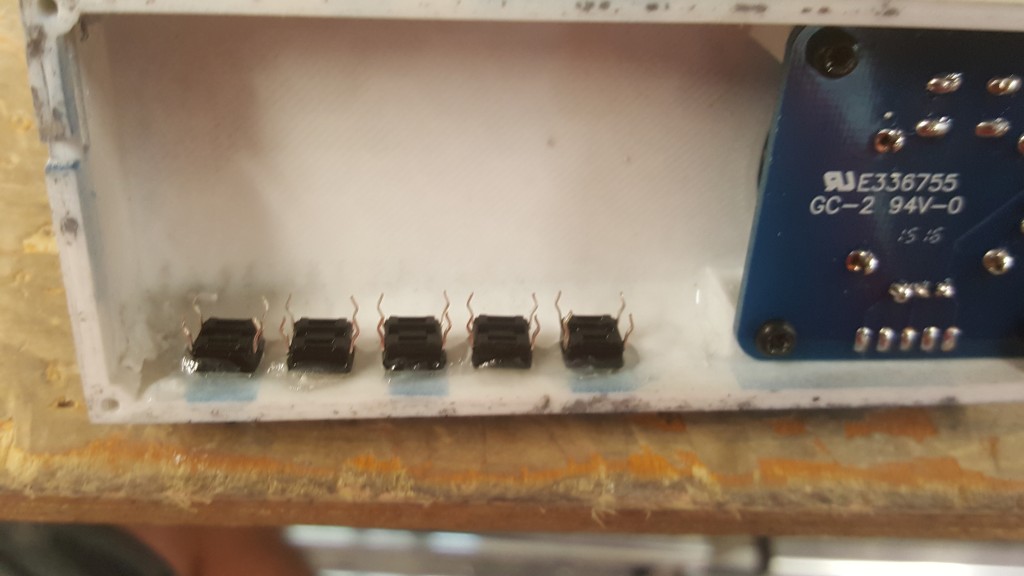
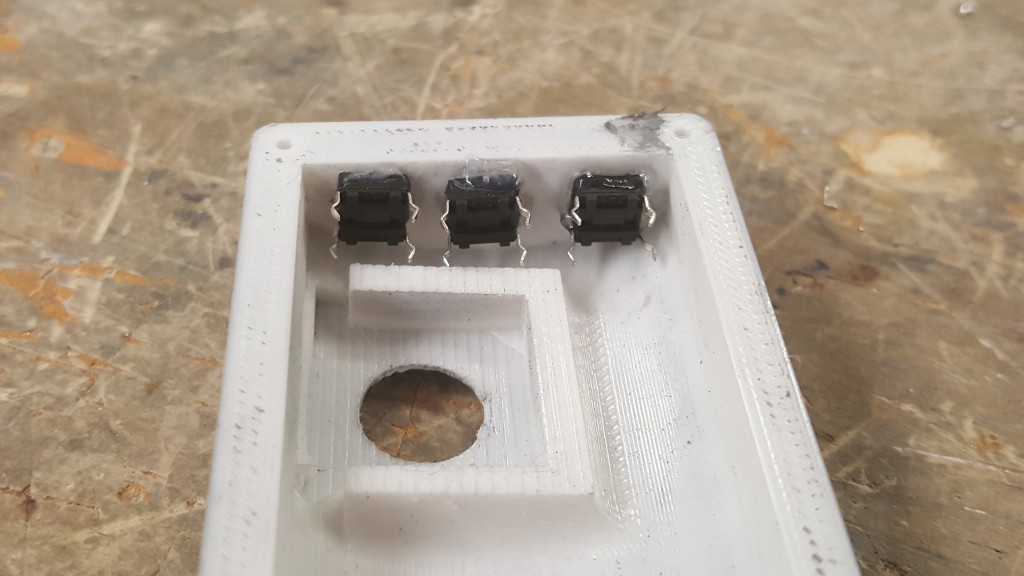
Now in this picture above you can see the 3 holes for pushbuttons that control the audio, I want to add a few more, so I am going to drill some new holes. You do not need to add more, but you can if you’d like. Once you insert the switches in, use a small amount of Super Glue GEL to secure them (be sure to use the gel so it doesn’t run into your switch and lock it up). Make sure they are in the same orientation as below.
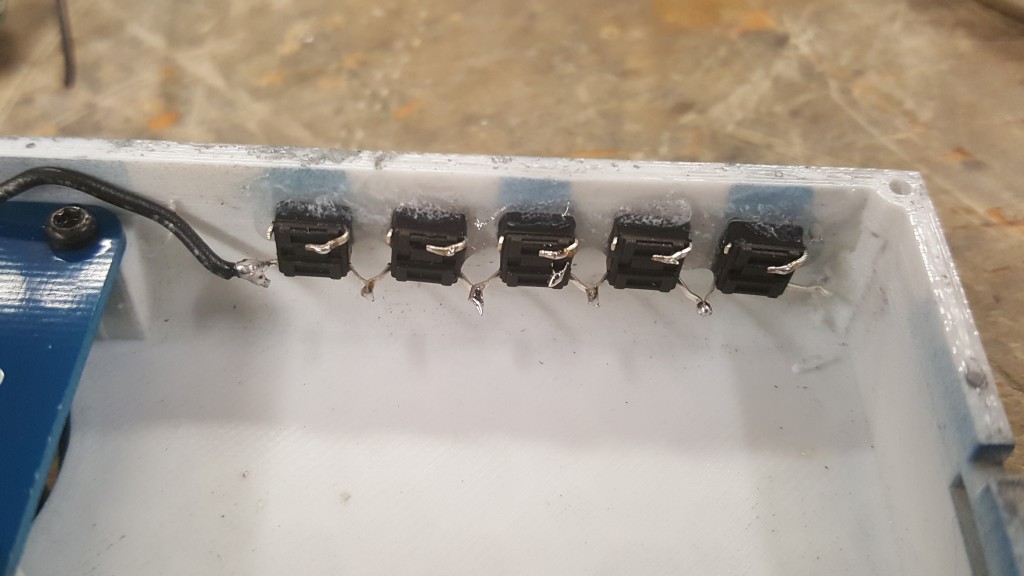
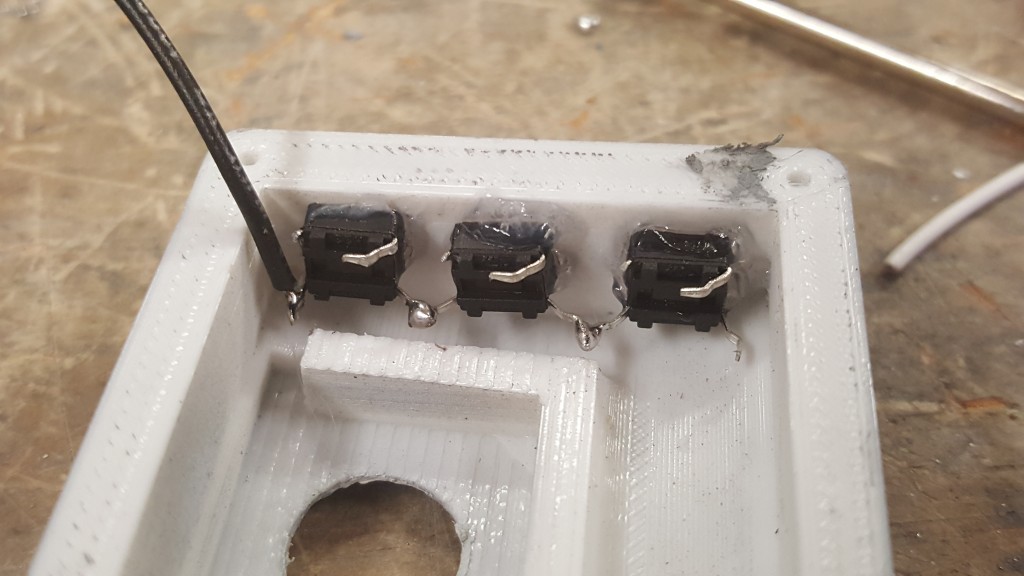
We are now going to solder the ground wire for all of these switches. They are going to use the internal pull-up resistors built into the Arduino, so no need for separate resistors. Simply bend the lower pins until they touch and solder them up. That will simplify connecting them to ground. Add a short black wire to the last button to solder to the last pin on the joystick (as seen below) This is a ground and will be wired to everything else later.
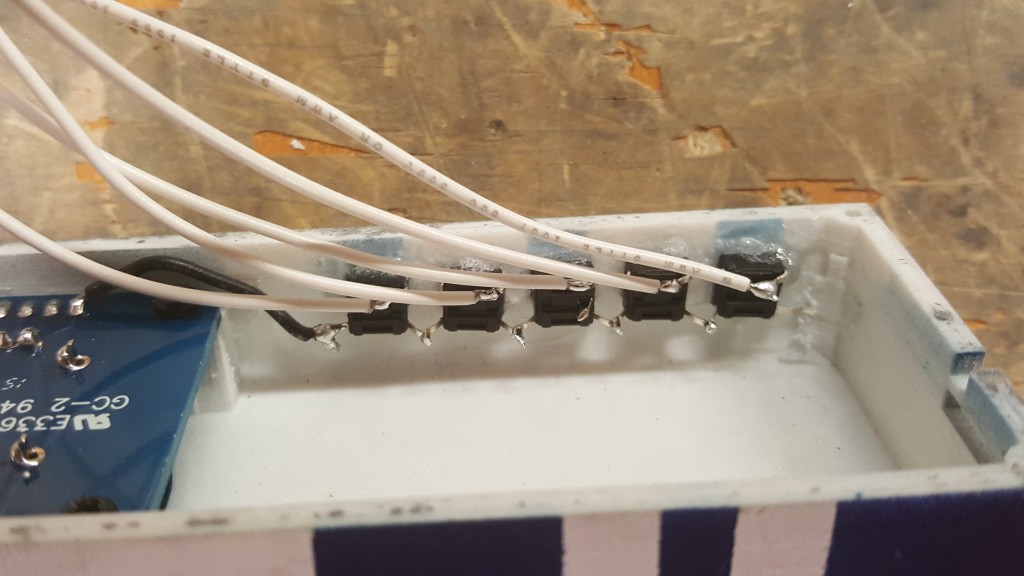
After this, we are going to clip a pin on each switch, this will just make it easier to not short anything out when we cram everything together. See the photos below on which pins to snip, then bend the other pin over (again to save room and eliminate shorts) After you do this, solder a wire to each button and set them to the side.
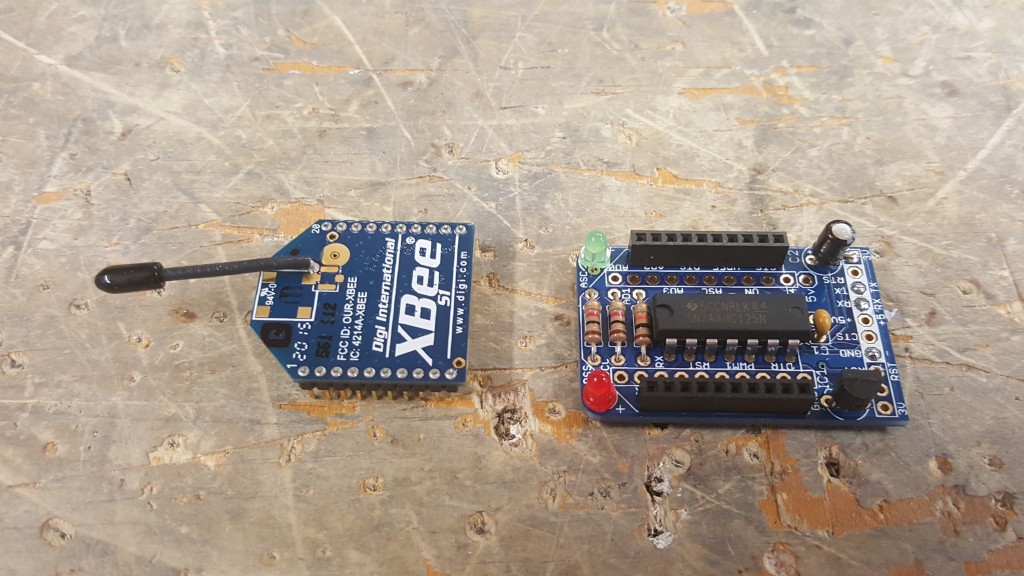
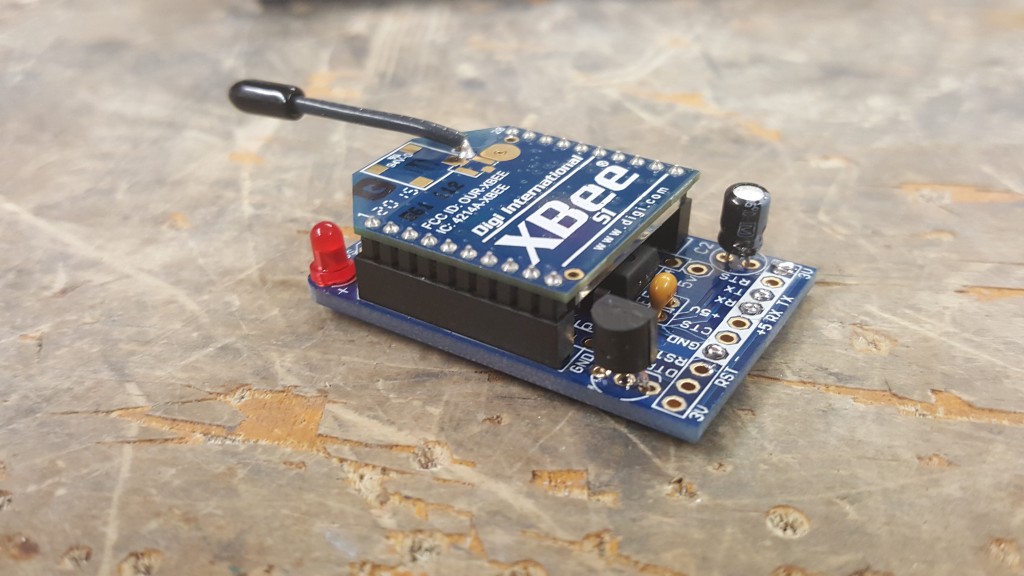
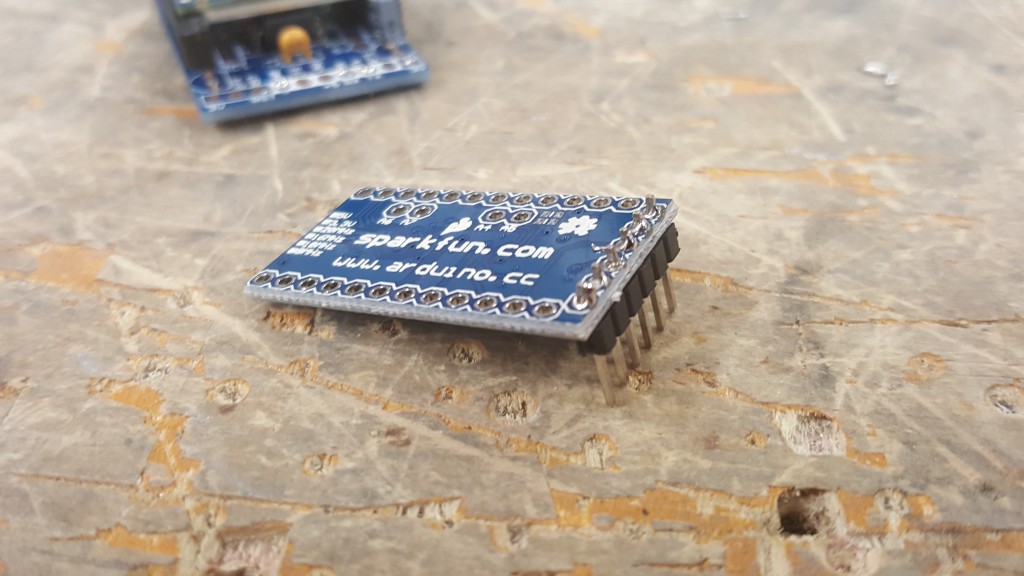
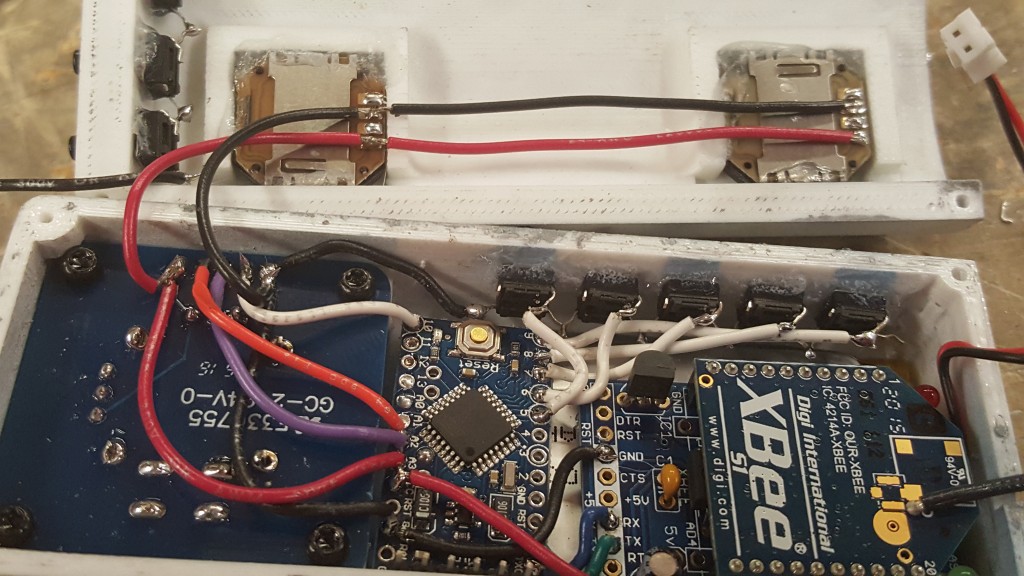
Solder a set of straight male headers to the Arduino’s programming side. This will make it easy to program your remote after you finish. If you haven’t assembled your XBEE adapter kit, please do that now. (Instructions are HERE For this build, program your XBEEs to how you would like them. I use stock configuration except I changed the buad rate to 38400 and changed my channels. After you program them, cut off the headers on the end. It makes more sense to buy an extra adapter to use for programming if you can. You can also use just the XBEE without the adapter in the remote if you’d like, but I installed mine.)
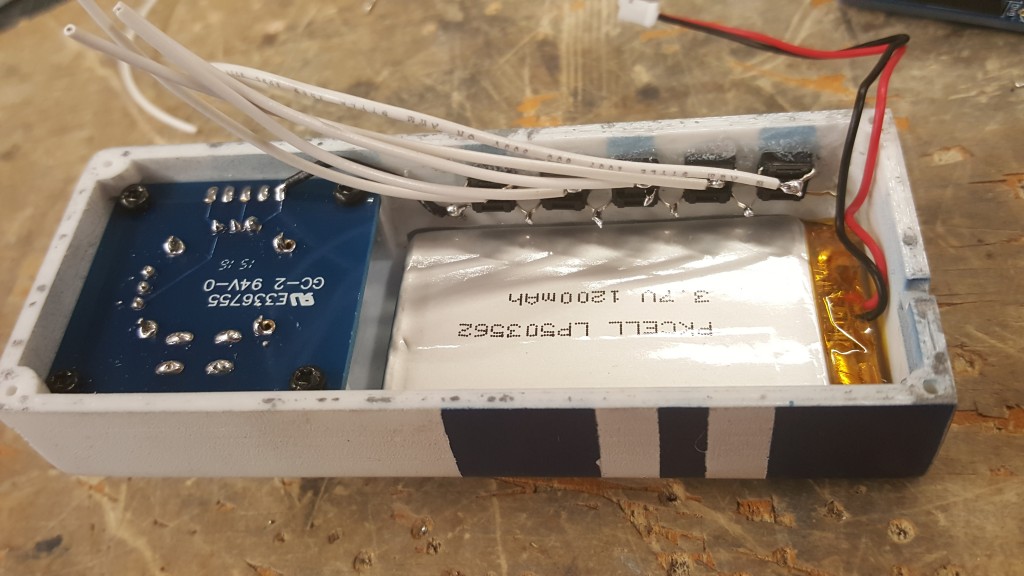
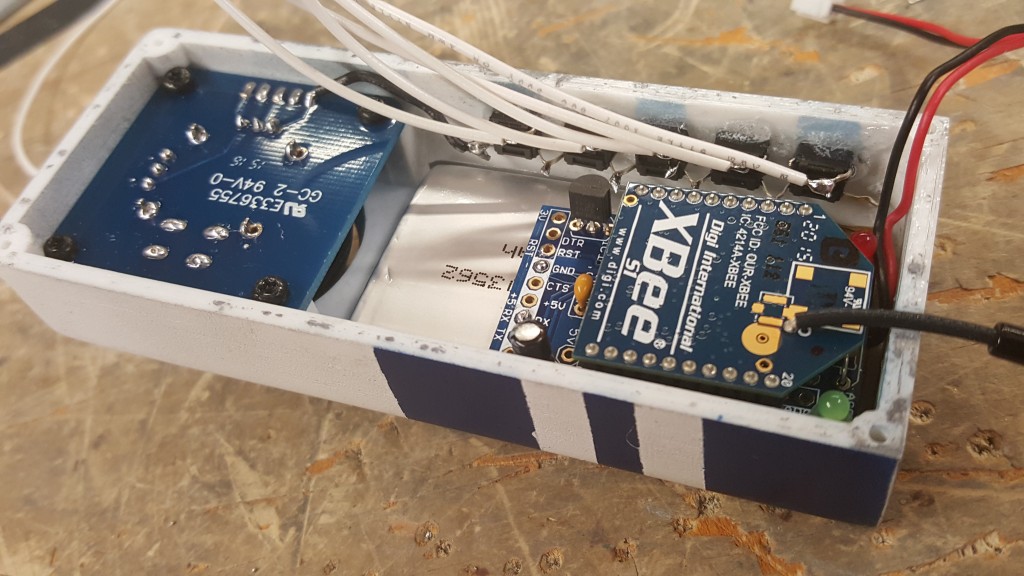
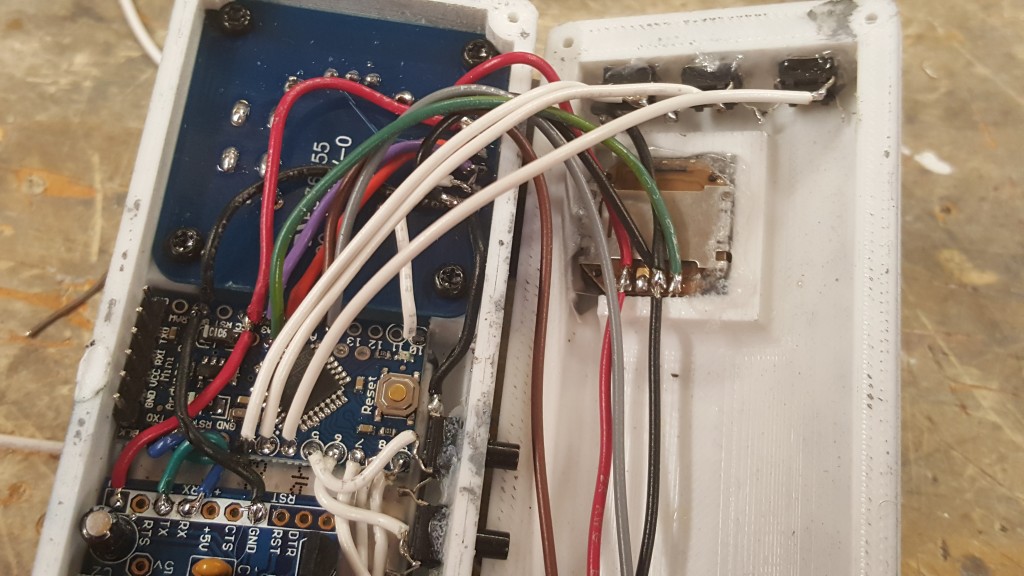
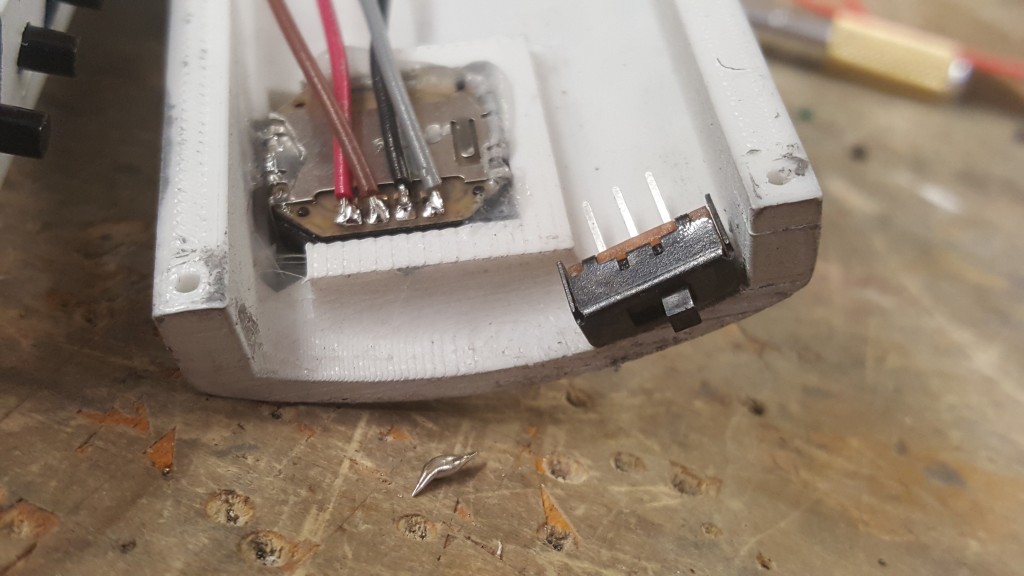
Now we are going to glue the battery down. I choose hot glue because if I want to release it, a small amount of rubbing alcohol will let it pop right up. On top of the battery I am gluing down the XBEE adapter and the Arduino. Please note the orientation. This helps with the wiring.
Now, lets solder those pesky wires attached to your push buttons, If using all 5 like I am, solder them to pins 5-9 on the Arduino. If using 3, just do it on pins 5-7. Get the wires as short as you can to save room. The key to this remote is to use as little space as possible.
After that, lets get the XBEE wired up with serial and power. You will be sending out the date via the TX and RX lines between the Arduino and XBEE. Make sure you invert these, as in RX goes to TX and TX to RX as seen here.
Now for power. Come out of the 3v Pin on the XBEE into the VCC pin on the Arduino. Then your ground, GND to GND on the Arduino. Again I stress, short wires!
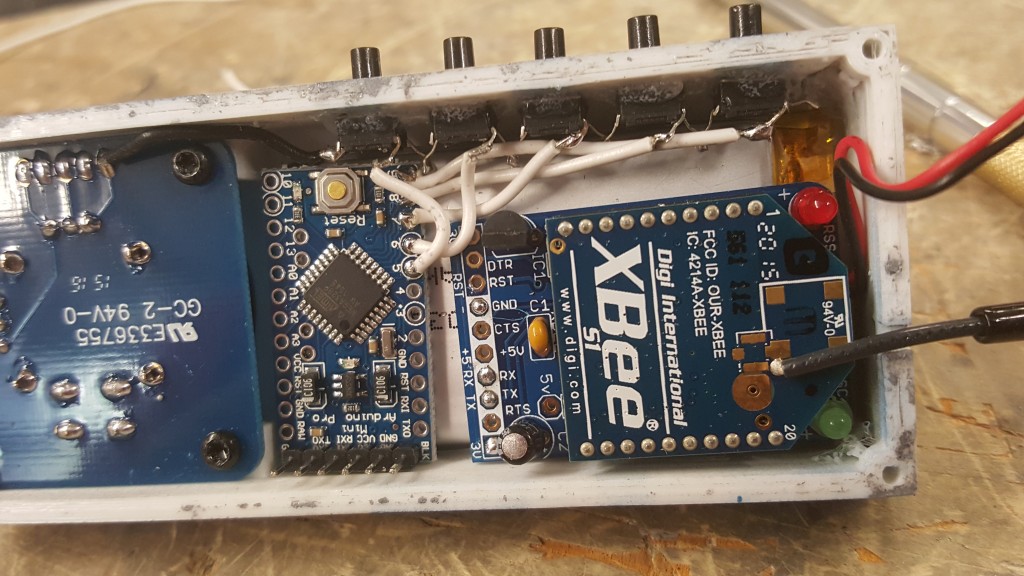
After you do that, your going to want to daisy chain these two lines into the joystick. Use the photo below to see the pins. That way its a big chain of power and ground and not each component getting their own feed from the battery. This is perfectly ok and works just fine. Notice the Ground pin is the same we used for the pushbuttons.
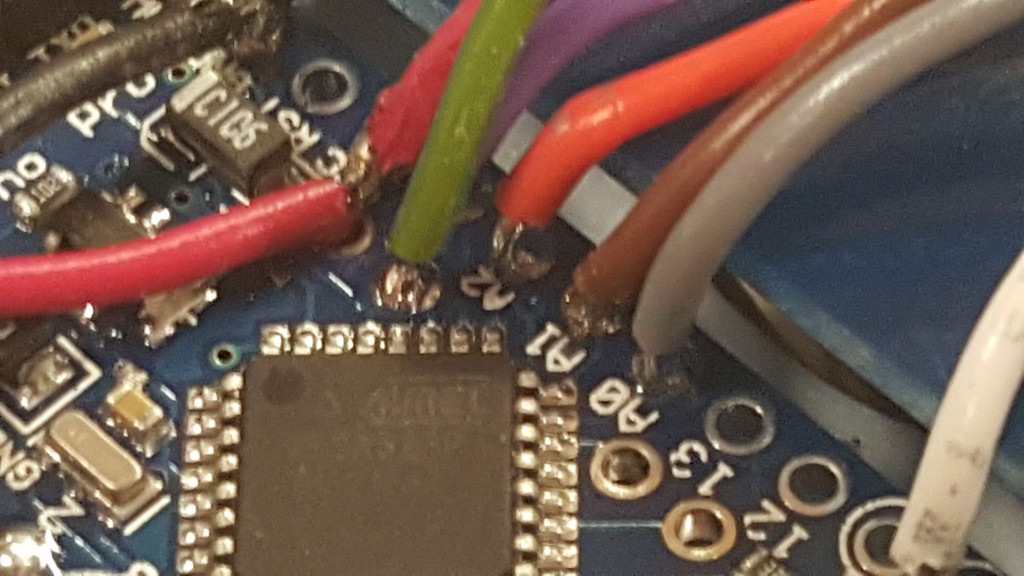
Now, lets wire up the X and Y pot pins from the Joystick to the Analog input pins on the Arduino. Using the photo below, wire up X and Y to Analog pins A2 and A3. The white wire will be soldered to the remaining pad on the joystick to digital pin 10 on the Arduino. This is the signal for the button inside the joystick when you click it down (Like zooming in with the pistol on Halo 1)
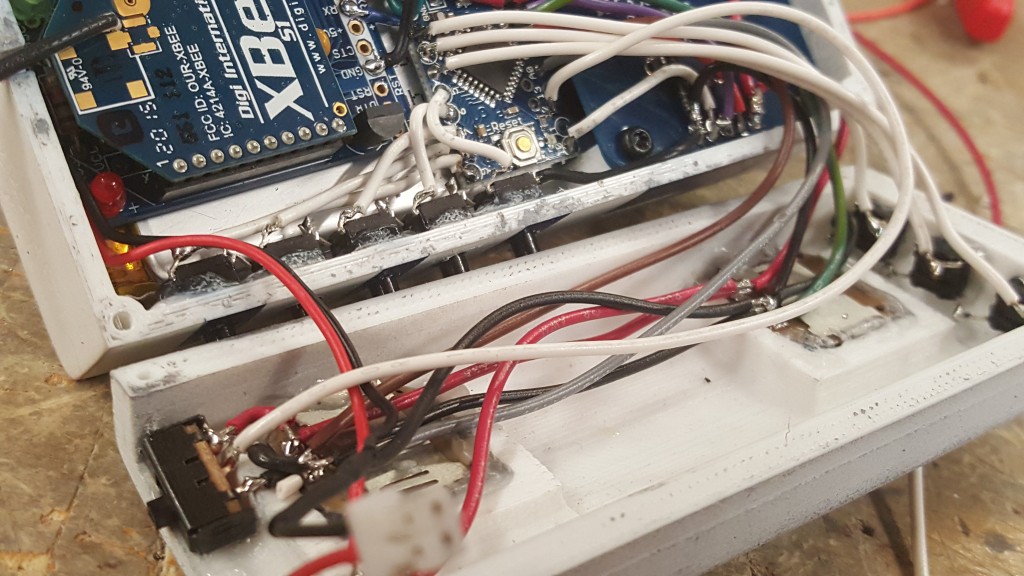
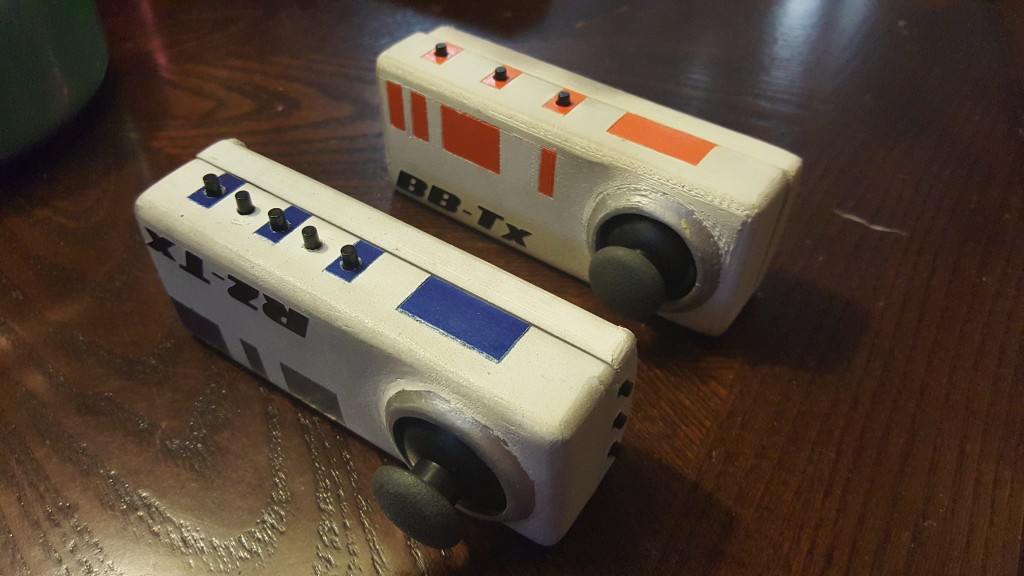
We are getting closer! Set the top half of the controller to the side and grab the back half. I added 3 more push buttons to the top of my controller. After using my BB controller for quiet some time, I realized that a few buttons up here would be comfortable and useful. Wire them up just like you did before.
We are going to glue in the Small PSP thumb joysticks into it. Before you put them in, you will need to snip off the two tabs on each stick. Shown here…
It may require some filing to get the holes big enough to fit the thumbstick in, but it will work. Push the sticks in with the pads facing down (see below) then after they are in and have some play to them (dont want them to tight as they will stick when using them. You want them to snap back easy.) Again using Super Glue GEL glue them in place.
Now lets get power and ground to the thumb sticks. We want to run the least amount of wires between the two halves on the shell, So we will again daisy chain coming off the main analog stick on the top half of the case. Watch the pins you solder to!
Now go ahead and give the top buttons ground by soldering it to the pad on the top thumb stick. We don’t want to run that wire between the two halves remember, so this way it saves space.
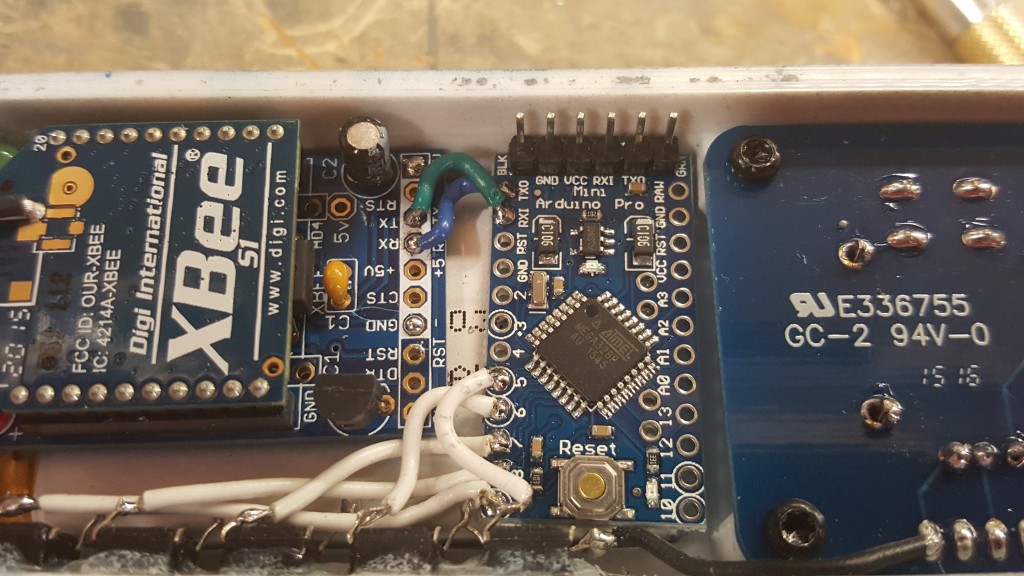
Now for the pot pins on these thumb sticks. I am using the X and Y of the bottom stick and only the X from the top. In my R2 config the top stick controls the dome pan, and the bottom controls the Holo projectors X and Y. Its up to you how you do this. But in my case I wires to Analog A0, A1 and A5. A5 is not marked on the Arduino Mini, but you can see it in the second photo which one it is. Its where the green/yellow wire is soldered into.
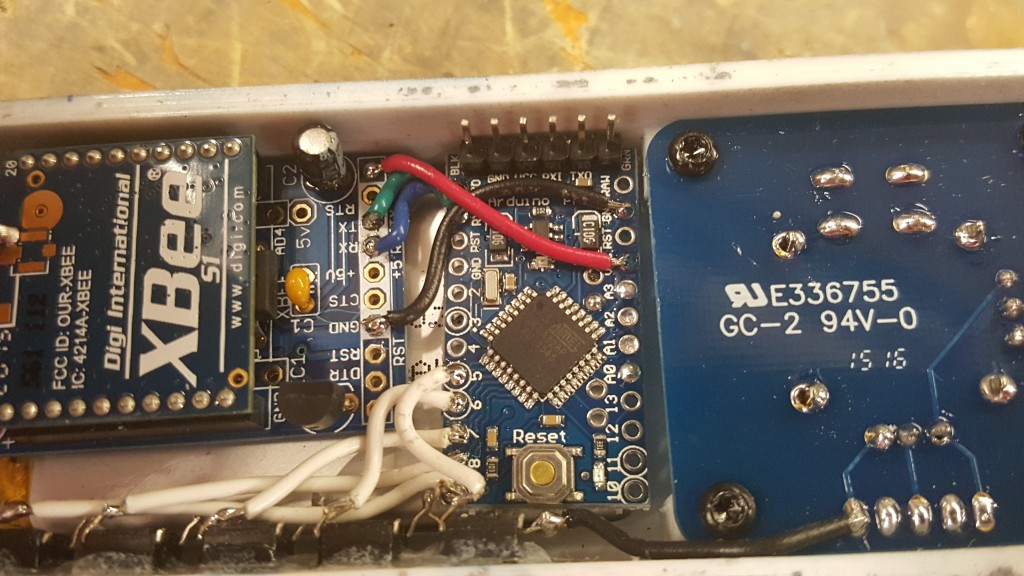
Now lets get those top buttons wired in. They go to Digital pins 2-4 in my setup.
This should all be coming together now! Lets get the battery wired up! I glue down the power switch to the bottom half of the case. Makes it easy to get to when turning on and off your controller. Then wire up the 3v line along with ground from the battery as shown in the second photo. Only the 3v line goes through the switch. Leave the connector on the battery like shown so you can charge it up when not using it. You can charge it while using it as well if wired like in my photo.
You can see in this photo above I have a second switch. I wired it up to ground and Digital pin 12. This is a option I put on my unit to allow a “auto” mode that will make R2 or BB-8 move their dome around and talk on their own randomly. This is not a necessary step.
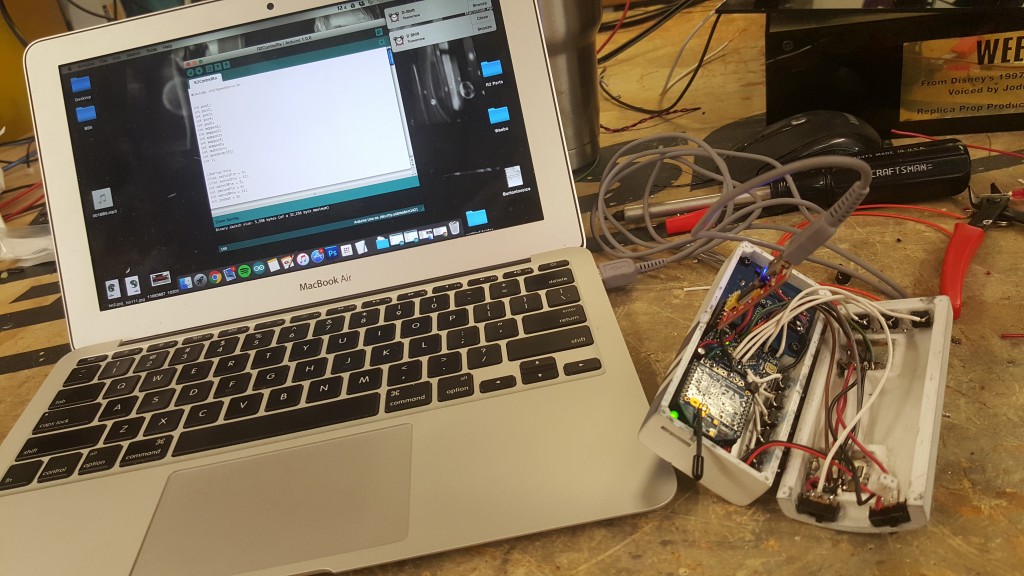
Alrighty that is it! Hook up your FTDI and program in the code. I have attached my new version of the code below for you to use if you’d like. Each setup will require your own way of coding. I am in no way saying this code will work for you, but with some Arduino experience you will be up and running quickly! Good Luck!
I could even control both at the same time if I wanted to!
Here are the new Arduino Sketches for download. – R2-TxControl
Here is the one place for all of my BB-8 Files and Code. I want to share this information just as the dome parts were shared with me. Please feel free to use this for you own BB-8 Project. This is meant to be a guide to help with yours, I do not offer support on building your own. This is not a “beginner” project and really takes a lot of work and modification to complete.
Please note that this page is going to be a work in progress and I will do my best to keep it updated with new ideas and designs.
We have all come to love the little droid in the new StarWars : Force Awakens movie! Brings us right back to the day that we first fell in love with R2-D2! Not only did I enjoy him in the movie, I was absolutely fascinated by how he worked. Of course magnets had to be involved, but that was all I had in mind and I went to researching the internet, and of course the internet responded with the BB-8 Builders Club on FaceBook. There were plenty of people, like myself, that wanted their very own BB-8. A lot of people have built R2-D2 replicas (www.astromech.net) and they were already on the way to bring BB-8 to life!
Now most of the work that was really well done by the club was the dome/head of BB. It had been digitally designed to be extremely accurate and can be printed at home with a 3D printer, I used a Makerbot! Now since it is very well documented on how to print your own dome (Check out BB-8 Builders on FaceBook) I am going to skip a play-by-play on how to do that. Any of the 3D files and questions you may have will be available on their FaceBook page which currently sits well over 10,000 members.
Now, what I am offering here is the plans/files for what controls my BB-8’s head. The Body. It is the most difficult process of building him as the different “forces” (see what I did there?) you have to deal with on a sphere. It wants to roll, it wants to wobble, it wants to not let that head sit on top of it while still, let alone while driving! So how is it done?? How did they pull it off?? Was it CG?? Well I went t design a system I thought would work, and it did nicely. Its not perfect by any means and has had many revisions, and will have more in the future. But what you see here on this page is how my BB works in the videos above. Lets check it out..
Now I went with a Single axel setup. There are plenty of people trying this way, but also a hamster setup (where a system rolls along the inside of the ball). My system turns the sphere using a axel that has counterweight. This allows the sphere to move without any contact to the inside of there sphere except for where the motors are mounted along the axis. This is how it was done on the Stage version of the droid. As seen in this video..


